
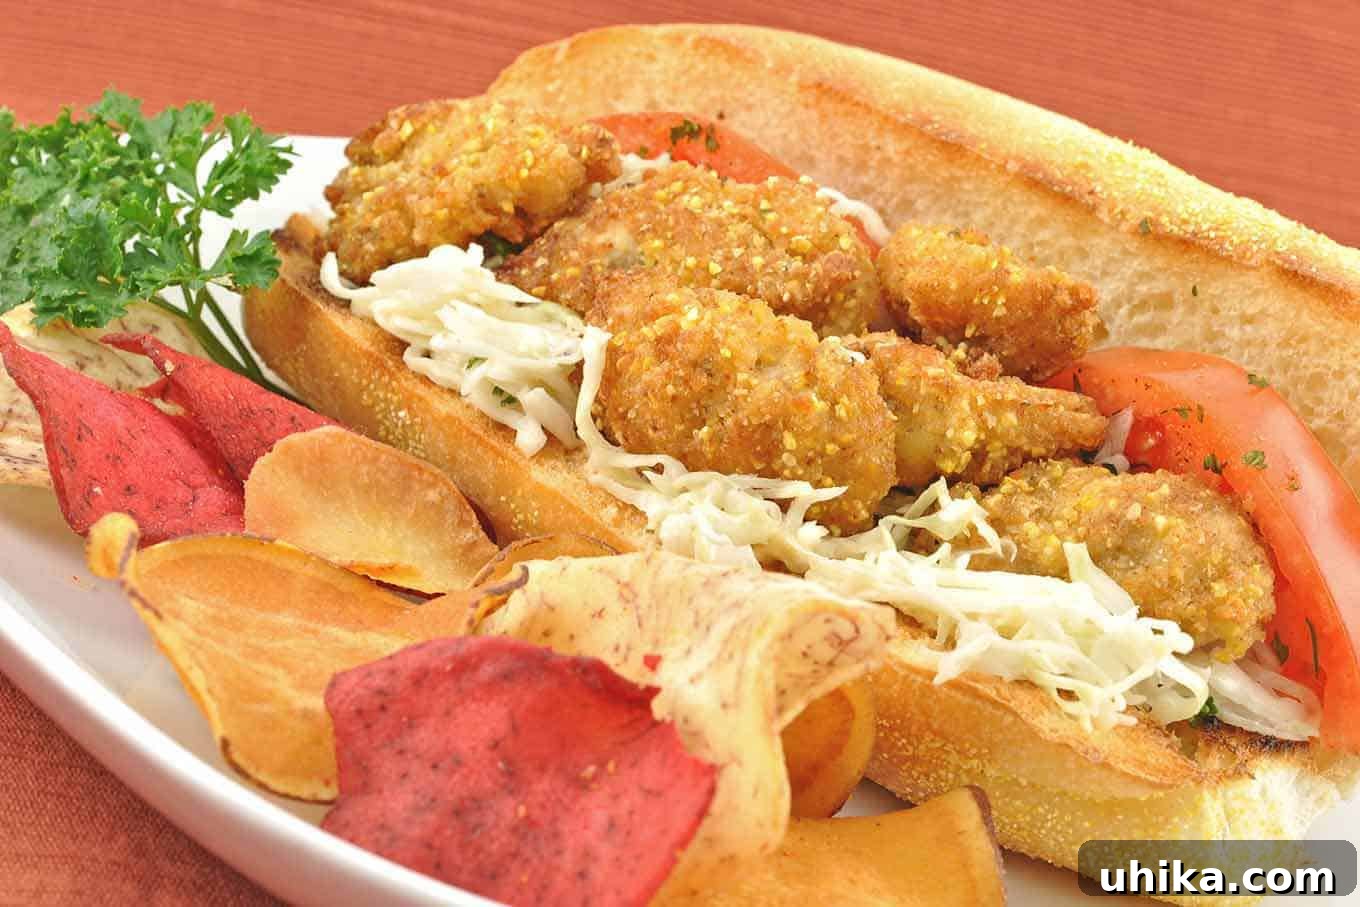
Experience the Legendary Pan-Fried Oyster Po’Boy: A Taste of New Orleans Tradition
In the vibrant tapestry of American culinary delights, few sandwiches command as much respect and adoration as the po’boy. Hailing from the soulful streets of New Orleans, this iconic sandwich is more than just a meal; it’s a cultural institution. While po’boys come with a variety of tantalizing fillings, from succulent roast beef to plump shrimp, it’s the fried oyster po’boy that truly stands out, offering a uniquely decadent and unforgettable experience.
Our recipe elevates this humble sandwich to new heights, featuring perfectly pan-fried oysters nestled in toasted hoagie rolls. Each bite is complemented by crisp slices of ripe, beefsteak tomatoes and a zesty, quick-to-fix garlic and onion slaw. Prepare to embark on a culinary journey that captures the true essence of Louisiana’s rich gastronomic heritage with every savory mouthful.
The Storied History of the New Orleans Po’Boy
The origin of the po’boy sandwich is steeped in local folklore, with several tales vying for historical accuracy, yet all point to its emergence as a working-class staple in early 20th-century New Orleans. One popular theory attributes its creation to brothers Bennie and Clovis Martin, former streetcar conductors who opened a restaurant in 1922. During the 1929 streetcar strike, they famously offered free sandwiches to their former colleagues, referring to them as “poor boys.” These generous meals were often filled with economical options like fried potatoes and gravy, served on long French bread, quickly earning the moniker “po’boy.”
Over time, the po’boy evolved, embracing an array of fillings that mirrored the abundance of the region. Seafood, particularly local Gulf oysters and shrimp, became incredibly popular, solidifying the po’boy’s status as a quintessential New Orleans dish. The key components remain consistent: fresh, crusty New Orleans-style French bread, a generous filling, and typically, a dressing of lettuce, tomatoes, pickles, and mayonnaise. Our pan-fried oyster rendition pays homage to this cherished tradition, bringing the authentic flavors and textures of the Big Easy right to your kitchen.
Crafting Your Own Pan-Fried Oyster Po’Boy: A Step-by-Step Guide
Creating this iconic sandwich is a rewarding experience that combines simple techniques with incredible flavors. Here’s an overview of the process, ensuring your oysters are perfectly crispy and your slaw is bursting with complementary zest. The detailed ingredient list, exact quantities, and full instructions are provided in the comprehensive recipe card below.
- **Prepare the Coating & Wet Mixture:** Begin by combining cornmeal, flour, breadcrumbs, and a selection of seasonings in one shallow dish. In another, whisk together egg and buttermilk to create the wet coating. This two-step breading process is crucial for achieving that signature crispy texture.
- **Coat the Oysters:** Gently add the shucked oysters to the egg-buttermilk mixture, ensuring each one is thoroughly coated. Then, transfer them to the dry cornmeal mixture, turning carefully to achieve an even, uniform breading. Place the coated oysters in a single layer on a clean plate, allowing them to rest for at least 10 minutes. This resting period is vital for the coating to adhere properly and prevents it from falling off during frying.
- **Whip Up the Garlic-Onion Slaw:** While the oysters are resting, prepare the refreshing slaw. Combine finely shredded cabbage and thinly sliced sweet onion in a large mixing bowl. In a separate bowl, whisk together the dressing ingredients: buttermilk, mayonnaise, minced garlic, a dash of hot sauce, and a pinch of sugar. Pour the creamy dressing over the cabbage and onion, tossing until everything is well combined. Taste and adjust seasonings as needed, then set aside.
- **Master the Pan-Frying Technique:** Heat a neutral oil in a large frying pan to approximately 350°F (medium-high heat). A simple test involves dropping a pinch of the dry crumb mixture into the oil; if it sizzles immediately, your oil is ready. Fry the oysters in small batches to avoid overcrowding the pan and maintain optimal oil temperature. Cook until they are beautifully golden brown and crispy on both sides. Transfer the cooked oysters to a paper towel-lined plate to drain excess oil, then repeat with the remaining batches.
- **Assemble Your Po’Boy Masterpiece:** To build your magnificent sandwiches, take lightly toasted hoagie rolls and line each with thick slices of ripe tomato, seasoned lightly with salt and pepper. Add a generous portion of the fresh garlic-onion slaw, and finally, crown each sandwich with an ample serving of the perfectly pan-fried oysters. Serve immediately and savor the symphony of flavors!
Achieving Pan-Fried Oyster Perfection: Expert Tips and Tricks
While oysters may appear delicate, pan-frying them to golden perfection is surprisingly straightforward with a few key techniques. These tips will ensure your oysters are wonderfully crisp on the outside and incredibly juicy and tender on the inside, preventing common pitfalls and maximizing flavor.
- **Gentle Handling and Resting Time:** Always handle oysters with care to preserve their plump, juicy texture. The 10-minute resting period after coating is crucial. It allows the breading to hydrate slightly and adhere firmly, minimizing fallout during frying. Additionally, it helps bring the oysters closer to room temperature, preventing them from significantly cooling down the hot oil when added to the pan.
- **Optimal Oil Depth:** Ensure you add enough neutral oil (such as canola or corn oil) to your frying pan. Aim for a depth roughly equal to half the thickness of your oysters. A 1/4-inch depth works well for most oysters, but for particularly plump varieties, you might consider adding a little more oil to ensure even cooking and browning.
- **Avoid Overcrowding the Pan:** This is one of the most critical rules for successful pan-frying. Frying oysters in small batches prevents the oil temperature from dropping too drastically. A crowded pan leads to lower oil temperatures, which can result in a soggy coating and oysters that absorb too much oil, becoming greasy instead of crispy. Give each oyster space to sizzle and crisp up.
- **Knowing When to Flip:** Pay close attention to the oysters as they fry. You’ll know it’s time to flip them when you start to see a slight bit of moisture forming on the uncooked upper side, and the bottom is a beautiful golden brown. This typically takes about 2 to 2-1/2 minutes per side. Use tongs for precise and gentle turning.
- **Keeping Oysters Warm:** If you’re frying in batches and want to keep the earlier batches warm and crispy, transfer them to a baking sheet in a single layer. Place the baking sheet in a preheated oven set to a low temperature, around 200-250°F (95-120°C). Crucially, do not cover the oysters, as this will trap steam and make them soggy.
- **Consider an Electric Skillet:** For those who own one, an electric skillet can be a game-changer for frying. Its ability to maintain a precise and consistent temperature throughout the cooking process guarantees excellent, evenly cooked results every time.
- **Freshness Matters:** Always start with the freshest possible oysters. Their quality directly impacts the flavor and texture of your po’boy. If shucking them yourself, ensure they are tightly closed before shucking.
- **Seasoning the Breading:** Don’t be shy with your seasoning! The cornmeal mixture is where much of the oyster’s flavor will come from. Adjust the cayenne and other spices to suit your preference for heat.

Pan Fried Oyster Po’Boys
Lynne Webb
15
10
25
4
servings
Rate Recipe
Print Recipe
Ingredients
For the Pan-Fried Oysters:
- 2 dozen oysters, shucked
- 1/3 cup yellow cornmeal
- 1/3 cup all-purpose flour
- 1/3 cup dry breadcrumbs (unseasoned)
- 1/2 teaspoon salt
- 1/4 teaspoon cayenne, or more to taste
- 1/2 teaspoon paprika
- 1 large egg, lightly beaten
- 1/4 cup buttermilk
- Neutral oil (canola, corn) for frying
For the Garlic-Onion Slaw:
- 5 cups finely shredded cabbage
- 1/2 sweet onion (Vidalia, Maui), very thinly sliced
- 1/3 cup buttermilk
- 2 tablespoons mayonnaise
- 1/2 clove garlic, minced
- 1/4 teaspoon hot sauce
- Pinch of sugar
- Salt and pepper to taste
For the Sandwiches:
- 2 tomatoes, cored and thickly sliced
- 4 hoagie rolls, split and lightly toasted
Instructions
-
In a shallow dish or pie plate, combine the cornmeal, all-purpose flour, dry breadcrumbs, salt, cayenne, and paprika. Mix thoroughly until well combined.
-
In a separate shallow dish, whisk together the large egg and buttermilk until smooth. Add the shucked oysters to this wet mixture, a few at a time, ensuring they are fully coated using a spoon.
-
Carefully transfer the wet oysters to the dry cornmeal mixture using tongs. Turn each oyster individually to ensure it is evenly coated with the crumb mixture. Once coated, place the oysters in a single layer on a clean plate, leaving a little space between each. Repeat this process with all remaining oysters. Allow them to stand and rest for at least 10 minutes before frying. This step helps the breading adhere better.
-
While the oysters are resting, prepare the garlic-onion slaw. In a large mixing bowl, combine the finely shredded cabbage and the very thinly sliced sweet onion.
-
In a separate small bowl, whisk together the 1/3 cup buttermilk, mayonnaise, minced garlic, hot sauce, and a pinch of sugar to create the dressing. Pour this dressing over the cabbage and onion mixture, then toss gently to combine thoroughly. Season the slaw to taste with salt and freshly ground black pepper. Set the prepared slaw aside until you are ready to assemble the sandwiches.
-
Heat about 1/4-inch of neutral oil in a large, heavy-bottomed skillet over medium-high heat until it reaches approximately 350°F (175°C). You can test the oil temperature by dropping a small pinch of the dry crumb mixture into the pan; if it sizzles immediately, the oil is ready for frying.
-
Carefully add about 1/3 of the coated oysters to the hot oil, ensuring not to overcrowd the pan. Fry the oysters until they are golden brown and crispy on both sides, turning once with tongs. This typically takes about 2 to 2-1/2 minutes per side. (Refer to the “Tips for Making Perfect Pan-Fried Oysters” section above for additional guidance). Transfer the cooked oysters to a plate lined with paper towels to drain any excess oil. Repeat this process with the remaining batches of oysters until all are cooked.
-
To assemble your delicious po’boy sandwiches, take each lightly toasted hoagie roll and line the bottom half with several slices of cored and thickly sliced tomato. Season the tomatoes lightly with a pinch of salt and pepper. Add a generous portion of the fresh garlic-onion slaw on top of the tomatoes, then evenly divide the pan-fried oysters among the four rolls (approximately 6 oysters per sandwich). Close the sandwiches and serve immediately for the best experience.
Notes
Serving Suggestions & Variations:
Beyond the classic presentation, consider these ideas:
- **Condiments:** A dash of hot sauce, a squeeze of lemon, or a dollop of remoulade sauce can further enhance the flavors of your oyster po’boy.
- **Side Dishes:** Serve your po’boys with classic New Orleans sides like sweet potato fries, hush puppies, or a simple green salad.
- **Bread Options:** While hoagie rolls are traditional, a crusty baguette or even a soft ciabatta can also make for a delicious sandwich. Ensure it’s substantial enough to hold the filling.
- **Spice Level:** Adjust the amount of cayenne in the oyster breading and hot sauce in the slaw to match your preferred level of heat.
Nutrition
Calories:
426
,
Total Fat:
11
g
,
Cholesterol:
48
mg
,
Sodium:
772
mg
,
Carbohydrates:
68
g
,
Fiber:
6
g
,
Sugar:
13
g
,
Protein:
13
g
Nutrition information is automatically calculated, so should only be used as an approximation.
Loved this recipe? Share your thoughts and rate it below!