
Authentic Zeppole di San Giuseppe: A Guide to Italian St. Joseph’s Day Pastries
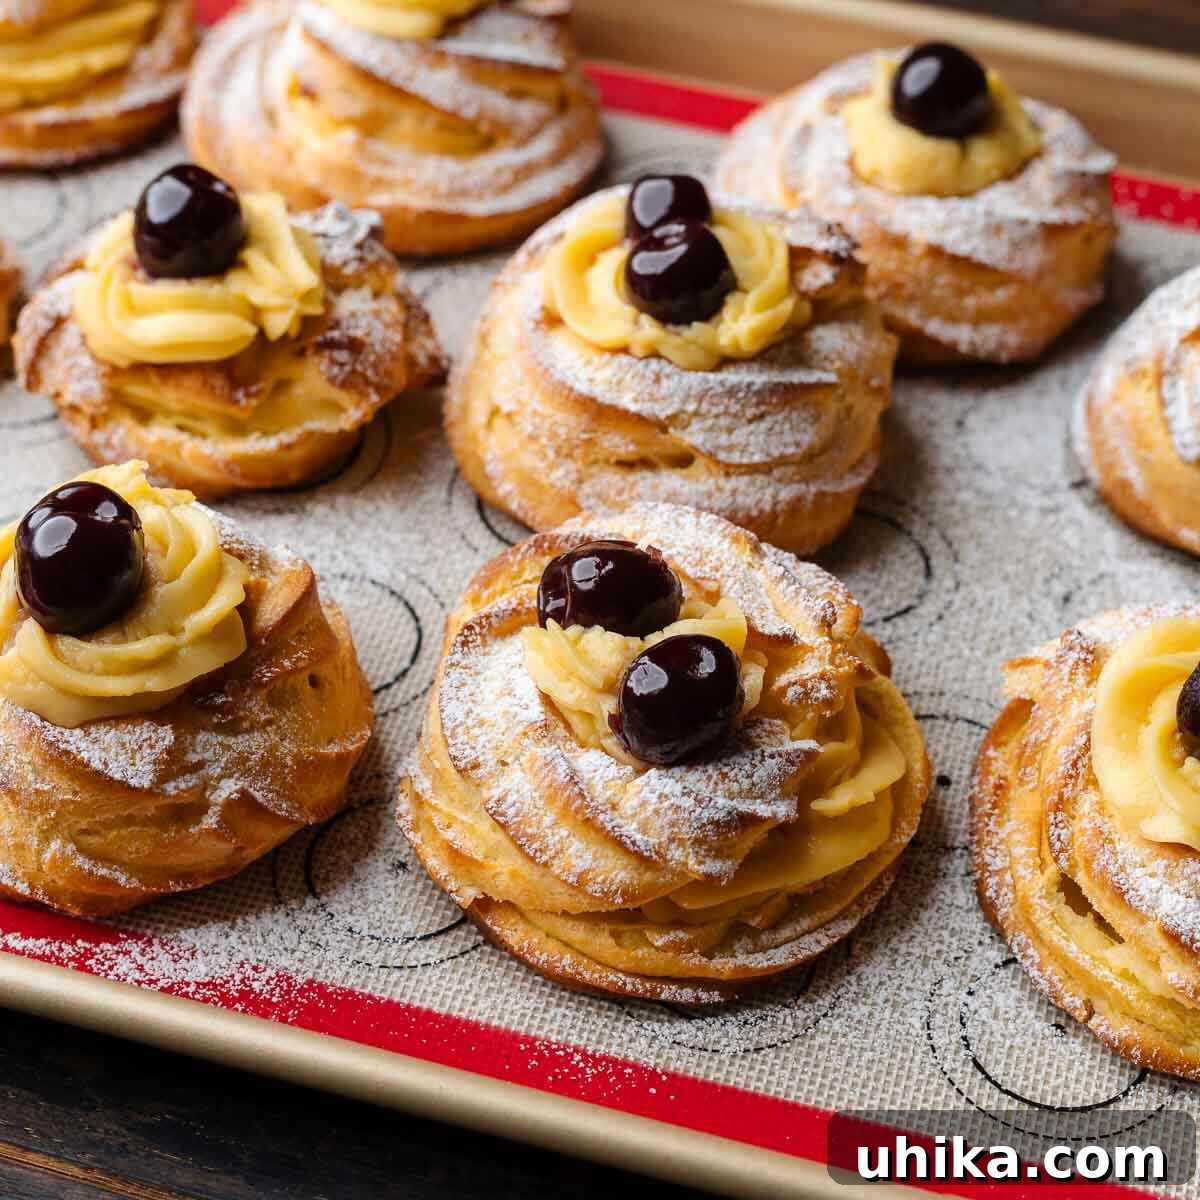
Zeppole di San Giuseppe, known affectionately as St. Joseph’s pastries, are more than just a dessert; they are a delightful taste of Italian tradition and culinary artistry. These exquisite treats are crafted from delicate choux pastry, expertly piped and then either baked until golden and airy or fried to a tender crisp. Each pastry is then generously filled with a smooth, rich pastry cream and crowned with a vibrant, glistening cherry. While deeply rooted in the Feast of San Giuseppe on March 19th, their irresistible charm makes them a cherished indulgence that can—and indeed, should—be enjoyed throughout the entire year!
The Cultural Significance of Zeppole di San Giuseppe
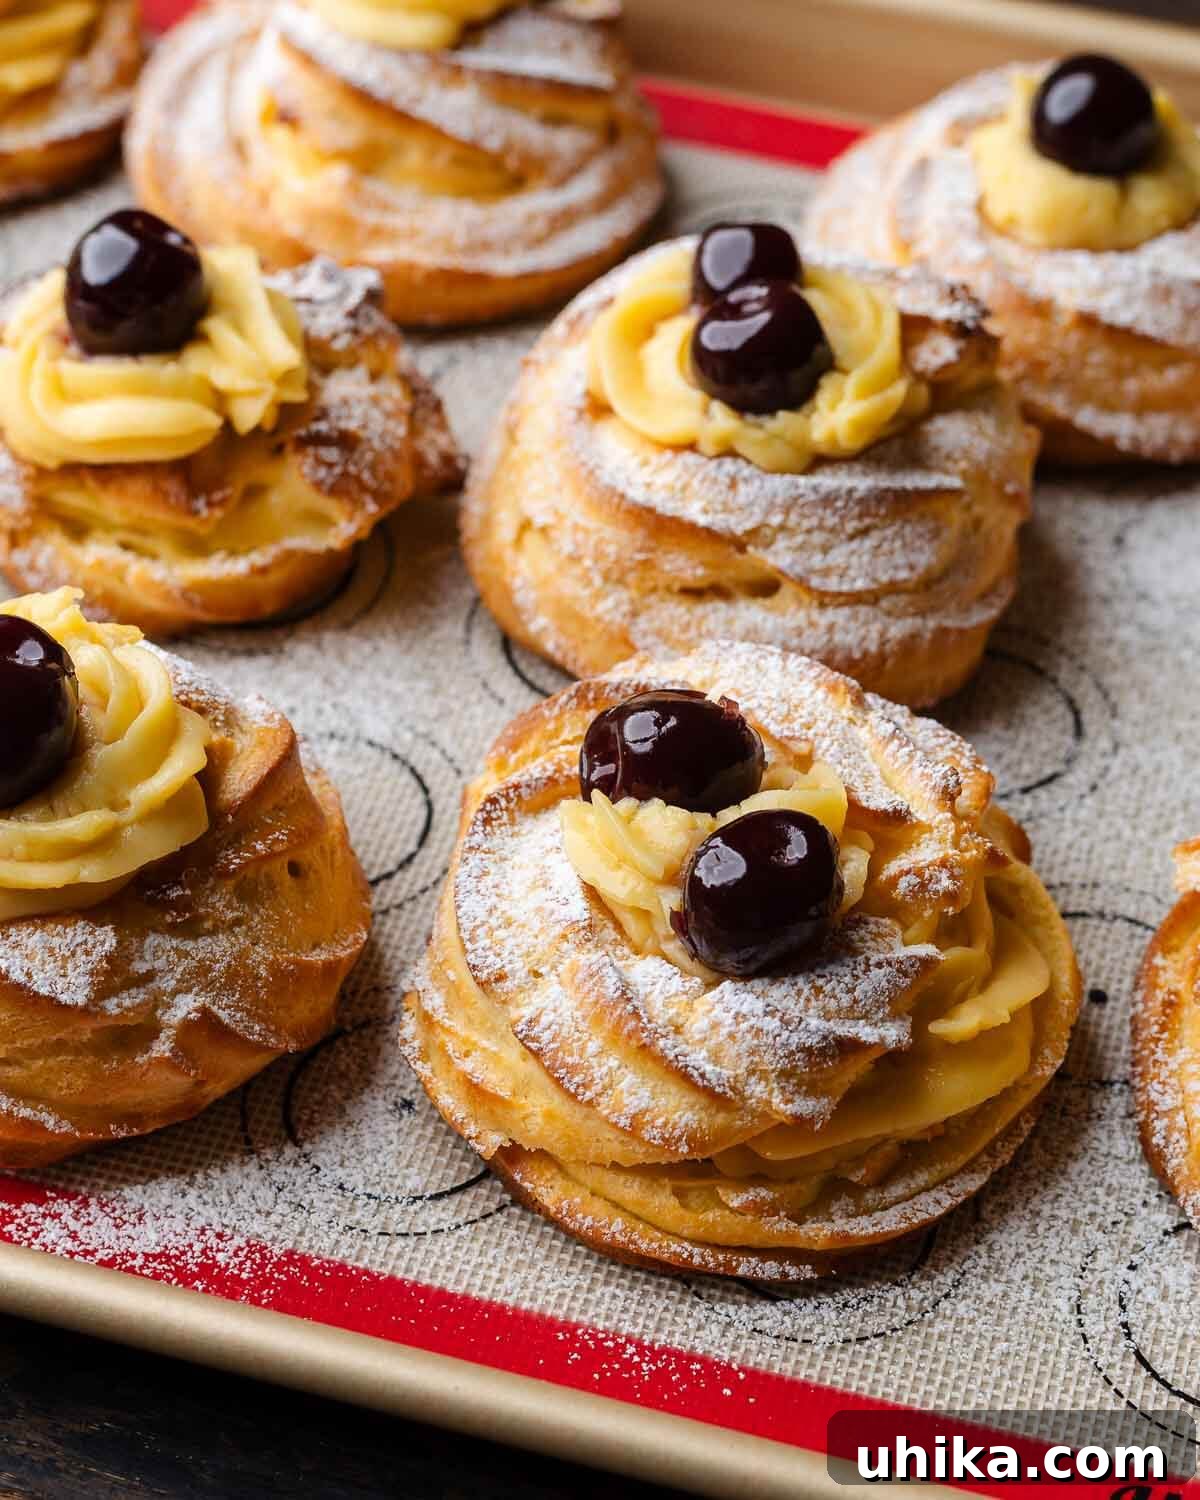
For millions of Italians and Italian-Americans worldwide, March 19th is a day of profound significance. It marks the Feast of St. Joseph (Festa di San Giuseppe), a beloved religious holiday that is celebrated with deep reverence and, perhaps most notably, with an abundance of traditional foods. Among the culinary centerpiece of this celebration are the iconic Zeppole di San Giuseppe. These sweet, cream-filled pastries symbolize renewal and hope, often prepared as offerings to St. Joseph and shared generously within families and communities. The tradition extends beyond just sweets, with savory dishes like Pasta con le Sarde also making an appearance on many tables, completing a truly festive spread.
What Makes Zeppole di San Giuseppe So Special?
While they boast an elegant and intricate appearance, suggesting a complex culinary feat, Zeppole di San Giuseppe are surprisingly accessible for the home baker. Their delightful simplicity in creation belies their incredibly delicious and satisfying taste. The magic of these pastries lies in their core components: a light, airy choux pastry shell and a rich, velvety pastry cream filling.
They share a foundation with classic cream puffs, as both rely on the versatility of choux pastry (pâte à choux). However, Zeppole di San Giuseppe distinguish themselves through their unique shape and presentation. Typically, the choux dough is piped using a star tip, creating beautiful, spiraled rings or delicate swirls. These shapes are then either baked until they puff up into a golden, hollow shell or, in many traditional recipes, fried to achieve a wonderfully crisp exterior. Once cooled, the luxurious pastry cream is piped into the center, adding a burst of creamy sweetness. A dusting of powdered sugar and a vibrant cherry on top complete these edible works of art, making them not only a treat for the palate but also a feast for the eyes.
Choux Pastry Ingredients: Crafting the Perfect Base
The foundation of any great Zeppola is a perfectly light and airy choux pastry. Understanding the role of each ingredient is key to achieving that signature delicate texture. Here are the components you’ll need for this essential dough, with some special notes to guide you:
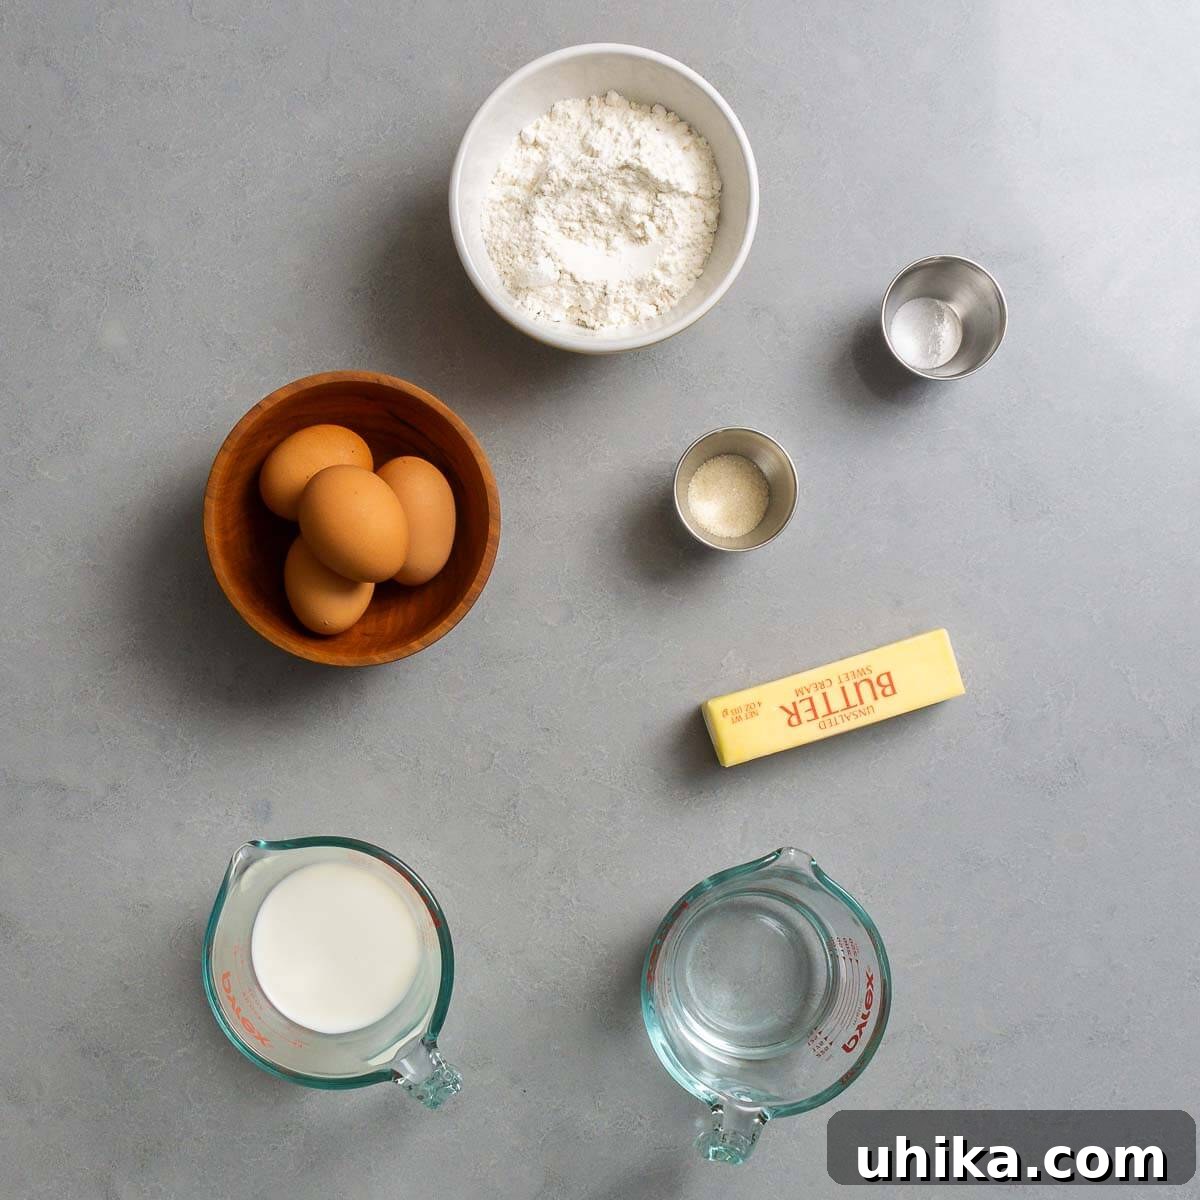
- Eggs: These are a powerhouse ingredient in choux pastry dough. They provide structure, richness, and are crucial for the dough’s elasticity and ability to puff up. For best results, use large eggs at room temperature, as they incorporate more smoothly into the dough.
- All-purpose Flour: The primary dry ingredient, giving the pastry its form. While some recipes call for bread flour, all-purpose flour provides a good balance for a tender yet stable choux. Sifting your flour is always a good practice to prevent lumps.
- Whole Milk: Incorporating full-fat (whole) milk into the pâte à choux adds a wonderful richness and flavor that water alone cannot provide. It contributes to a more tender and golden crust.
- Unsalted Butter: Butter provides essential flavor and tenderness. Using unsalted butter gives you precise control over the overall salt content in your pastry.
- Water: When combined with milk, water helps create steam during baking. This steam is what causes the choux pastry to expand rapidly and create its characteristic hollow interior.
- Granulated Sugar & Fine Sea Salt: A small amount of granulated sugar balances the savory notes and promotes browning, while a pinch of fine sea salt enhances all the other flavors in the dough.
For exact quantities and detailed measurements, please consult the complete recipe card found further down in this guide.
Pastry Cream Ingredients: The Decadent Filling
No Zeppola is complete without its sumptuous pastry cream (crème pâtissière), a velvety custard that provides the perfect counterpoint to the airy choux. Gathering high-quality ingredients will ensure your cream is irresistibly smooth and flavorful.
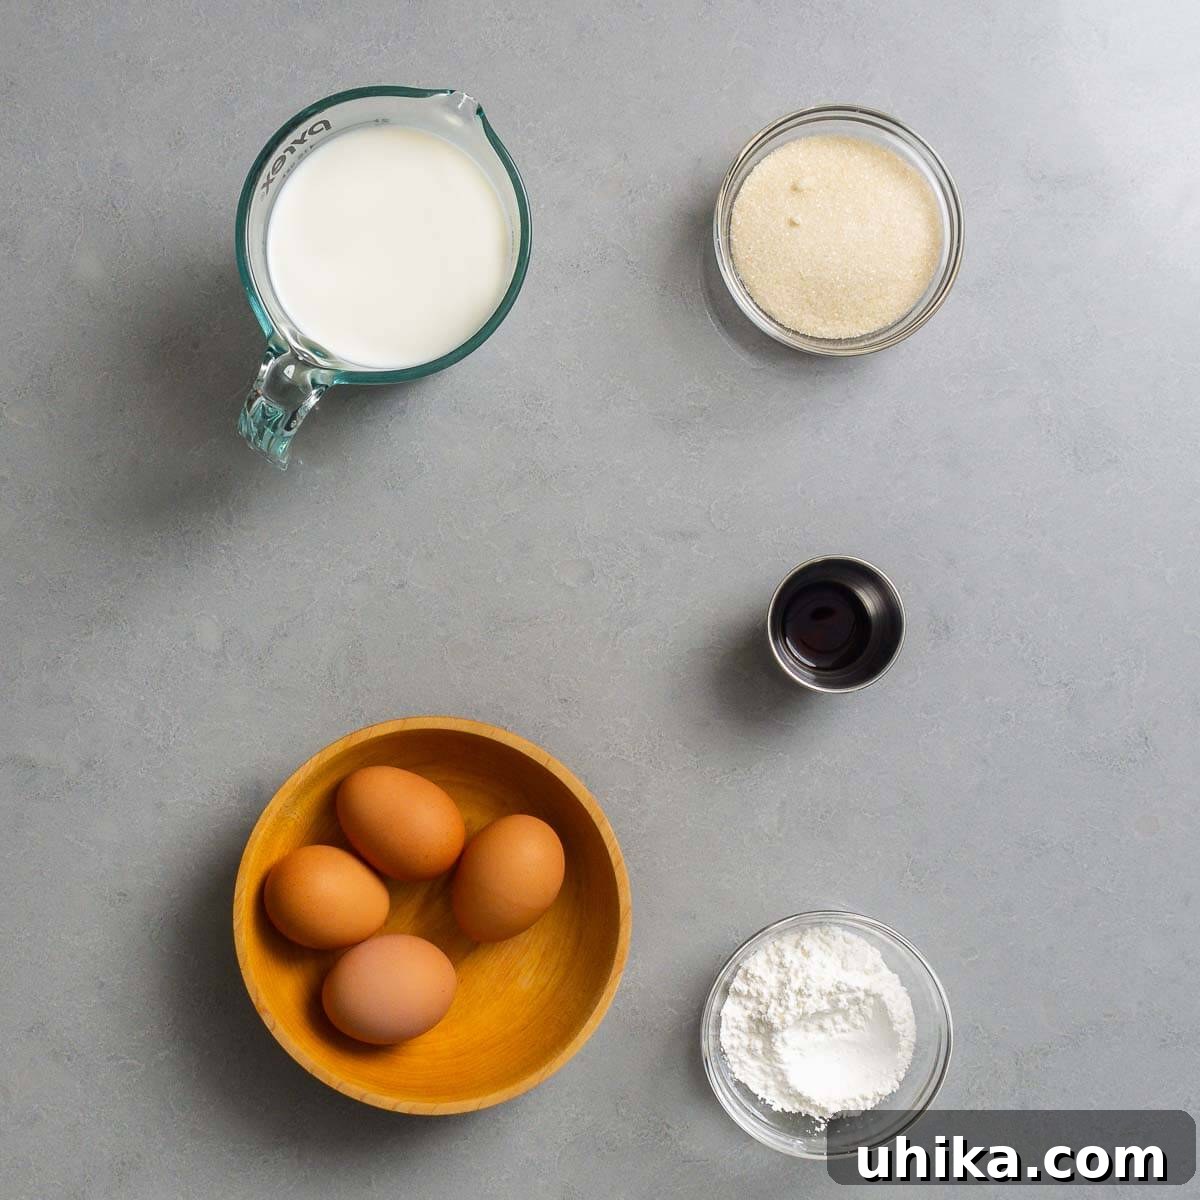
- Large Egg Yolks: These are the backbone of a rich, custardy pastry cream, imparting a beautiful yellow hue and a luxurious mouthfeel. Separate them carefully. Remember, the leftover egg whites can be saved for other delightful recipes, such as crisp pignoli cookies or meringues.
- Whole Milk: Essential for a truly creamy and flavorful pastry cream. Skim or low-fat milk will yield a thinner, less decadent result. Ensure you follow the warming instructions provided in the recipe steps.
- Granulated Sugar: Provides the necessary sweetness to balance the richness of the egg yolks and milk.
- Cornstarch: This is our thickening agent. Cornstarch ensures the pastry cream sets to a desirable, pipeable consistency without becoming overly heavy or gummy. It also contributes to the cream’s smooth texture.
- Vanilla Extract: For an authentic Italian flavor profile, use a high-quality vanilla extract. It adds warmth and aromatic depth to the cream, making a significant difference in the final taste.
Please refer to the detailed recipe card below for precise measurements and quantities for each ingredient.
First, Make the Choux Pastry (Pâte à Choux)
Creating the perfect choux pastry is a rewarding process that lays the groundwork for delicious Zeppole. Follow these detailed, step-by-step instructions carefully to achieve light, airy shells that are ideal for filling.
- Preheat your oven to 400°F (200°C) and position the oven rack squarely in the middle. In a large, sturdy saucepan, combine 1 stick (115g) of unsalted butter, 2 teaspoons (9g) of granulated sugar, 1/2 cup (120g) of water, and 1/2 cup (120g) of whole milk. Place the saucepan over medium heat, stirring occasionally, until the mixture comes to a vigorous boil. (Photo #1)
- Once the liquid mixture is boiling, immediately remove the saucepan from the heat. Add 1 1/4 cups (160g) of all-purpose flour all at once. Using a robust spatula or wooden spoon, stir vigorously and continuously until all the flour is fully incorporated and the mixture coalesces into a cohesive ball of dough. (Photo #2)
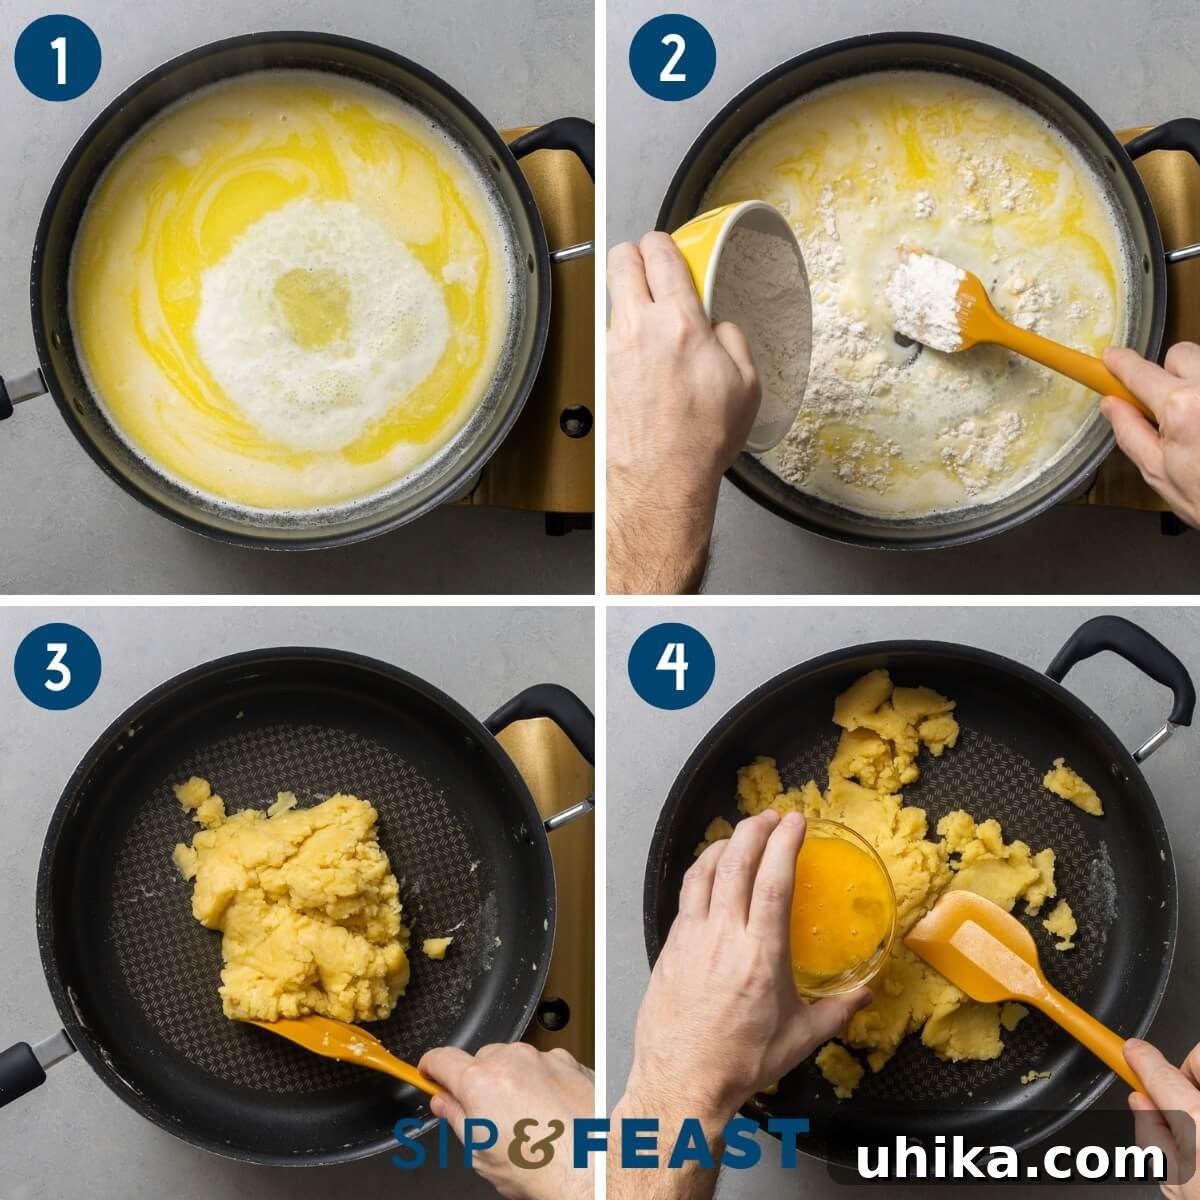
- Return the saucepan containing the dough to medium heat. Continue stirring and “drying out” the dough for approximately 2 minutes. This crucial step helps evaporate excess moisture, ensuring your choux pastry will be crisp and light. The dough should form a smooth ball and leave a thin film on the bottom of the pan. (Photo #3)
- Remove the pan from the heat. Transfer the dough to a large mixing bowl or spread it out in the saucepan to facilitate cooling. It is essential to let the dough cool for at least 5 minutes before adding the eggs; if the dough is too hot, the eggs will scramble. Once cooled slightly, add 1 lightly beaten egg and mix vigorously until it is completely incorporated into the dough. This may take a moment as the dough initially resists mixing. (Photo #4)
- Continue by adding the remaining 3 beaten eggs, one at a time. After each addition, mix thoroughly until the egg is fully absorbed and the dough is smooth before adding the next. The final batter should be glossy, smooth, and pliable, capable of holding its shape when piped. (Photo #5)
- Fit a pastry bag with a large open star tip (e.g., Ateco 826 or 827). Carefully scoop the prepared choux dough into the pastry bag. Avoid overfilling the bag to maintain control. (Photo #6)
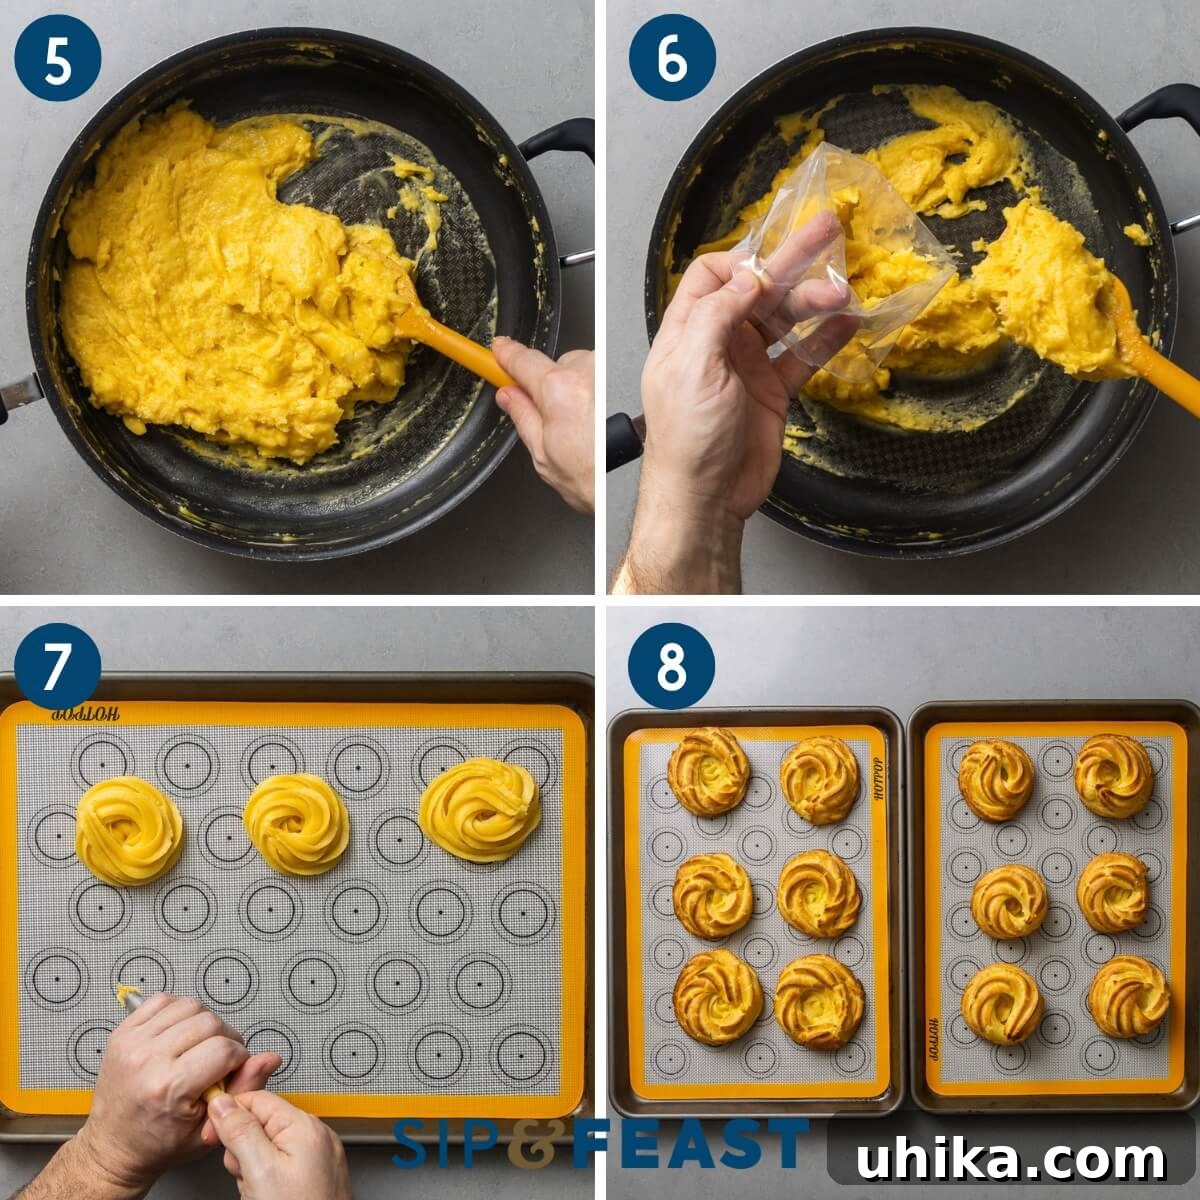
- Prepare two baking sheets by lining them with parchment paper or silicone mats. Begin piping 3-inch diameter circles of dough in two concentric layers. Start piping the first layer from the inside, then pipe a second layer on top, creating a slight cavity or hole in the center. This hole will eventually hold the pastry cream. Ensure to leave at least 3 inches of space between each piped pastry, as they will expand considerably during baking. (Photo #7)
- Bake the piped choux pastry in the preheated oven for 25-30 minutes, or until they are beautifully puffed, golden brown, and firm to the touch. It’s crucial not to open the oven door during the first 20 minutes to prevent the pastries from deflating. Once baked, remove them from the oven. After allowing them to rest on the baking sheets for about 10 minutes, transfer them carefully to a wire rack to cool completely. This prevents them from becoming soggy on the bottom. (Photo #8)
Next, Make the Pastry Cream and Finish the Zeppole
With your choux pastry shells cooling, it’s time to prepare the luscious pastry cream and assemble these delightful treats. A key note: both the baked zeppole shells and the pastry cream must be completely cool before you begin the filling process. While you can start with either component, for optimal workflow, consider preparing the pastry cream a day in advance and refrigerating it overnight. This allows it to chill thoroughly and develop a perfect consistency for piping.
- First, prepare an ice bath: fill a large bowl with ice water and set it aside. In a medium saucepan, gently warm 2 cups (480g) of whole milk and 2 teaspoons (9g) of vanilla extract over low heat. You want the milk to be warm and fragrant, not boiling. (Photo #1)
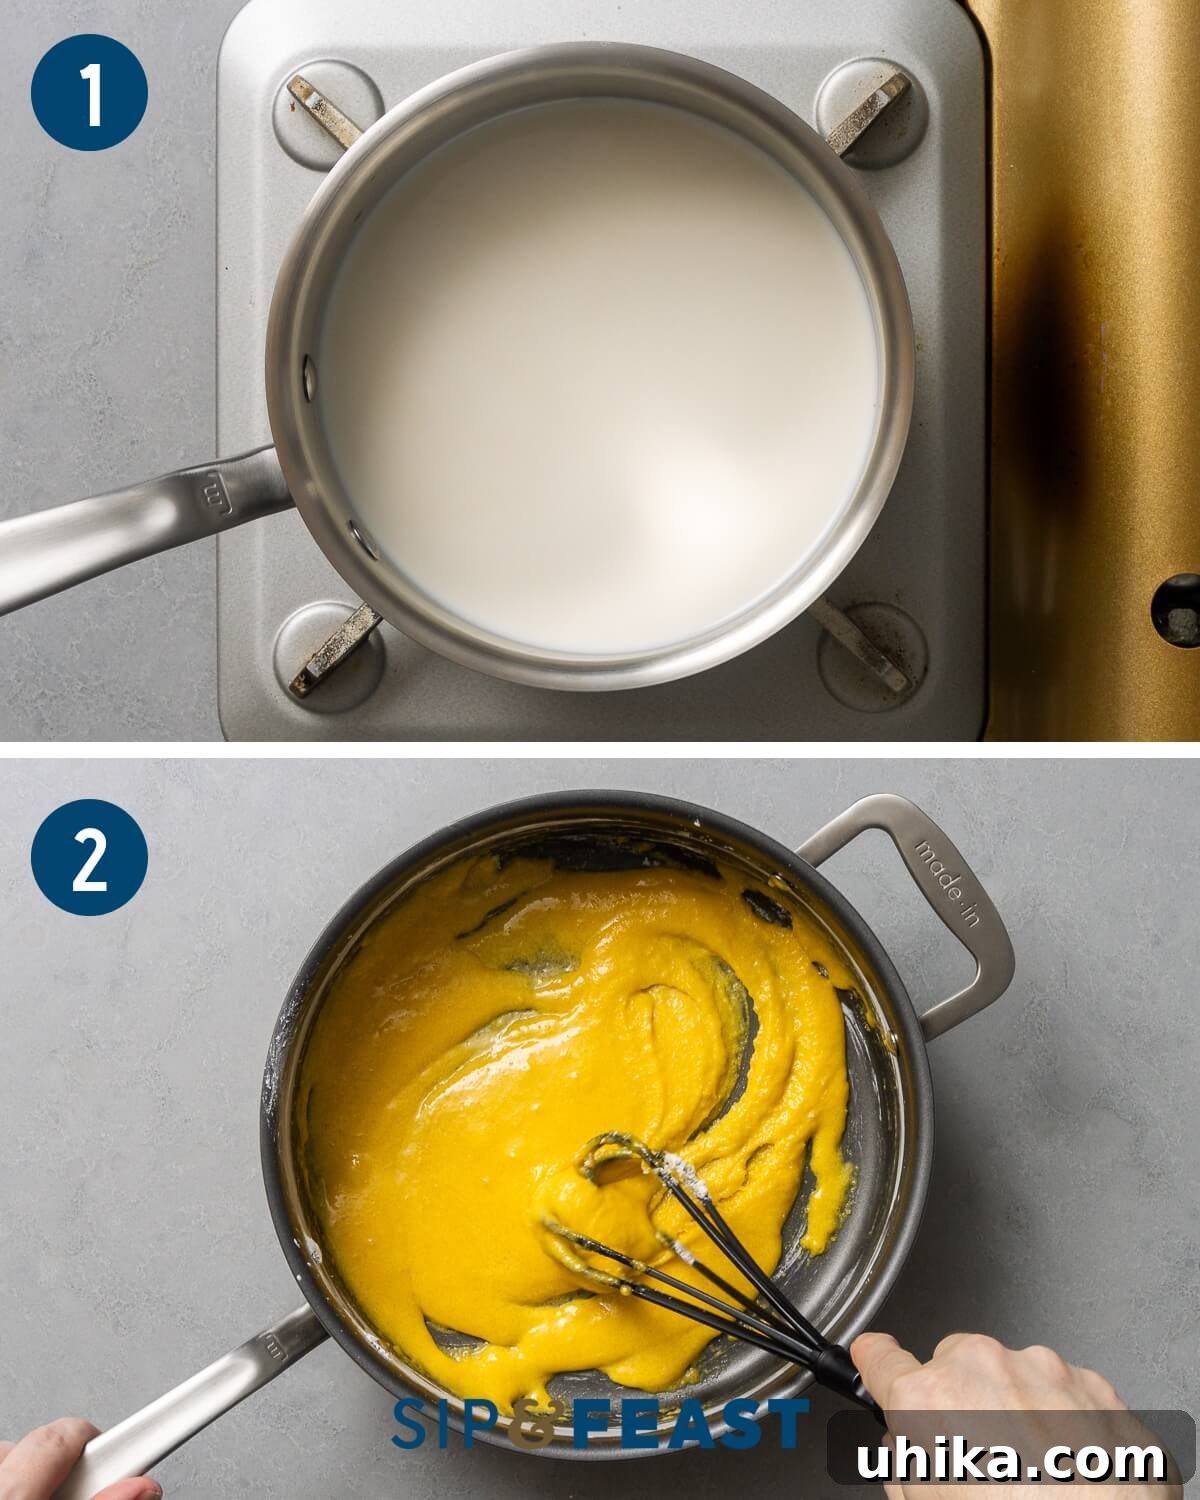
- In a separate, heat-proof saucepan (ensure it’s off the stove at this stage), combine 4 large egg yolks, 1/2 cup (100g) of granulated sugar, and 1/4 cup (35g) of cornstarch. Whisk these ingredients vigorously until they are thoroughly combined, forming a pale, smooth, and lump-free mixture. This prevents the yolks from scrambling. (Photo #2)
- Gradually pour about half of the warm milk mixture into the egg yolk mixture, whisking constantly to temper the yolks (this prevents them from cooking too quickly). Once combined, pour the tempered egg mixture back into the saucepan with the remaining warm milk. Place the saucepan over medium heat and continue to whisk continuously to prevent scorching. (Photo #3)
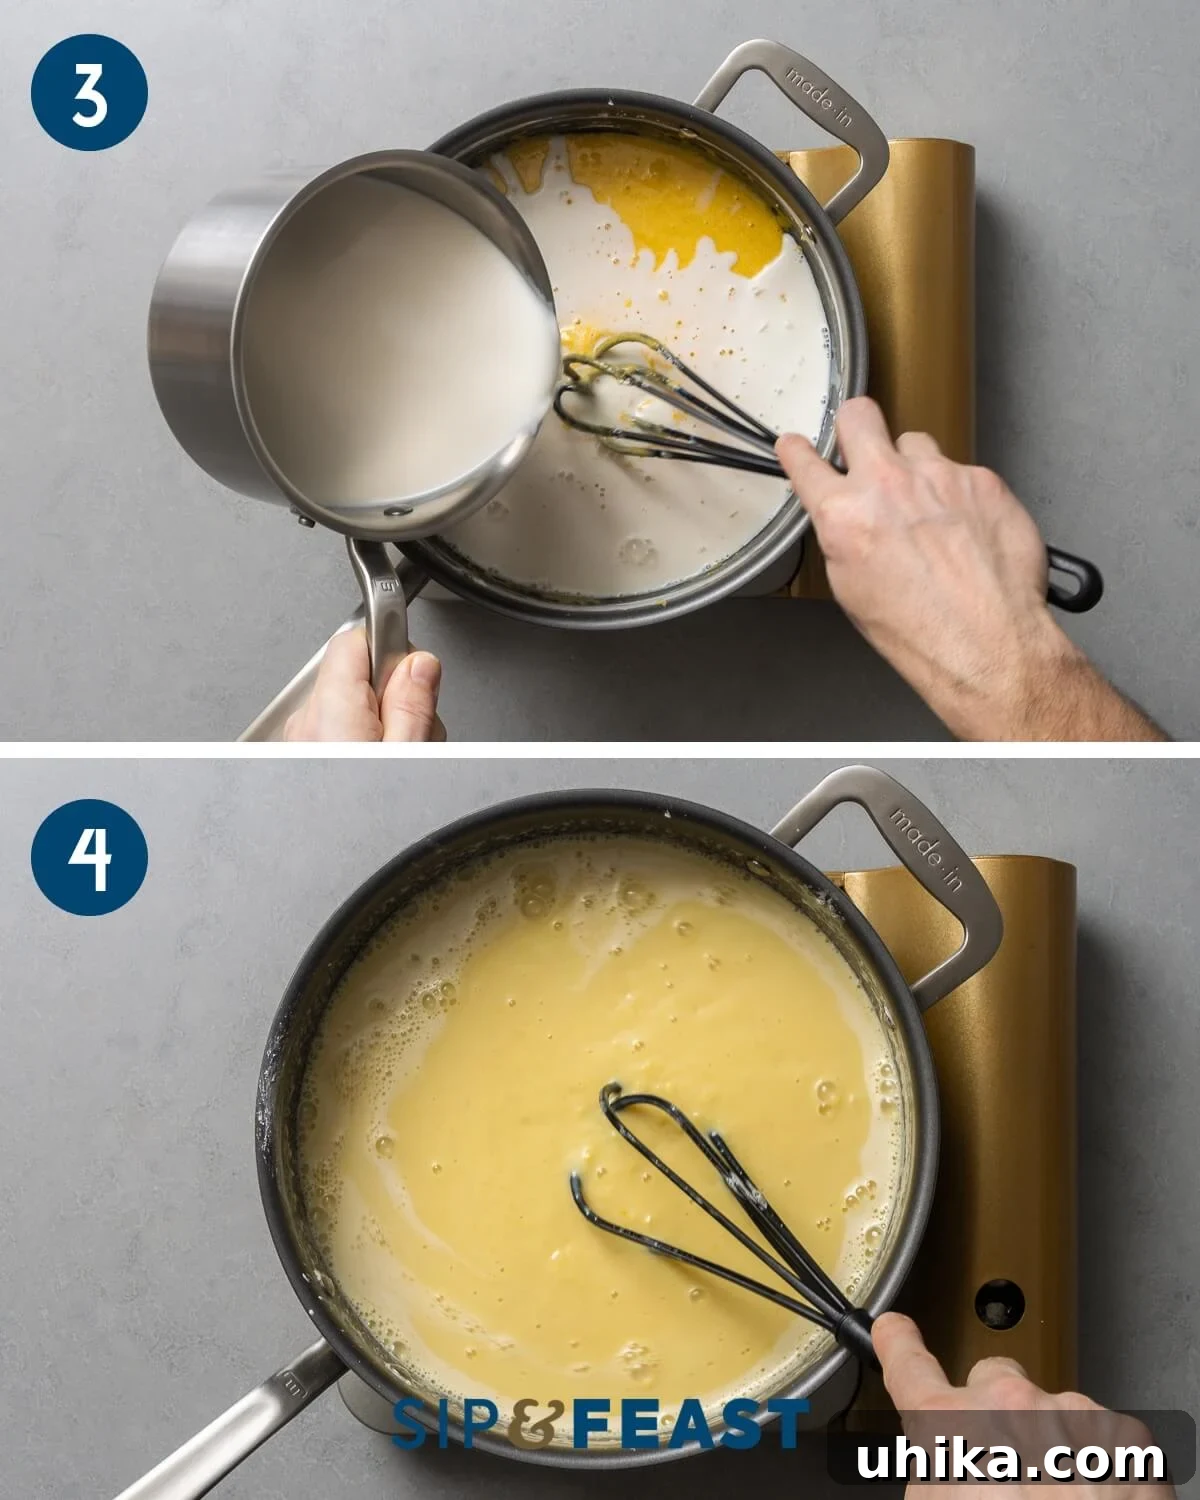
- Slowly increase the heat to medium-high while maintaining constant, vigorous whisking. The cream will begin to thicken noticeably. Continue to whisk to ensure an even cook and prevent any lumps from forming or the bottom from sticking. (Photo #4)
- Continue cooking and whisking until the mixture comes to a gentle boil and visibly thickens to a rich, custardy consistency. This typically takes about 2-3 minutes from the point of boiling. The cream should be thick enough to thoroughly coat the back of a wooden spoon without running off quickly. (Photo #5)
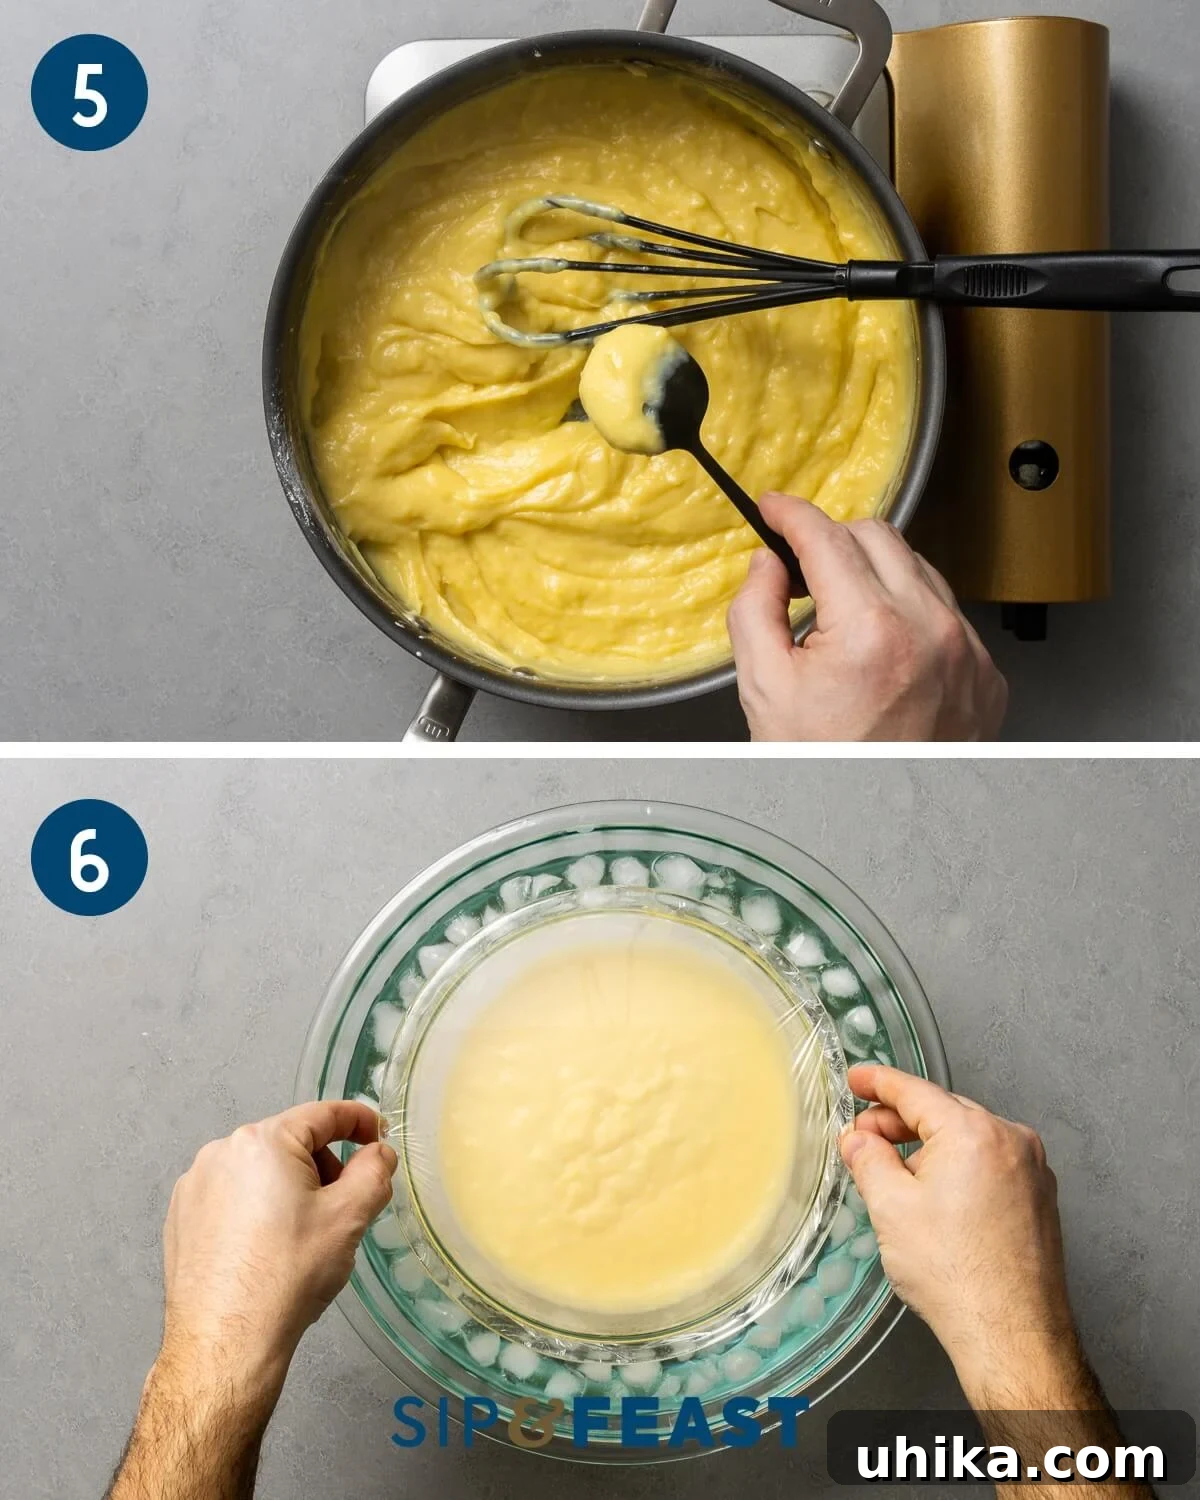
- Immediately pour the hot pastry cream into a clean medium bowl. Cover the surface of the cream directly with plastic wrap, pressing it down so it touches the cream to prevent a skin from forming. Place this bowl into the larger bowl of ice water you prepared earlier. Stir occasionally in the ice bath until the cream is thoroughly chilled. Once cold, remove the bowl from the ice water. The cream is now ready for filling, or it can be refrigerated overnight for best results. (Photo #6)
- Once both the choux pastry shells and the pastry cream are completely cool, assess your pastry shells. If the central indentation or hole is large enough to generously accommodate the pastry cream, you can pipe directly into it. However, if the opening is small, carefully slice each pastry in half horizontally. This creates two halves (like a sandwich) that are much easier to fill effectively. (Photo #7)
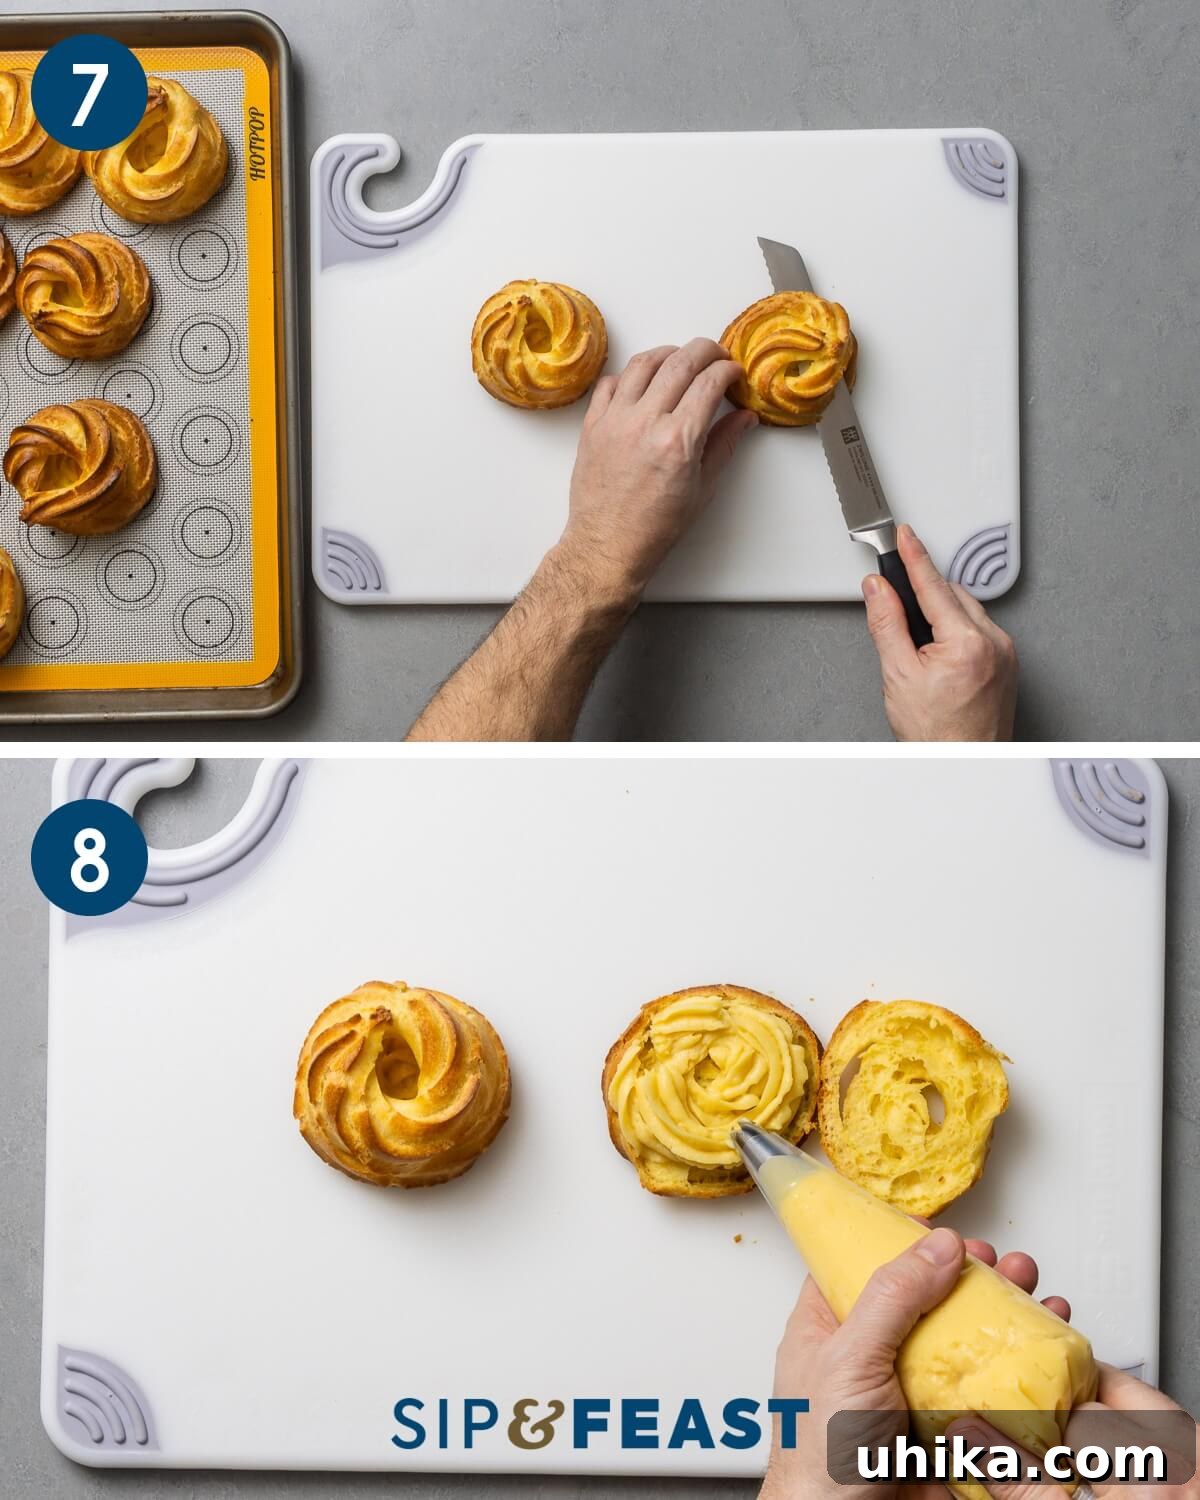
- Transfer the thoroughly cooled pastry cream into a pastry bag fitted with a star tip (the same one used for the choux pastry works perfectly). If you sliced your pastry shells, pipe a generous amount of cream onto the bottom half, then carefully place the top half back on, creating a beautifully filled “sandwich.” (Photo #8)
- Pipe an additional, smaller swirl of pastry cream onto the very top center of each assembled zeppola. Ensure this top swirl is slightly smaller in diameter than the pastry itself, creating a neat, elegant, and visually appealing presentation. (Photo #9)
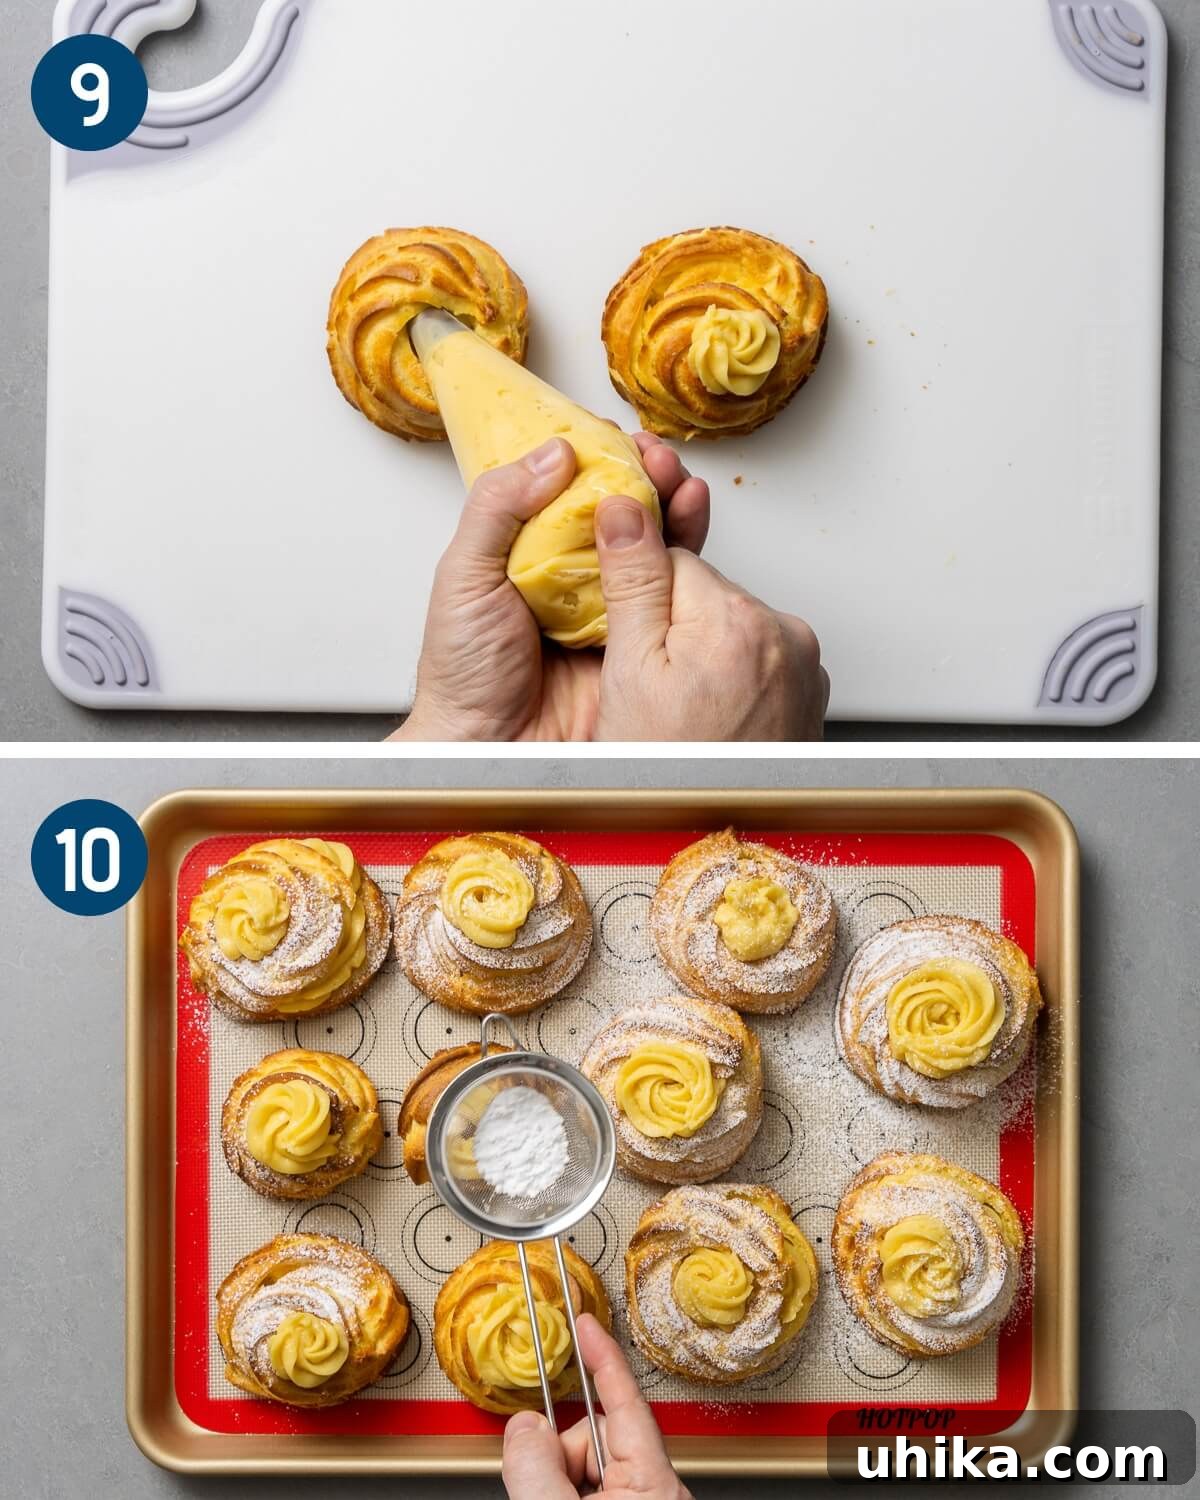
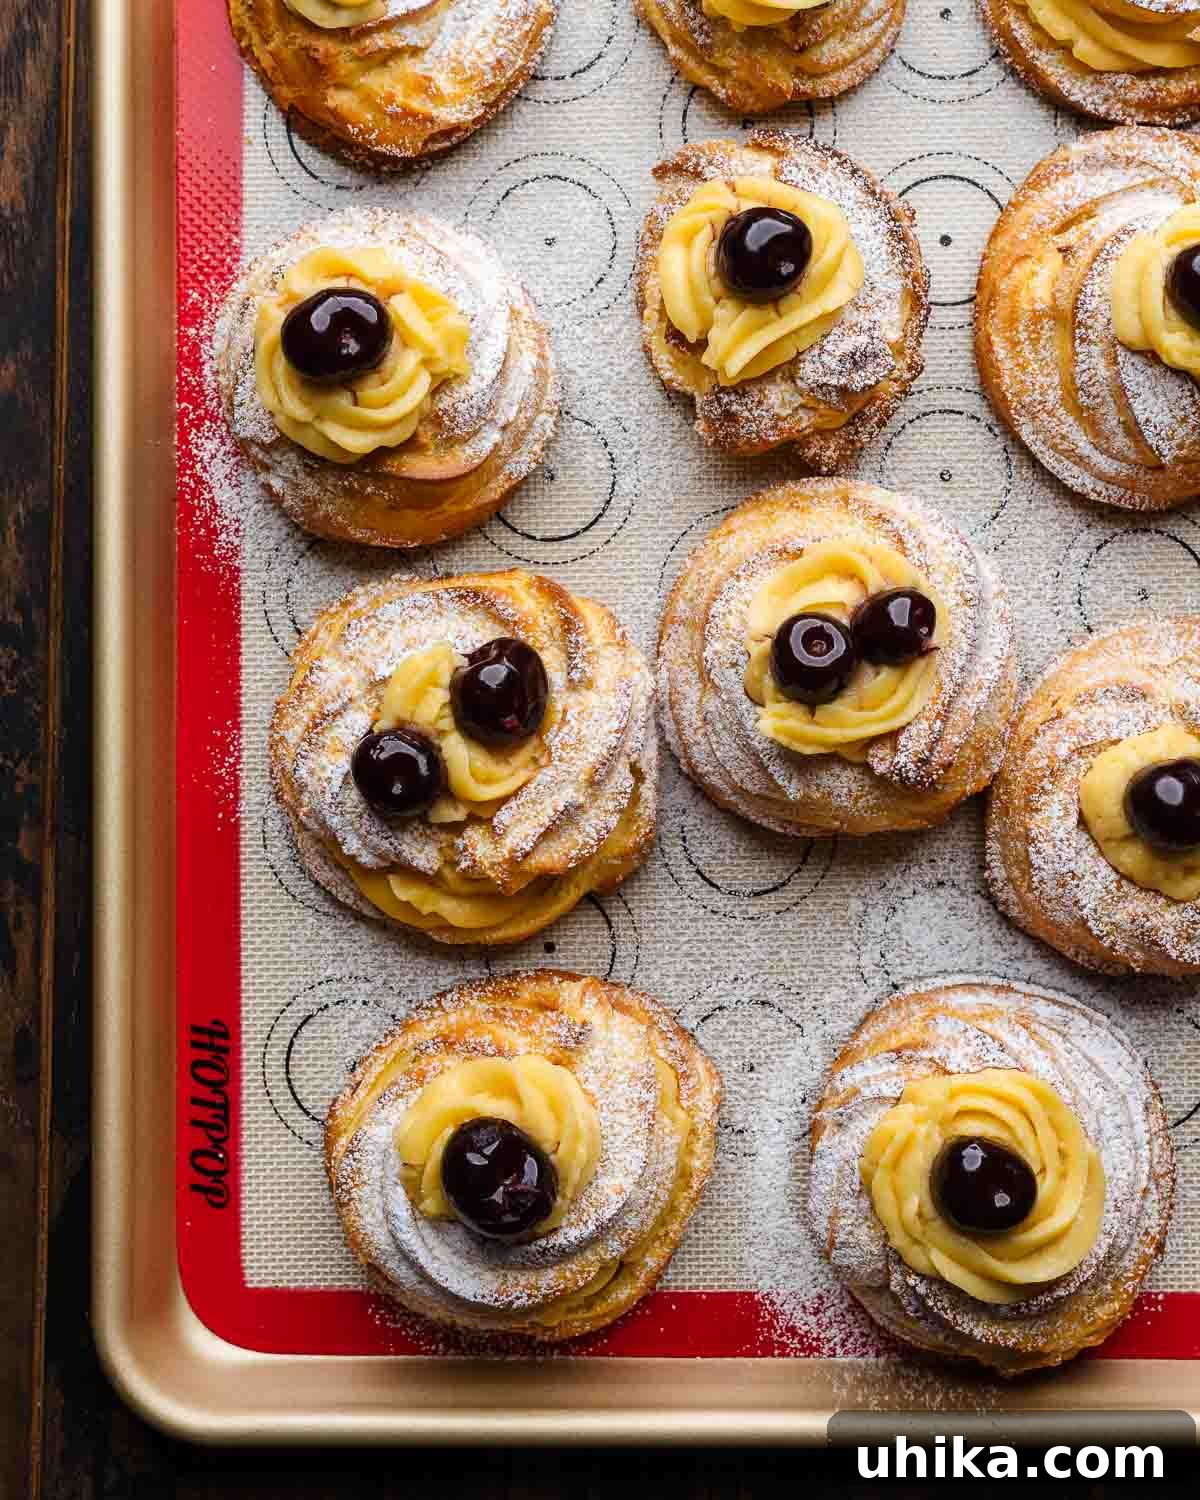
- To finish your stunning Zeppole di San Giuseppe, generously dust each pastry with a fine layer of powdered sugar. As the final touch, crown each one with one or two beautiful Amarena cherries (or any cherries you prefer, if desired). Serve immediately and savor every exquisite, creamy, and delightful bite! (Photo #10)
Expert Tips for Perfect Zeppole
- Achieving the Ideal Pastry Cream Consistency: Pastry cream can be quite finicky. It’s often easier to correct if it’s slightly too thick than too thin. If your cooled cream is too thick, gradually whisk in a teaspoon of cold milk at a time until you achieve a smooth, pipeable consistency. If it’s too thin after cooking, create a slurry with 1 teaspoon of cornstarch and 1 tablespoon of cold milk, whisk it into the warm cream, and gently heat while stirring until it thickens to the desired consistency.
- Baked vs. Fried Choux Dough: In Italy, Zeppole di San Giuseppe are frequently fried for a rich, crispy texture. While I prefer baking them for ease and a slightly lighter result, frying is a delicious alternative. If you choose to fry, I recommend par-baking your piped pastries for just 10 minutes until they firm up and hold their shape, then let them cool completely. This pre-baking makes them much more stable and easier to deep-fry without deforming. Fry the par-baked shells in a neutral-flavored oil (like vegetable or canola) at 350°F (175°C) until deep golden brown and cooked through, similar to how you would prepare traditional fried zeppole.
- Choosing the Right Cherries: The type of cherry can truly elevate your Zeppole. While widely available Maraschino cherries can be used, for an authentic and more sophisticated flavor and appearance, I highly recommend darker, richer Amarena cherries. These can often be found in specialty grocery stores, online, and sometimes at stores like Trader Joe’s. A quick rinse of your cherries before placing them on the pastries helps remove excess syrup, preventing it from dripping and marring your beautiful creation.
- Cooling the Choux Dough Properly: After cooking the flour into the liquid mixture, it’s absolutely vital to let the choux dough cool down significantly before incorporating the eggs. If the dough is too hot, the eggs will scramble upon contact, ruining the texture of your pastry. The dough should be warm to the touch, not piping hot, before adding any eggs.
- Resist Opening the Oven Door: When baking choux pastry, the steam generated inside the oven is crucial for creating those airy, hollow interiors. Avoid opening the oven door, especially during the first 20-25 minutes of baking, as this releases the steam and can cause your pastries to deflate prematurely.
- Prepare Pastry Cream in Advance: For the best texture and to simplify your baking process, consider making the pastry cream a day ahead. Chilling it overnight allows it to firm up perfectly and allows the flavors to meld beautifully, making it much easier to pipe smoothly into your cooled choux shells.
- Essential Equipment: Investing in a good quality pastry bag and a sturdy large star tip (like an Ateco 826 or 827) will make piping the choux and the cream significantly easier and yield more professional-looking results. A heavy-bottomed saucepan for the choux and a reliable whisk for the pastry cream are also indispensable.
Serving and Storage Suggestions
Zeppole di San Giuseppe are truly best enjoyed fresh, ideally within a few hours of being filled. Their delicate choux pastry can soften over time when in contact with the moist pastry cream. Serve them as a celebratory dessert for St. Joseph’s Day, a special brunch treat, or a delightful ending to an Italian-themed dinner. They pair wonderfully with a strong espresso or a sweet dessert wine.
How to Store Leftovers
If you find yourself with any leftover Zeppole (a rare occurrence!), they can be stored in an airtight container in the refrigerator for up to 3 days. For longer storage, you can freeze them for up to 3 months. To freeze, place them on a baking sheet until solid, then transfer to a freezer-safe bag or container. Thaw in the refrigerator overnight before serving. Note that the texture of the choux pastry may become slightly softer after freezing and thawing.
Frequently Asked Questions About Zeppole
Q: Can I make Zeppole di San Giuseppe ahead of time?
A: Yes, you can! The choux pastry shells can be baked a day in advance and stored in an airtight container at room temperature. The pastry cream can also be made 1-2 days ahead and kept refrigerated, tightly covered with plastic wrap pressed directly onto the surface to prevent a skin from forming. Assemble and fill the pastries just a few hours before serving for the best texture.
Q: What is the difference between baked and fried Zeppole?
A: The main difference lies in texture and richness. Baked zeppole are lighter and more airy, with a crisp shell. Fried zeppole, a more traditional approach in many regions of Italy, tend to be richer and have a slightly chewier, more substantial texture from absorbing a bit of frying oil. Both are delicious, and the choice often comes down to personal preference.
Q: Can I use different fillings for Zeppole?
A: While traditional Zeppole use pastry cream, you can certainly experiment! Some variations include ricotta cream (similar to cannoli filling), whipped cream, or even chocolate pastry cream for a twist. However, for an authentic St. Joseph’s Day experience, stick to the classic pastry cream.
Q: My choux pastry collapsed. What went wrong?
A: Choux pastry can be finicky. Common reasons for collapse include opening the oven door too early (releasing essential steam), not drying out the dough enough on the stovetop, adding eggs when the dough is too hot, or not baking them long enough (they need to be firm and golden, not just puffed). Ensure your oven temperature is accurate and resist the urge to peek!
More Italian Desserts to Savor
If you’ve thoroughly enjoyed creating and tasting these beautiful San Giuseppe pastries, we invite you to explore more delightful Italian desserts. These recipes are sure to bring more joy to your kitchen and your table!
- Classic Cannoli: Crispy fried pastry shells generously filled with a sweet, creamy ricotta cheese mixture, often enhanced with chocolate chips or candied fruit.
- Authentic Tiramisu: A timeless Italian no-bake dessert featuring layers of coffee-soaked ladyfingers, a rich mascarpone cheese cream, and a dusting of cocoa powder.
- Delightful Struffoli: Tiny, fried dough balls drizzled with sweet honey and adorned with colorful sprinkles, traditionally enjoyed during the Christmas season.
If you’ve enjoyed this Zeppole di San Giuseppe (St. Joseph’s Day Pastries) Recipe or any other recipe on our site, we would be thrilled if you could give it a 5-star rating and share your thoughts in the comments below. Your feedback and ratings are incredibly valuable and help our community of food lovers!
We’re committed to catering to a variety of learning preferences. If you are someone who prefers to learn by watching, you can discover most of our delicious recipes and cooking demonstrations on our dedicated YouTube channel and our vibrant Facebook Page. Join us and embark on new culinary adventures!
Zeppole di San Giuseppe (St. Joseph’s Day Pastries)
James Delmage

Pin
Zeppole di San Giuseppe are traditionally made to commemorate Saint Joseph’s Day but are so good you’ll make them all year long!
Ingredients
For the choux pastry
- 1 stick (115g) unsalted butter
- 2 teaspoons (9g) granulated sugar
- 1 pinch fine sea salt
- 1/2 cup (120g) whole milk
- 1/2 cup (120g) water
- 1 1/4 cups (160g) all-purpose flour
- 4 large eggs, beaten
For the pastry cream
- 4 large egg yolks
- 2 cups (480g) whole milk, warmed
- 1/2 cup (100g) granulated sugar
- 2 teaspoons (9g) vanilla extract
- 1/4 cup (35g) cornstarch
Toppings
- Amarena cherries or any cherries you like
- Powdered sugar
Instructions
For the choux pastry
- Preheat oven to 400°F (200°C) and set the rack on the middle level.
- Place the butter, sugar, water, and milk in a large saucepan. Turn the heat to medium and let the mixture come up to a boil.
- Once boiling, add the flour and using a spatula stir well until all of the flour is incorporated and the mixture comes together into a ball (about 2 minutes).
- Remove the pan from the heat and move the dough around with the spatula to cool it down. Wait at least 5 minutes before adding the eggs.
- Add one lightly beaten egg and mix well until it is fully incorporated. Repeat the process for the remaining eggs, one at a time. The batter should have a sheen and be pliable and easy to pipe.
- Place the dough into a piping bag with a star tip. Prepare baking sheets lined with either silicone or parchment paper. Pipe 3-inch circles in two layers, starting from the inside on the first layer. Leave a hole in the top of the second layer for the pastry cream. Make sure to leave at least 3 inches of room between each because they will expand during baking.
- Bake for 25-30 minutes or until they turn lightly golden. Remove from the oven and after 10 minutes transfer to a wire rack to finish cooling.
For the pastry cream
- Prepare a large bowl filled with ice water.
- In a medium saucepan over low heat, warm up the milk and vanilla.
- To a separate saucepot (not on the stove) add the egg yolks, sugar, and cornstarch and whisk until combined. Place the pot onto a burner then begin whisking in the warm milk.
- Next, turn the heat to medium and continue to whisk. Slowly increase the heat, while continuing to whisk. Let the mixture come to a boil for 2-3 minutes or until it thoroughly coats the back of a wooden spoon.
- Pour the pastry cream into a medium bowl and tightly cover with plastic wrap. Place the bowl into the larger bowl of ice water. Once the cream is cold remove the bowl from the ice water and move on to filling the pastries.
Piping and finishing the pastries
- Slice the pastry in half for easy filling or if a large enough area was made for holding the filling forgo the slicing of the pastry.
- Place the cooled pastry cream into a piping bag with a star tip. Fill the bottom of the pastry with cream then close it up like a sandwich. Top with more cream but smaller in diameter than the zeppole.
- Sprinkle with powdered sugar then place 1 or 2 cherries on top. Enjoy!
Notes
- This recipe yields 8-10 pastries that are roughly 3 inches in diameter.
- Traditionally, St. Joseph’s Day Pastries are fried. If you would like to do this, parbake for only 10 minutes then let them cool before deep frying in 350°F (175°C) vegetable oil until golden. Parbaking is recommended because it is very hard to add the piped dough straight into the oil without deforming the pastries.
- The pastry cream should be fairly thick so that it doesn’t fall out of the tip of the pastry bag. However, if the cream is too thick, thin with a teaspoon of milk at a time and whisk until the desired consistency is achieved.
- Leftovers can be stored in the fridge for up to 3 days or they can be frozen for up to 3 months.
Nutrition Information
Serving: 1 pastry |
Calories: 355 kcal |
Carbohydrates: 19.7g |
Protein: 13.5g |
Fat: 24.6g |
Saturated Fat: 12.1g |
Cholesterol: 670mg |
Sodium: 86mg |
Potassium: 146mg |
Fiber: 0.4g |
Sugar: 6.9g |
Calcium: 103mg |
Iron: 2mg
Nutrition information is automatically calculated and should only be used as an approximation.
Loved this recipe? Share your thoughts!
We invite you to leave a comment below and let us know how your Zeppole di San Giuseppe turned out! Your feedback is invaluable. If you share your creations on Instagram, don’t forget to tag us at @sipandfeast or use the hashtag #sipandfeast so we can see your beautiful pastries!