
Mastering Authentic Detroit-Style Pizza: A No-Knead Recipe for Home Cooks
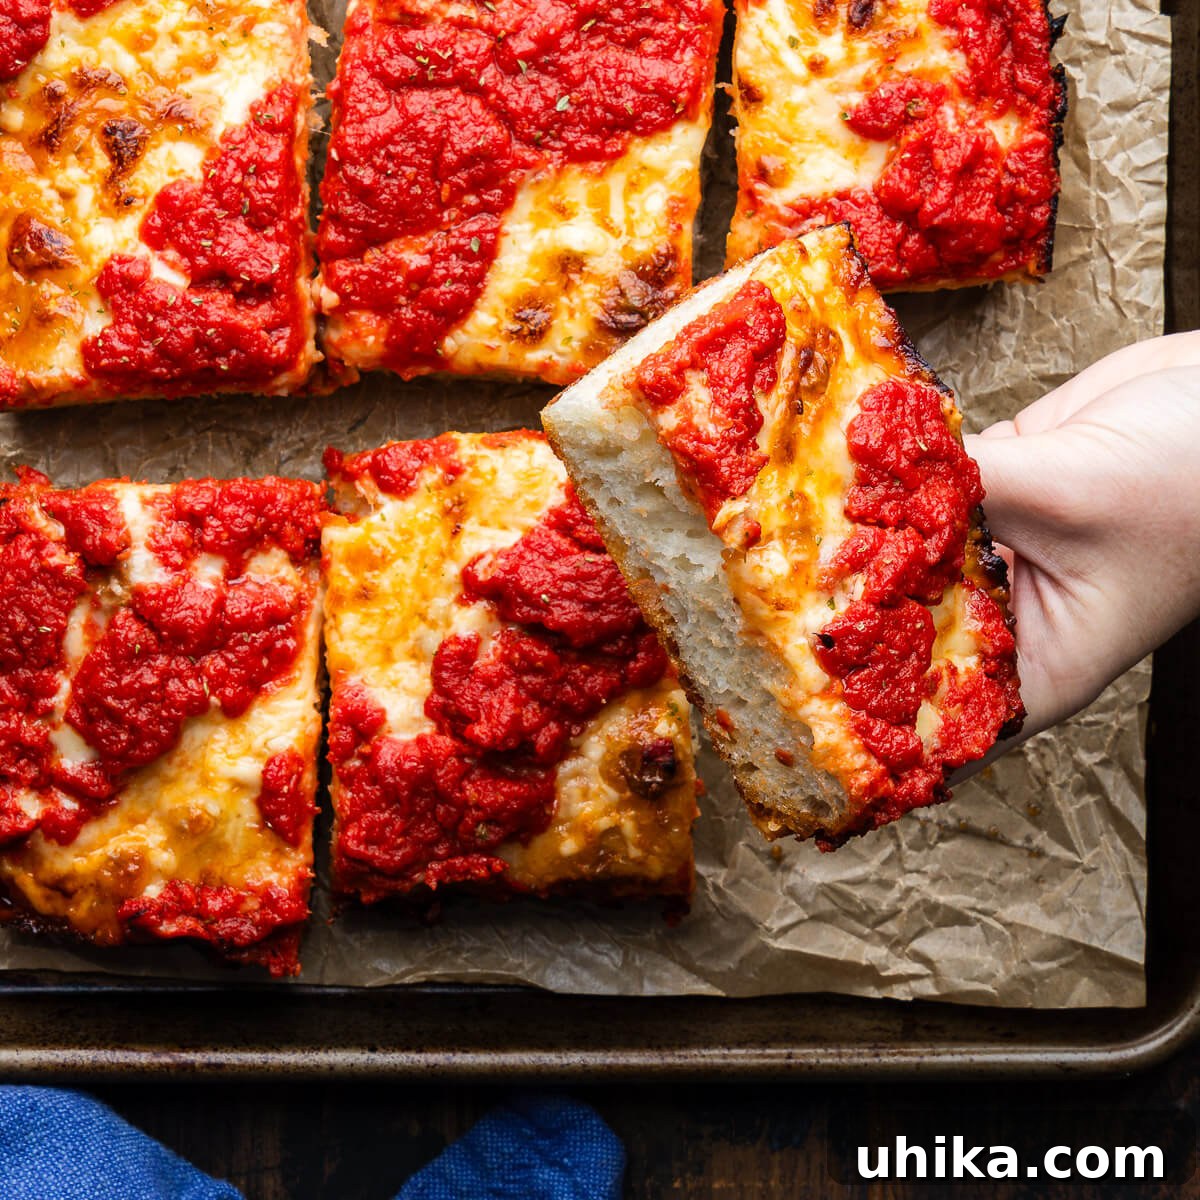
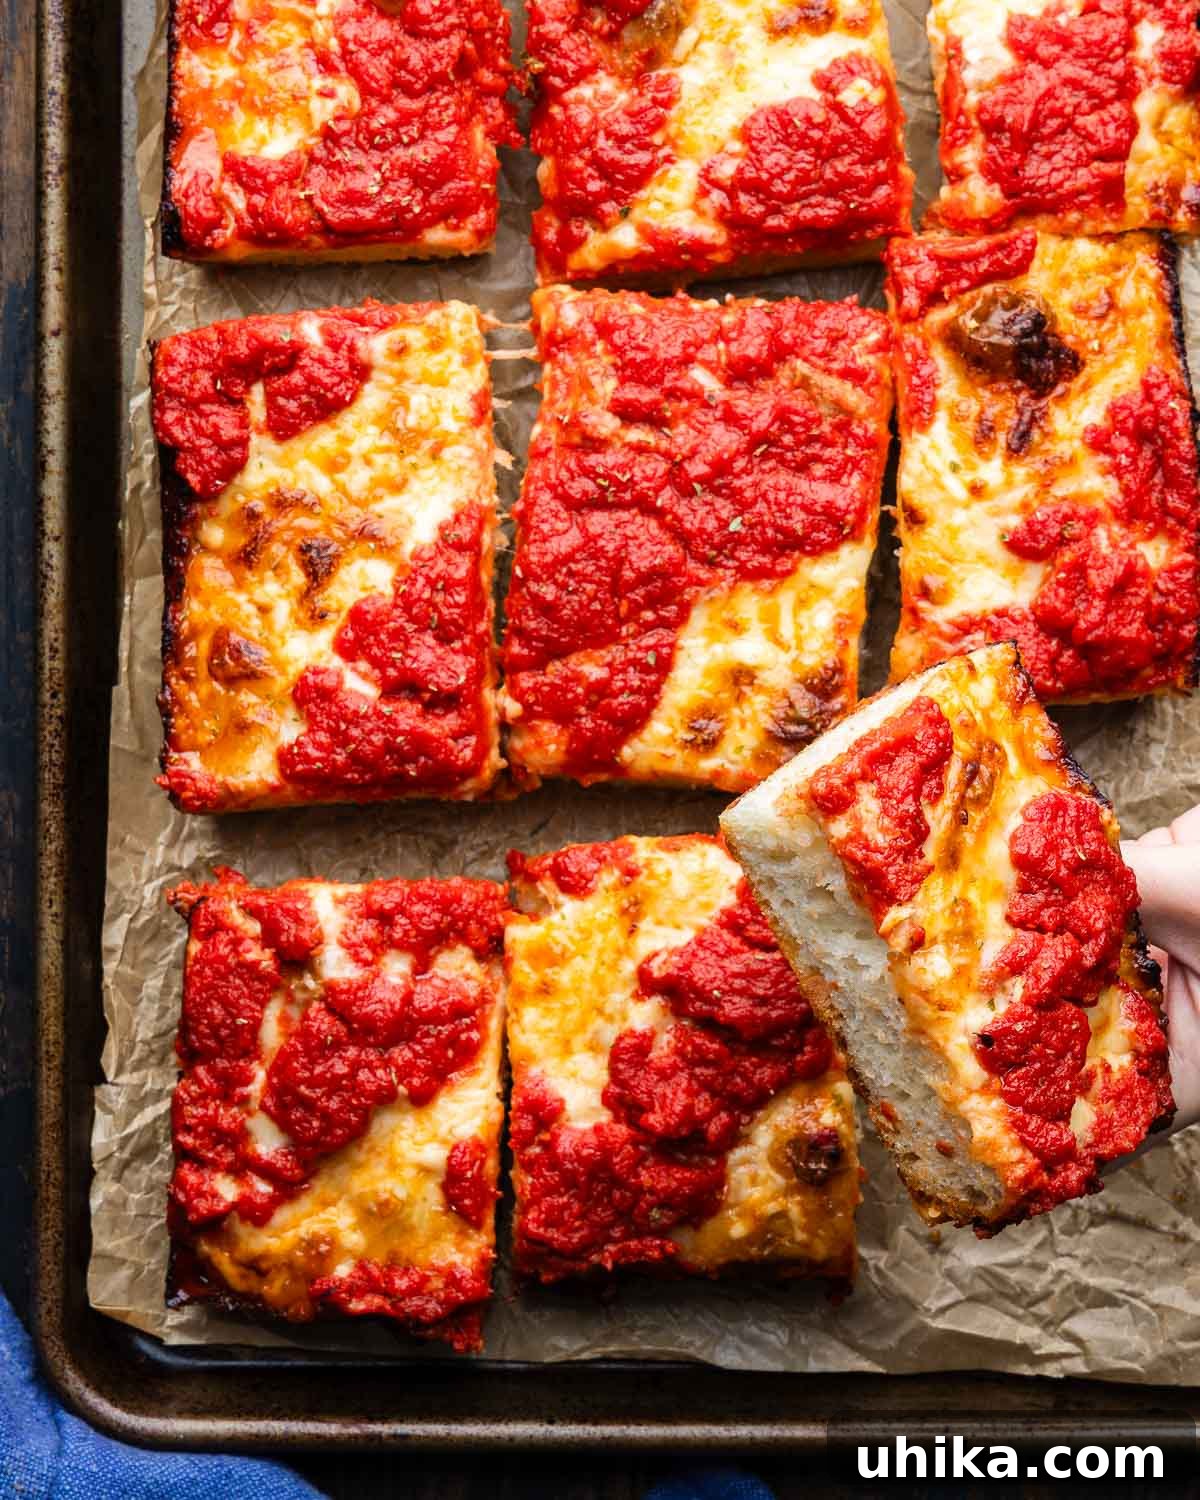
There’s something uniquely satisfying about a perfectly crafted Detroit-Style Pizza. Its signature characteristics – a surprisingly light and airy interior, a thick, substantial crust, and those iconic crispy, caramelized cheese edges (the “frico”) – make it a true culinary delight. What makes this recipe even better is that the dough requires no strenuous kneading, making it remarkably accessible for any home cook. Forget the need for a professional pizza oven; with the right technique and a standard home oven, you can achieve a Detroit pizza that rivals your favorite pizzeria.

The Motor City Classic: A Pizza Journey
As an avid pizza maker, my quest has always been to bring you meticulously tested and authentically flavored pizza recipes. While I’ve explored various styles, from my beloved New York round pizza to hearty Grandma pizza, sharing my Detroit Style Pizza recipe took a little longer. I was determined to absolutely perfect it, ensuring every detail captured the essence of this Motor City marvel.
This recipe is a true game-changer, not just for its incredible taste but also for its surprisingly simple dough preparation. The magic lies in a high-hydration, no-knead dough that relies on a gentle stretch-and-fold technique rather than vigorous kneading. This method yields an exceptionally airy and tender crumb, reminiscent of a superior focaccia, yet with the satisfying chew of a classic pizza. It’s a delightful departure from the pizza styles I typically make, offering a unique texture profile that’s incredibly addictive.
Originating in Detroit in 1946 at Buddy’s Rendezvous, this pizza was traditionally baked in rectangular blue steel pans originally used in auto factories for parts. These pans, with their dark, heavy-gauge steel, contribute to the deep, golden, and incredibly crispy crust. Our modern version aims to replicate that authentic experience, providing a sturdy yet light base for rich toppings and that signature crispy edge. This dish has quickly become a cherished favorite in our home, and I am genuinely excited for you to experience the joy of making and tasting it!
Essential Ingredients for Detroit-Style Pizza
Crafting the perfect Detroit-Style Pizza begins with selecting the right ingredients. Each component plays a vital role in achieving that distinct flavor and texture. Below, you’ll find a visual guide and detailed notes to help you understand the importance of each item.
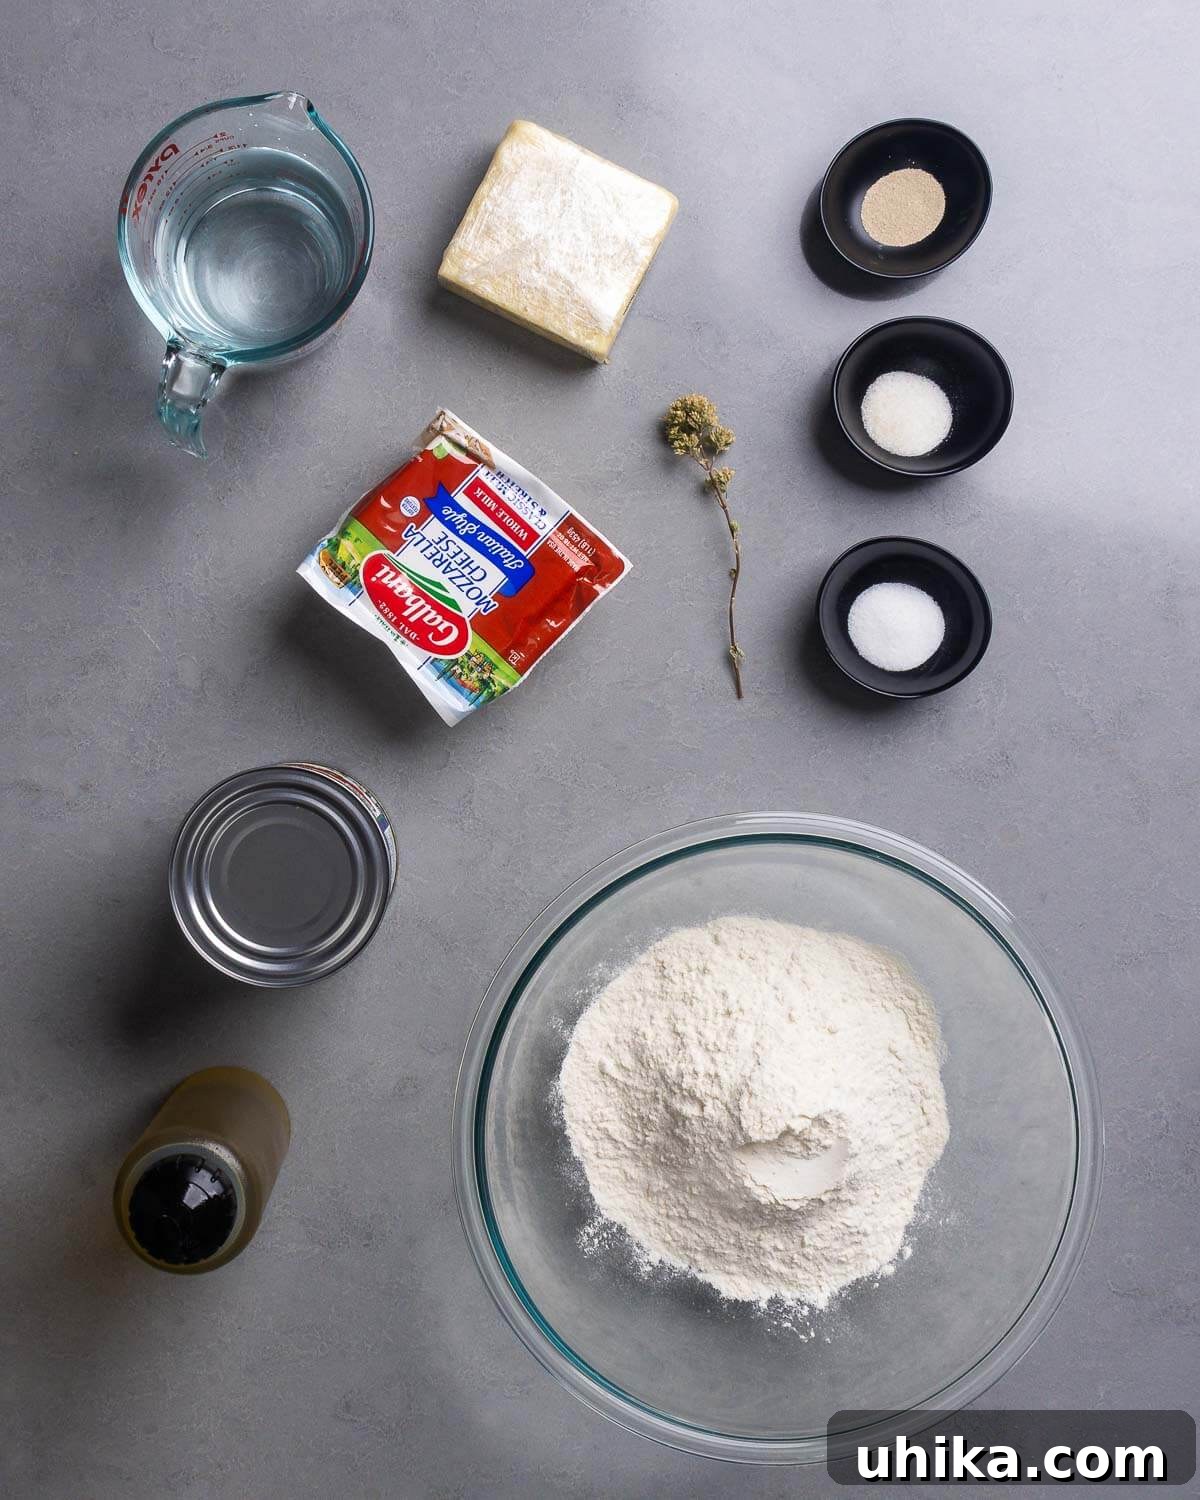
- Flour: The Foundation of Flavor and Texture. For Detroit pizza dough, bread flour is my unwavering choice, just as it is for many of my other pizza recipes. Its higher protein content is essential for developing strong gluten networks, which are crucial for the structure of bread and pizza dough, especially in high-hydration recipes like this one. High hydration (around 80%) is what gives Detroit pizza its characteristic airy, open crumb. Substituting with all-purpose flour or other flours is not recommended, as it will likely result in a stickier, more challenging dough to work with and a denser, less authentic final product. The robust gluten in bread flour allows the dough to capture and hold more air, leading to that coveted fluffy texture.
- Yeast: The Leavening Agent. I consistently use instant yeast for all my bread and pizza endeavors due to its user-friendliness. Unlike active dry yeast, instant yeast can be mixed directly with dry ingredients, eliminating the need for prior proofing in warm water. This saves time and simplifies the process. If active dry yeast is your only option, ensure it’s bloomed in 110°F water until foamy before incorporating it into your dry ingredients to confirm its activity. Using a reliable yeast ensures consistent rise and texture.
- Cheese: The Heart of the Frico. Traditionally, Wisconsin brick cheese is the gold standard for Detroit pizza, celebrated for its buttery flavor and superior melting qualities that create the iconic crispy edge, or “frico.” However, brick cheese can be difficult to find outside specific regions. My preferred combination for excellent results is a blend of low-moisture mozzarella and sharp white cheddar. Monterey Jack can also be a suitable substitute for cheddar, or you can opt for all mozzarella if preferred. The key is to place cheese not only on top of the pizza but crucially along the sides of the pan. As the pizza bakes, this cheese melts, bubbles, and then crisps against the hot pan, forming that irresistible, savory, caramelized crust that defines Detroit-style pizza.
- Tomatoes: The Bright, Tangy Sauce. For the sauce, I use one 28-ounce can of good quality crushed tomatoes. It’s important to drain them for a few minutes to remove excess water, but don’t discard the tomato water! You’ll need some of this flavorful liquid to brush on the dough before the first bake, enhancing its moisture and promoting an even cook. The strained tomatoes form the base of our simple, yet impactful sauce, seasoned minimally to allow the natural tomato flavor to shine.
- Oil: For Dough and Crispiness. Olive oil is incorporated directly into the dough, contributing to its elasticity and a subtle richness. For oiling the pizza pan, I highly recommend corn oil. Its higher smoke point and neutral flavor are ideal for creating a beautifully crispy, golden-brown bottom crust, a hallmark of authentic Detroit pizza. While olive oil can be used for the pan if corn oil isn’t available, corn oil provides a superior crispiness.
For precise measurements and quantities, please refer to the comprehensive recipe card below.
Step-by-Step Guide: Crafting Your Detroit-Style Pizza
Follow these detailed instructions to create your own masterpiece. Each step corresponds to the numbered images and written guidance below, ensuring a smooth and successful baking experience.
- In a large mixing bowl, begin by combining all the dry ingredients for the dough: bread flour, instant yeast, fine sea salt, and sugar. Whisk them together to ensure even distribution. Gradually add the cold water, starting with a small amount and increasing as you mix. Use a sturdy spoon or a dough whisk to combine everything thoroughly until a shaggy, rough mass forms. It won’t look smooth yet, but all the flour should be hydrated.
- Pour the olive oil over the shaggy dough mass. Continue mixing for a few more minutes, ensuring the oil is fully incorporated and the dough begins to pull away from the sides of the bowl, leaving minimal residue. This step helps in developing the gluten and adding richness. Once mixed, cover the bowl tightly with plastic wrap and let it rest at room temperature for 20 minutes. This short rest, known as autolyse, allows the flour to fully hydrate and gluten development to begin passively.
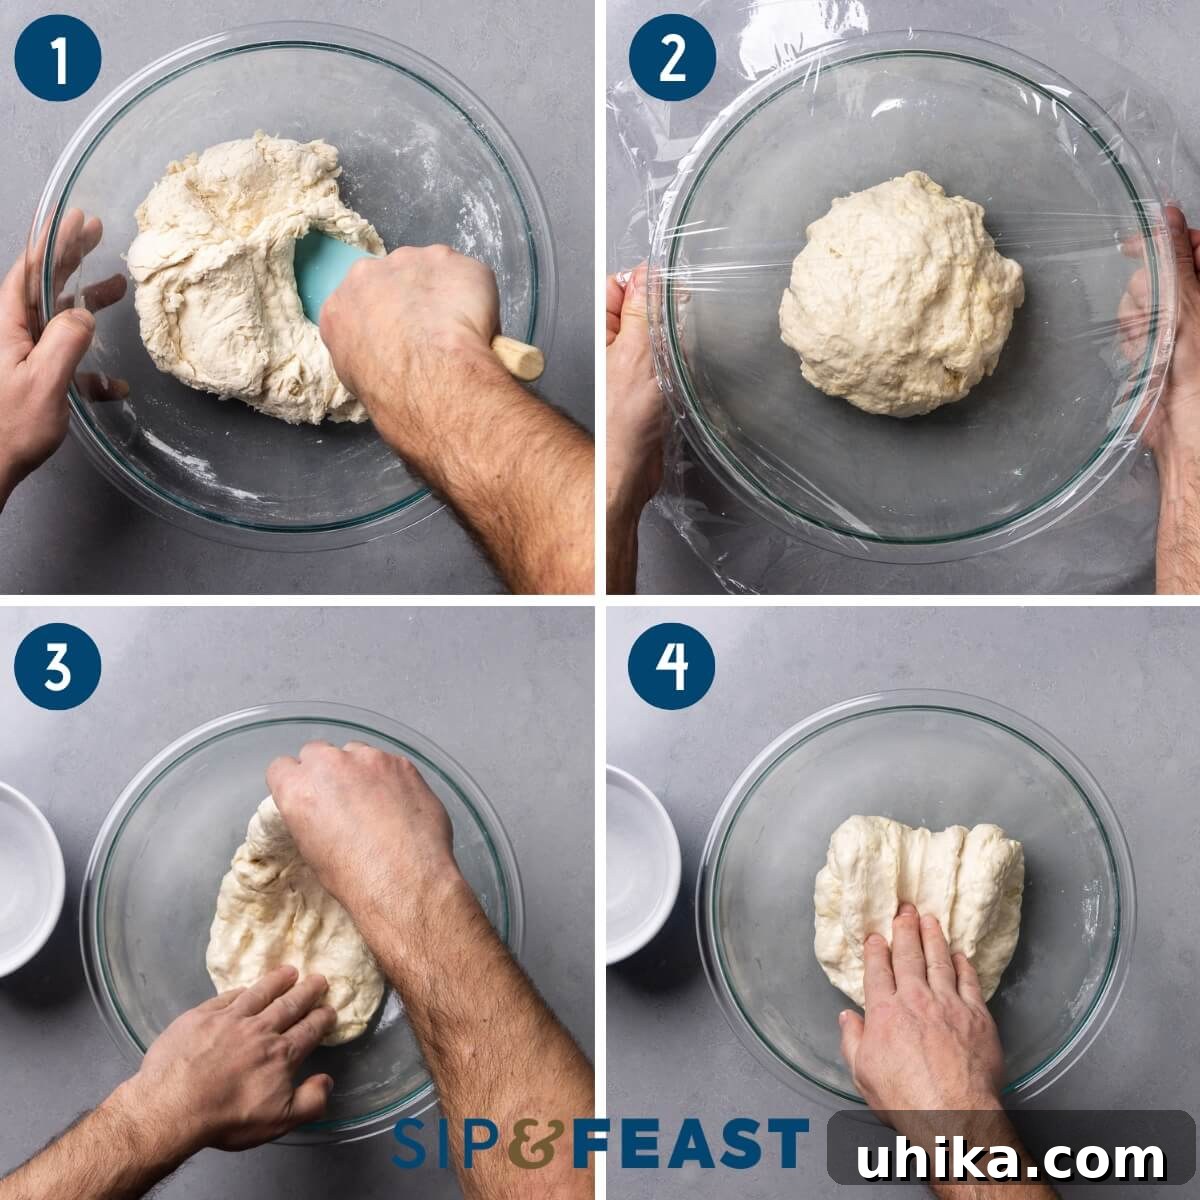
- After the 20-minute rest, uncover the dough. Prepare a small bowl of water to dip your hands in; this prevents the sticky dough from adhering to your fingers during the folding process. With wet hands, gently grab an edge of the dough mass.
- Stretch the grabbed portion of dough upwards, extending it as far as it can go without tearing.
- Fold the stretched dough back down towards the center of the main dough mass. This single action constitutes one “fold.” Rotate the bowl 90 degrees and repeat the process: dip your hands in water, stretch the next section of dough up, and fold it back into the center.
- Continue rotating the bowl, stretching, and folding. You’ll notice the dough gaining strength and becoming more elastic with each fold. Perform approximately 6 stretches and folds, or until the dough resists stretching further. This “bowl folding” technique is a gentle yet highly effective way to develop gluten without traditional kneading, yielding a light and airy texture.
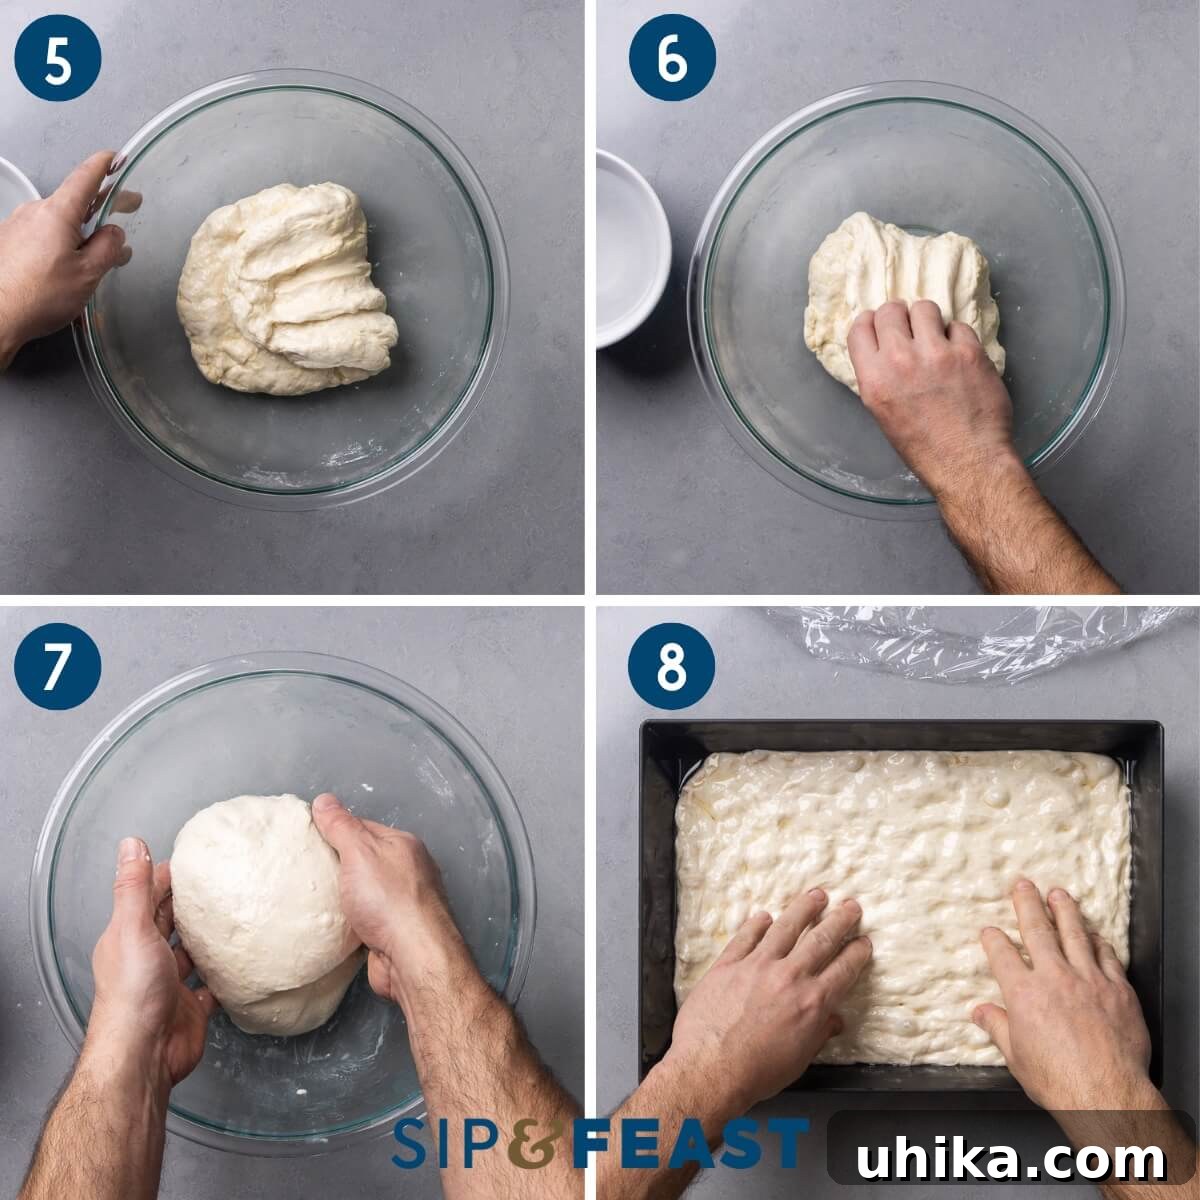
- Once the first series of folds is complete, cover the bowl again with plastic wrap and let it rest for another 30 minutes. Repeat the entire series of bowl folds (steps 3-6) a second time. After the second series of folds, the dough should be noticeably smoother and more elastic. Using a bowl scraper or wet hands, gently shape the dough into a ball and place it seam-side down in the bowl. Cover the bowl tightly with plastic wrap and refrigerate it overnight for a cold ferment. This extended cold fermentation significantly enhances the flavor and digestibility of the dough. While you can make the pizza the same day by allowing the dough to double in size in a warm spot after the second set of folds, an overnight cold ferment is strongly recommended for superior taste and texture development.
- On baking day, remove the dough from the refrigerator at least 2 hours before you plan to bake. This allows it to come to room temperature and relax, making it easier to work with. Preheat your oven to its maximum temperature, ideally 500°F (260°C). Position one oven rack on the lowest level and another on the middle level. Generously oil a 10×14-inch Detroit pizza pan with corn oil, ensuring the entire bottom and sides are coated. Place the dough ball into the center of the oiled pan. Gently press the dough out as much as you can towards the edges of the pan without forcing it. Cover the pan with plastic wrap and let it rest for 30 minutes. After resting, the dough will be more pliable; press it again until it fully covers the bottom of the pan and touches all edges. Cover again with plastic wrap for another hour, or until the dough has risen significantly and looks puffy. Placing the pan in a warm spot, or on a proofing mat set to 78°F (25°C), will accelerate this proofing process.
- While the dough is proofing, prepare your tomato sauce. Strain the 28-ounce can of crushed tomatoes for 3-5 minutes to remove excess water. Reserve the drained tomato water. In a separate bowl, combine 2 tablespoons of the strained tomato water with the drained crushed tomatoes. Season the sauce with Sicilian oregano and salt to taste. For a smoother sauce, you can briefly pulse it with an immersion blender or in a regular blender.
- Once the dough has proofed sufficiently, remove the plastic wrap from the pan. Using a pastry brush, lightly and evenly brush a thin layer (about 1-2 tablespoons) of the reserved tomato water over the entire surface of the dough. This thin layer helps create a slightly crisp surface on the dough and preps it for the sauce.
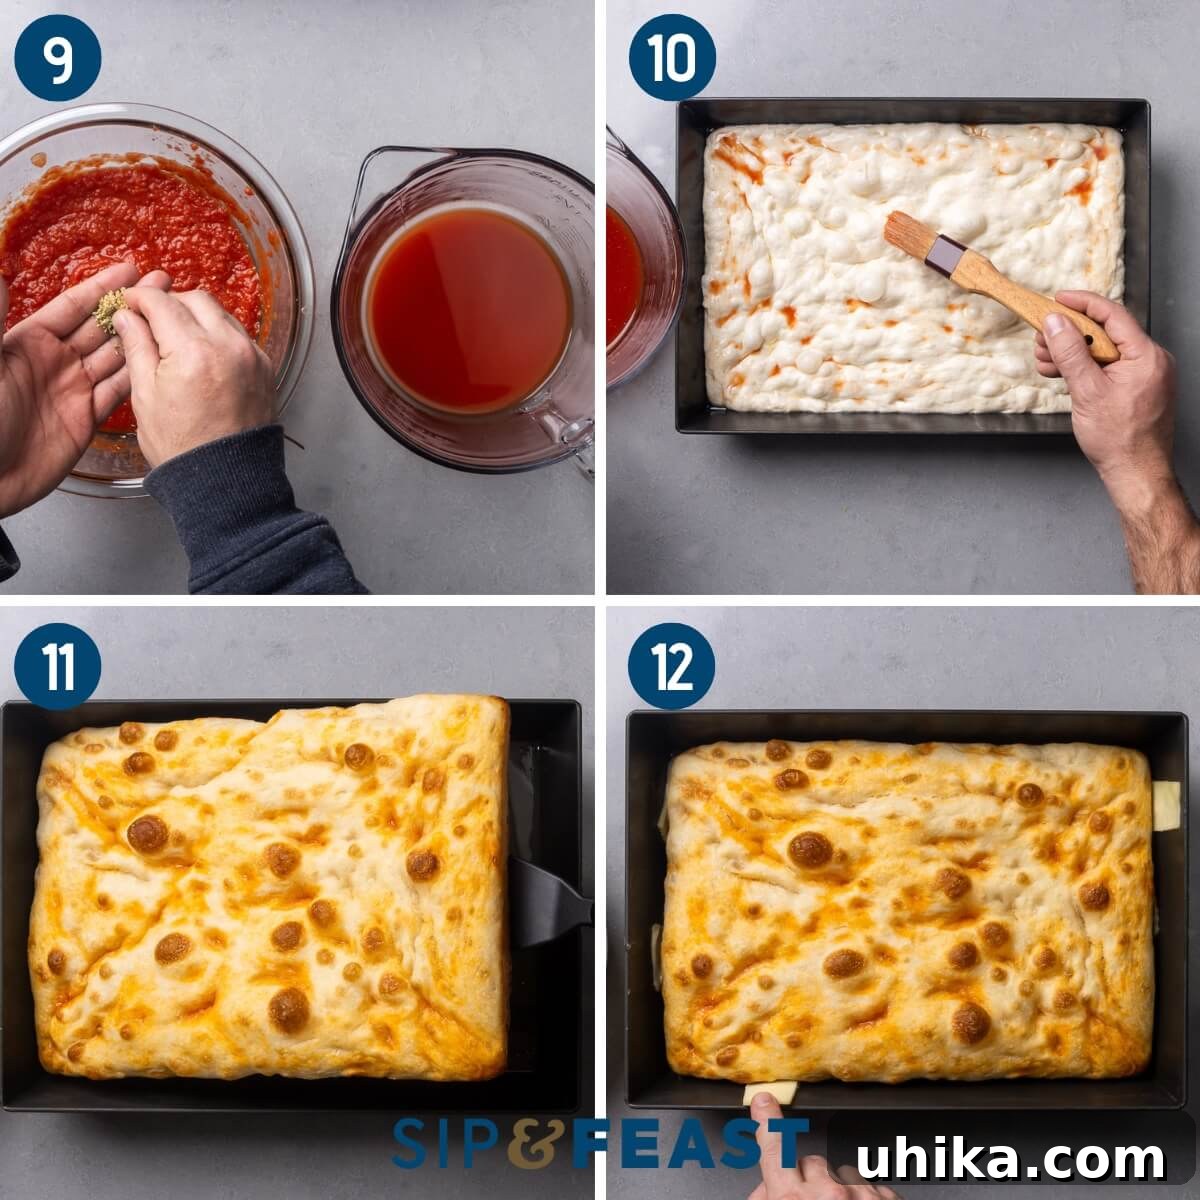
- Place the pizza pan on the lowest oven rack and bake for 12 minutes. This initial bake helps set the crust and begin the crucial browning of the bottom. After 12 minutes, carefully remove the pan from the oven. Using a metal spatula, gently lift a corner of the dough to check the bottom. If the bottom is still completely pale or blond, you will need to continue baking the pizza on the bottom rack for the remainder of the cooking time in the subsequent steps. If the bottom crust is already golden to golden brown, indicating good crispness, you can proceed to finish baking the pizza on the middle or upper level of the oven. This adjustment ensures optimal bottom crust development.
- Now it’s time to build the iconic crispy cheese edges. Take your sliced mozzarella cheese and slide the slices between the dough and the inside perimeter of the pan, all the way around. Ensure the cheese makes direct contact with the pan sides. As it melts and bakes, this cheese will caramelize and crisp up, forming the delicious “frico.”
- Evenly distribute the shredded mozzarella and cheddar cheese over the entire surface of the pizza dough. Then, spread your prepared tomato sauce. Traditionally, Detroit pizza sauce is applied in two or three thick vertical lines, or five diagonal lines across the pizza, rather than spreading it to the edges. This distinctive “racing stripe” pattern allows the cheese underneath to bubble and brown, creating another layer of texture and flavor.
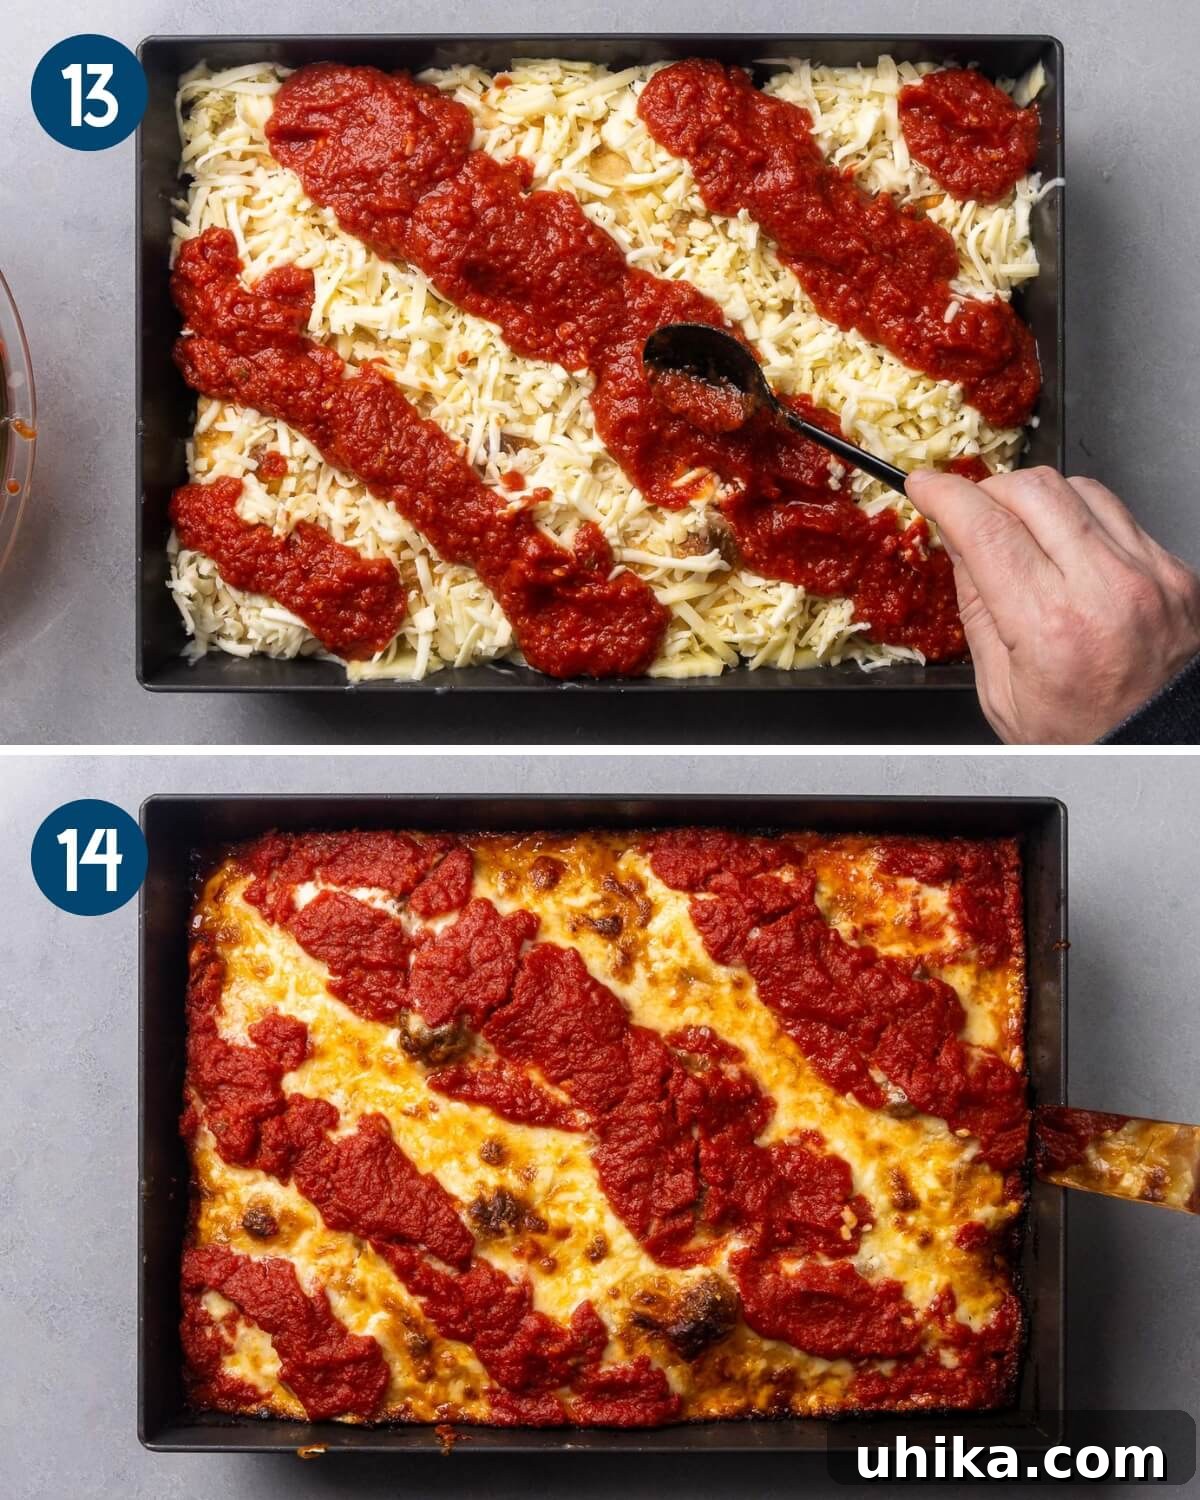
- Return the assembled pizza to the oven. Based on your assessment in step 11, place it either on the lowest rack (if the bottom needed more browning) or on the middle/upper rack (if the bottom was already golden). Bake for another 14-18 minutes, or until the cheese is beautifully melted, bubbly, and browned, and the edges are deeply golden and crispy. For ultimate precision, check the internal temperature of the center of the dough with an instant-read thermometer; it should register at least 195°F (90°C). Once baked, carefully remove the pizza from the pan using a sturdy offset spatula to loosen the edges and lift the entire pizza out. Slice it into 9 generous rectangular pieces, or smaller squares if preferred, and serve immediately. Enjoy your homemade Detroit-Style Pizza!
Expert Tips for Detroit Pizza Success
- The Dough is Key: Homemade vs. Store-Bought. While using store-bought pizza dough might seem convenient, for an authentic Detroit-style pizza, I highly recommend making your own dough from scratch. The primary reason is hydration. Our recipe utilizes a high-hydration dough (approximately 80% water to flour ratio), which is fundamental to achieving the incredibly light, airy, and focaccia-like interior that defines this pizza. Most commercially available pizza doughs typically have a lower hydration level (around 60-65%), which will result in a denser, less characteristic pizza. The no-knead, stretch-and-fold method makes homemade dough surprisingly easy.
- Essential Tools: The Right Pan and Thermometer. Investing in a proper Detroit pizza pan (typically 10×14 inches and made of blue steel or a similar heavy-gauge material) will significantly elevate your results. These pans are designed to conduct heat efficiently, promoting a superior crispy crust and even cooking. If a specialized pan isn’t available, a 9×13-inch deep cake pan can serve as an adequate substitute, though you might need to adjust baking times slightly. Additionally, an instant-read thermometer is an invaluable tool for ensuring your pizza is perfectly cooked through. Checking the internal temperature of the dough (aiming for at least 195°F / 90°C) guarantees a fully baked, never-doughy center.
- Achieving the Perfect Crispy Edges (Frico). The “frico” – those dark, crispy, caramelized cheese edges – is perhaps the most beloved characteristic of Detroit pizza. This magical crust is created when cheese is strategically placed along the sides of the pan, melting and crisping up against the hot metal. For the best frico, I suggest using slices of mozzarella cheese and carefully sliding them between the dough and the pan’s perimeter before the second bake. This ensures maximum contact with the hot pan. While shredded cheese can also be used, forming a small channel between the dough and the pan to sprinkle in the shredded cheese will help achieve a similar, albeit slightly different, crispy edge. Don’t be afraid to let the cheese get dark; that’s where the intense flavor and crunch reside!
- Optimal Oven Temperature and Rack Placement. High heat is crucial for Detroit-style pizza. Preheat your oven to its highest setting (500°F / 260°C is ideal) well in advance to ensure the pan and oven are thoroughly hot. Start baking the pizza on the lowest rack to maximize direct heat to the bottom of the pan, which is essential for developing that wonderfully crisp and browned base. Monitor the bottom crust during the first bake, and adjust to a middle or upper rack for the second bake if the bottom is already sufficiently browned. This two-stage baking process ensures both a crispy bottom and perfectly cooked toppings.
- The Art of Sauce Application. Unlike many pizza styles where sauce is spread to the edges, Detroit pizza typically features “racing stripes” of sauce applied after the cheese. This unique method allows the cheese to bubble and brown directly on the dough, creating a more complex texture and preventing the sauce from burning. Whether you opt for two or three thick vertical lines or five diagonal lines, this technique is part of the pizza’s charm and tradition.
Explore More Pizza Recipes
If you’ve fallen in love with homemade pizza, you’re in the right place to continue your culinary journey. In addition to the delicious Detroit-style pizza and the varieties referenced at the top of this article, here are a few more reader favorites that promise to bring authentic pizzeria flavors to your kitchen:
- New York Sicilian Pizza
- Classic Bar Pizza
- New York White Pizza with Roasted Garlic
If you’ve enjoyed this Detroit Pizza recipe, please consider leaving it a 5-star rating below!
You can also watch our cooking demonstrations on YouTube, follow along on our Facebook Page for daily inspiration, and become a Patreon member to access exclusive full-meal videos and additional content.
Detroit Pizza
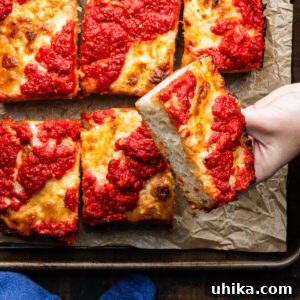
Pin
Equipment
-
1 10×14″ Detroit Pizza Pan
Ingredients
For the dough
- 3 1/3 cups bread flour
- 1/2 teaspoon instant yeast
- 1 1/2 teaspoons fine sea salt
- 1 teaspoon sugar
- 1 1/2 cups cold water
- 2 tablespoons olive oil
For the Detroit pizza
- 1/3 cup corn oil for oiling the pan
- 10 slices mozzarella cheese
- 1 1/2 cups shredded mozzarella
- 2 cups shredded sharp white cheddar
- 1 28-ounce can crushed tomatoes drained for 3-5 minutes and reserve tomato water
- 1/2 teaspoon Sicilian oregano
Instructions
For the dough
-
In a large bowl, mix together the dry ingredients (bread flour, yeast, salt, sugar). Add the water a bit at a time and mix thoroughly to form a dry rough mass.
-
Pour the olive oil over the dough and mix again to scrape off any dough residue stuck to the sides of the bowl. Cover with plastic wrap for 20 minutes.
-
Remove the plastic and bowl fold the dough. Keep a small bowl of water near your side. Dip hands into the water and grab the edge of the dough and pull and stretch it up and back down towards the middle of the dough mass. Rotate the bowl 90° and perform another fold, dipping your hand into the water between each fold. Keep rotating and folding until the dough will no longer easily stretch (about 6 stretches). Cover the bowl with plastic wrap and let it sit for 30 minutes before doing another series of bowl folds.
-
After two series of folds, use a bowl scraper or wet hands and place the seam side of the dough down into the bowl. Cover the bowl tightly with plastic wrap and place into the fridge overnight. Note: you can make the pizza the same day by letting the dough double in size after the second set of bowl folds, but the pizza will have far better flavor if refrigerated overnight.
For the Detroit pizza
-
Remove the dough from the fridge 2 hours prior to using.
-
Preheat oven to 500°F (260°C) and set 1 rack on the lowest level and the other to the middle level.
-
Oil a 10×14″ Detroit pizza pan, then place the dough ball into the pan and press it out to the edges of the pan. Cover with plastic wrap for 30 minutes, then press it again into the edges to fully cover the pan. Cover again with plastic for another hour or until the dough has risen significantly. Placing the pan in a warm spot or on a proofing mat set to 78°F (25°C) will speed up the process.
-
Meanwhile, strain the crushed tomatoes for 3 minutes to remove excess water. Save both the strained tomatoes and the tomato water. Mix 2 tablespoons of the crushed tomatoes into the tomato water. Season the tomatoes with salt to taste and the oregano. If you want a smooth sauce, blender pulse or use an immersion blender.
-
Remove the plastic from the pan and lightly brush a thin layer (about 1-2 tablespoons) of tomato water on top of the dough. Bake for 12 minutes on the bottom rack.
-
Remove the pan from the oven and with a spatula check the bottom. If the bottom is completely blond in color you will most likely need to bake the pizza on the bottom rack for the full amount of time in the next steps. If the dough is golden to golden brown at this point, you will finish baking on the middle or upper level of the oven.
-
Slide the sliced mozzarella into the edges of the pan. Evenly distribute the shredded cheese on top of the pizza. Spread the sauce in 2 or 3 thick vertical lines or 5 diagonal lines on to the pizza.
-
Return the pizza to the oven and bake for another 14-18 minutes or until the center of the dough reaches at least 195°F (90°C) internal temp when checked with an instant read thermometer. Slice the pizza into 9 large pieces or go smaller if you like. Enjoy!
Notes
- Pans: A dedicated Detroit pizza pan is ideal for this recipe, offering superior heat distribution for a crispy bottom and authentic “frico” edges. Alternatively, a 9×13-inch deep cake pan can be used, though results may vary slightly.
- Dough: While store-bought pizza dough (approximately 28-30 ounces for one Detroit pizza) can be substituted, be aware that most commercial doughs have a lower hydration (60-65%) compared to our homemade 80% hydration dough. This means the resulting pizza will likely have a denser crumb rather than the signature airy texture.
- Yeast: For consistency and ease, instant yeast (such as SAF brand) is recommended, as it can be directly mixed with dry ingredients without proofing. If using active dry yeast, proof it first in warm water (around 110°F / 43°C) until bubbly to ensure it’s active before adding to dry ingredients.
- Oil: Corn oil is preferred for oiling the pan due to its neutral flavor and higher smoke point, which contributes to a crispier, more evenly browned crust. Olive oil can be used as an alternative, but the crust may be less crispy.
- Cheese: Wisconsin brick cheese is traditional but often hard to find. A blend of shredded mozzarella and sharp white cheddar, or Monterey Jack substituted for cheddar, offers an excellent flavor and melting profile. Using all mozzarella is also an option.
- Toppings: Feel free to customize your Detroit pizza with your favorite toppings, such as cupping pepperoni. Keep in mind that pizzas with heavier toppings may require a few extra minutes of baking time.
- Leftovers: Store leftover Detroit pizza in an airtight container in the refrigerator for up to 3 days, or freeze for up to 3 months. Reheat in a 350°F (175°C) oven until warmed through and crispy.
Nutrition
Nutrition information is automatically calculated, so should only be used as an approximation.
Like this? Leave a comment below!Check us out on Instagram at @sipandfeast or tag #sipandfeast!