
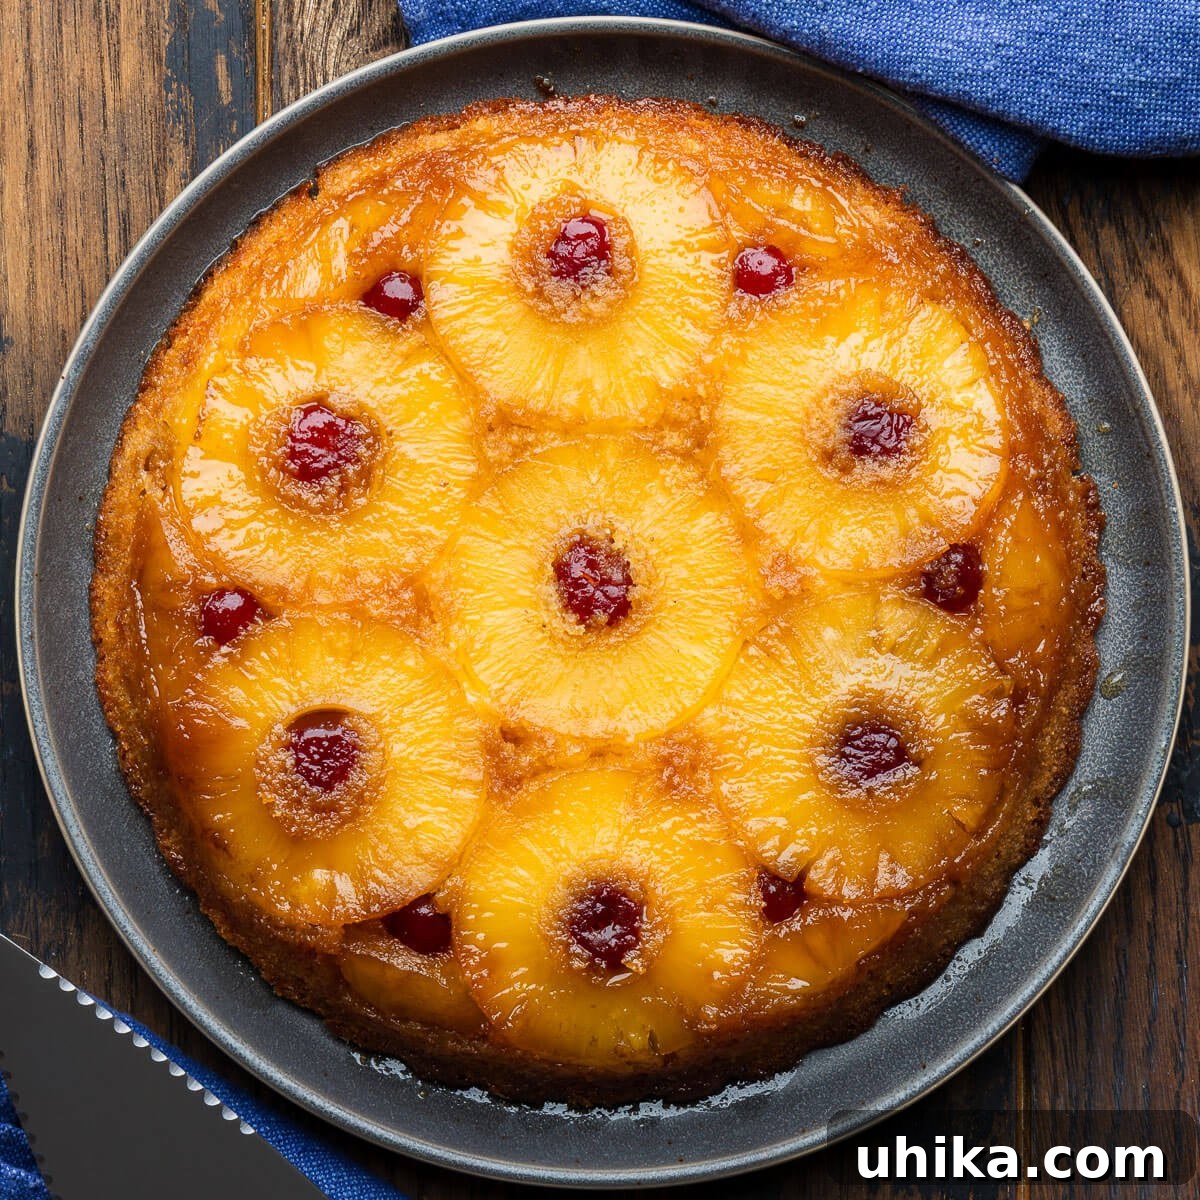
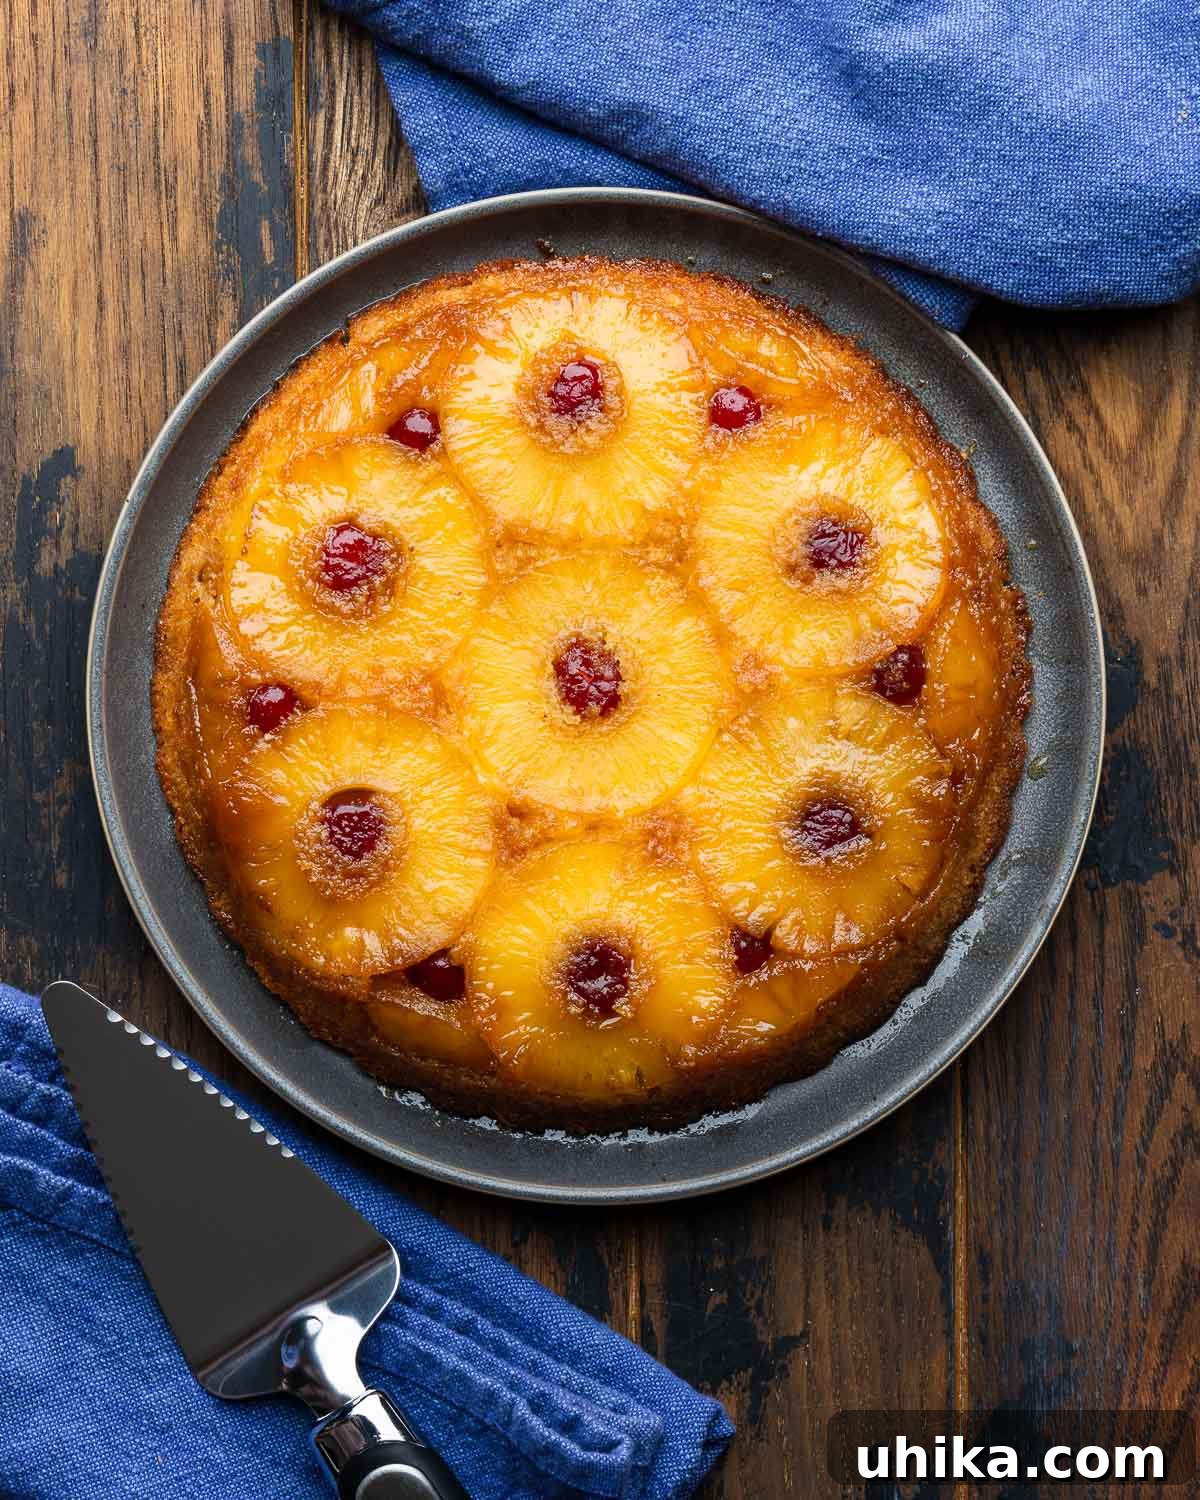
Indulge in a timeless dessert that never goes out of style: the Pineapple Upside Down Cake. With its vibrant caramelized pineapple and brown sugar topping, studded with ruby-red maraschino cherries, and a wonderfully moist vanilla cake base, this retro-classic is truly irresistible. Effortlessly elegant and incredibly delicious, it’s the ideal treat for any special occasion, family gathering, or simply a delightful whim on a quiet afternoon. Its charm lies not only in its stunning appearance but also in its comforting, familiar flavors that transport you back to simpler times.

Embracing the Enduring Charm of a Retro Dessert
There’s a special kind of magic in certain recipes that transcends generations. For me, the Pineapple Upside Down Cake is one of those culinary treasures that evoke a powerful sense of nostalgia. Each forkful reminds me of childhood, of evenings filled with laughter and the comforting aroma of baking wafting from my mom’s kitchen. She made this iconic 1920s-style inverted dessert frequently, and it was always met with eager anticipation and delight. It’s more than just a cake; it’s a delicious journey to a time before the constant pings of cell phones and the endless scroll of the internet. A time when simple pleasures, like a perfectly baked cake, were the highlight of the day.
The exquisite balance of flavors is what truly sets this cake apart. The sweet, buttery caramel sauce, infused with brown sugar, forms a glistening glaze over the tender, tangy pineapple slices and cheerful maraschino cherries. This magnificent topping provides a perfect counterpoint to the incredibly moist and tender vanilla cake, which subtly absorbs some of the pineapple’s delightful essence. It’s a symphony of textures and tastes that’s both sophisticated and wonderfully approachable.
Much like a classic Pound Cake, this dessert is traditionally associated with hospitality, often prepared “when company is coming over.” However, its ease of preparation and undeniable appeal mean it’s frequently baked in our home just because. No special occasion needed—sometimes, the best reason to bake a cake is simply to enjoy a slice of pure happiness.
Essential Ingredients for Your Perfect Pineapple Upside Down Cake
Crafting this delightful cake requires a handful of common pantry staples, each playing a crucial role in its distinct flavor and texture. Below, you’ll find a visual guide to the ingredients, along with special notes to help you select the best components for an outstanding result.
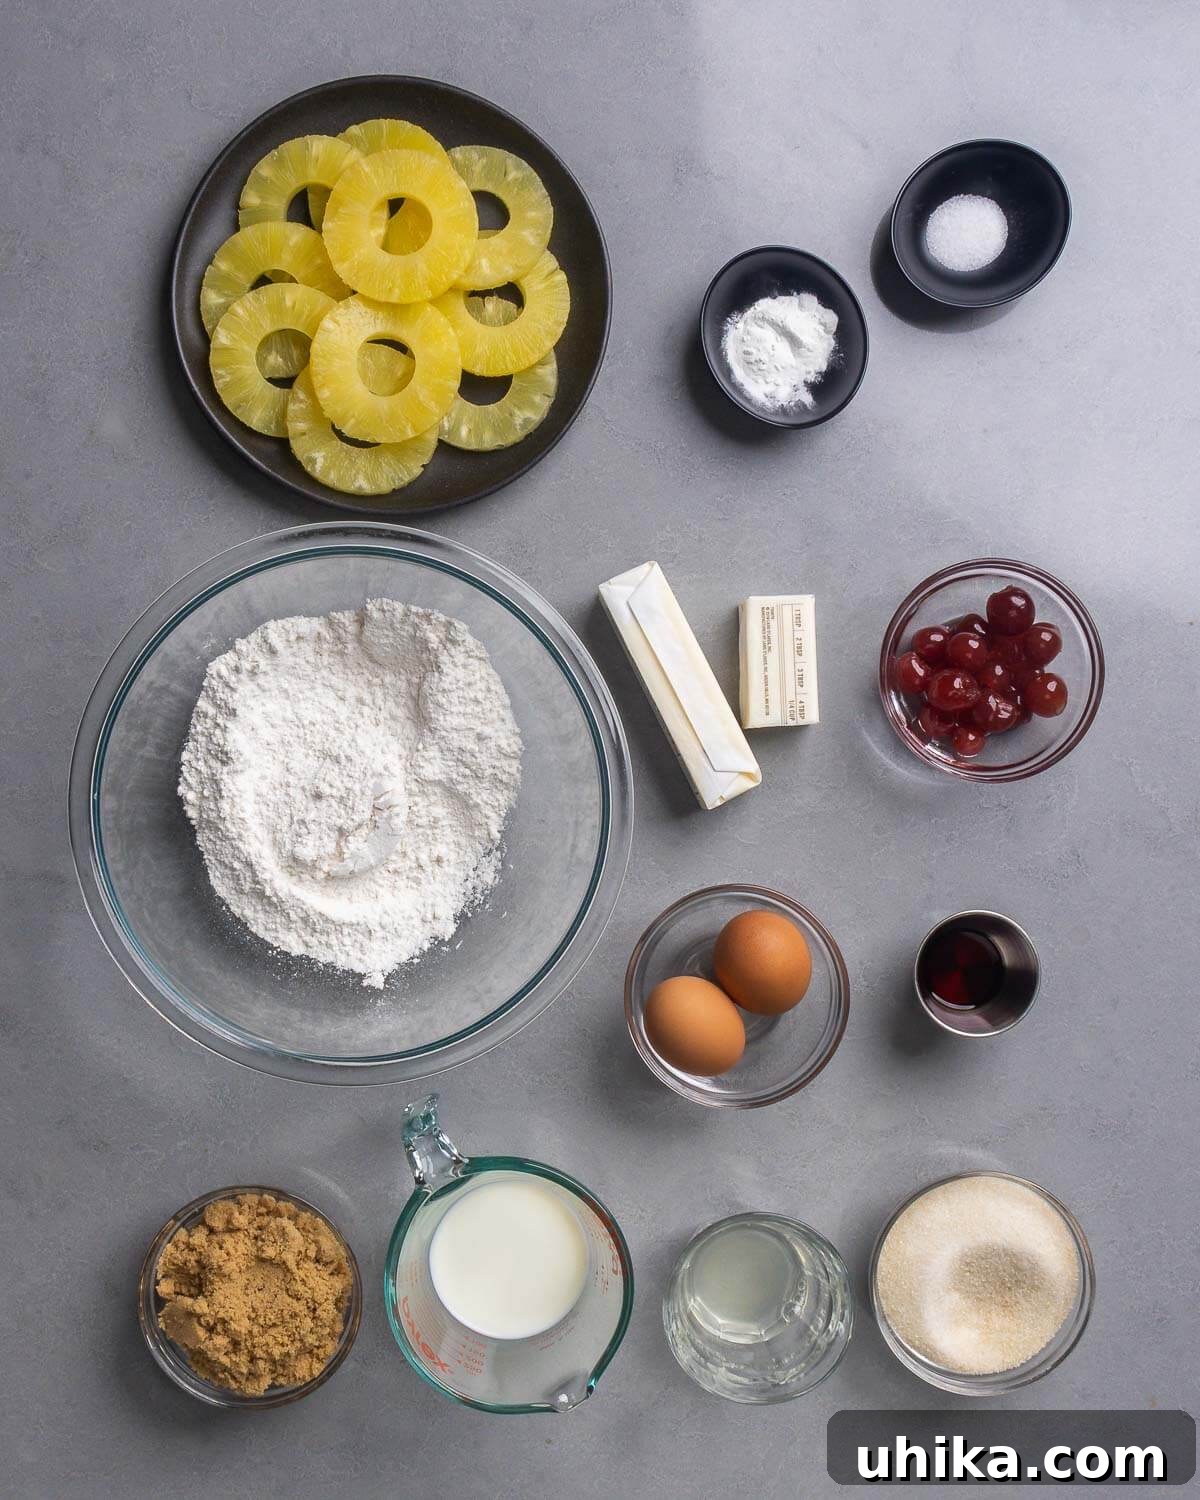
- Pineapple: While fresh fruit shines in many recipes, such as my Lemon Blueberry Ricotta Cake and Peach Blueberry Crisp, this classic pineapple upside down cake truly benefits from canned pineapple rings. Their consistent size, sweetness, and tender texture are ideal for creating the beautiful topping. Plus, the juice from the can is essential for adding that lovely pineapple flavor to the cake batter. Remember to pat the rings thoroughly dry before arranging them to prevent the topping from becoming too watery.
- Cherries: For that signature pop of color and sweet-tart flavor, maraschino cherries are a must. You can opt for the classic bright red variety or explore gourmet amarena cherries for a more intense, sophisticated twist. Drain them well before use to avoid introducing excess moisture.
- Sugar: A combination of sugars is key to this cake’s success. Light or dark brown sugar creates the rich, caramelized topping, providing depth and a molasses-like sweetness. Granulated sugar, on the other hand, is used in the cake batter to ensure a delicate crumb and balanced sweetness.
- Flour: For a truly light and tender pineapple upside down cake, cake flour is my preferred choice. Its lower protein content results in a finer, softer crumb. However, don’t let that deter you if you only have all-purpose flour on hand; it will still yield a delicious and satisfying cake.
- Butter: Both melted unsalted butter for the topping and softened unsalted butter for the cake batter are crucial. Using unsalted butter allows you to control the overall saltiness of the cake. Ensure the butter for the cake batter is at room temperature for optimal creaming with the sugar.
- Eggs: Large eggs, also at room temperature, are vital for creating a cohesive and well-emulsified cake batter. They add richness, structure, and help with leavening.
- Milk & Pineapple Juice: A combination of milk and pineapple juice provides the necessary liquid for the cake batter. Using room temperature milk and juice helps them integrate smoothly into the batter, ensuring a consistent texture. The pineapple juice further enhances the tropical flavor profile.
For precise measurements and detailed quantities, please refer to the comprehensive recipe card below. Gathering all your ingredients and ensuring they are at room temperature before you begin will make the baking process smoother and more enjoyable, contributing significantly to the success of your cake.
Step-by-Step Guide: Crafting Your Easy Pineapple Upside Down Cake
Creating this stunning Pineapple Upside Down Cake is surprisingly straightforward. Follow these detailed steps, correlating with the numbered images below, to achieve a perfectly moist cake with a beautiful, caramelized fruit topping. Precision and a little patience will ensure a fantastic result!
- Begin by preheating your oven to 350°F (175°C). Pour the 1/4 cup of melted unsalted butter into a deep 9-inch pie dish or a 9-inch round cake pan. Using a pastry brush or even a paper towel, ensure you thoroughly grease the sides of the dish with the butter. This crucial step prevents the cake from sticking during the inversion process and guarantees a clean release.
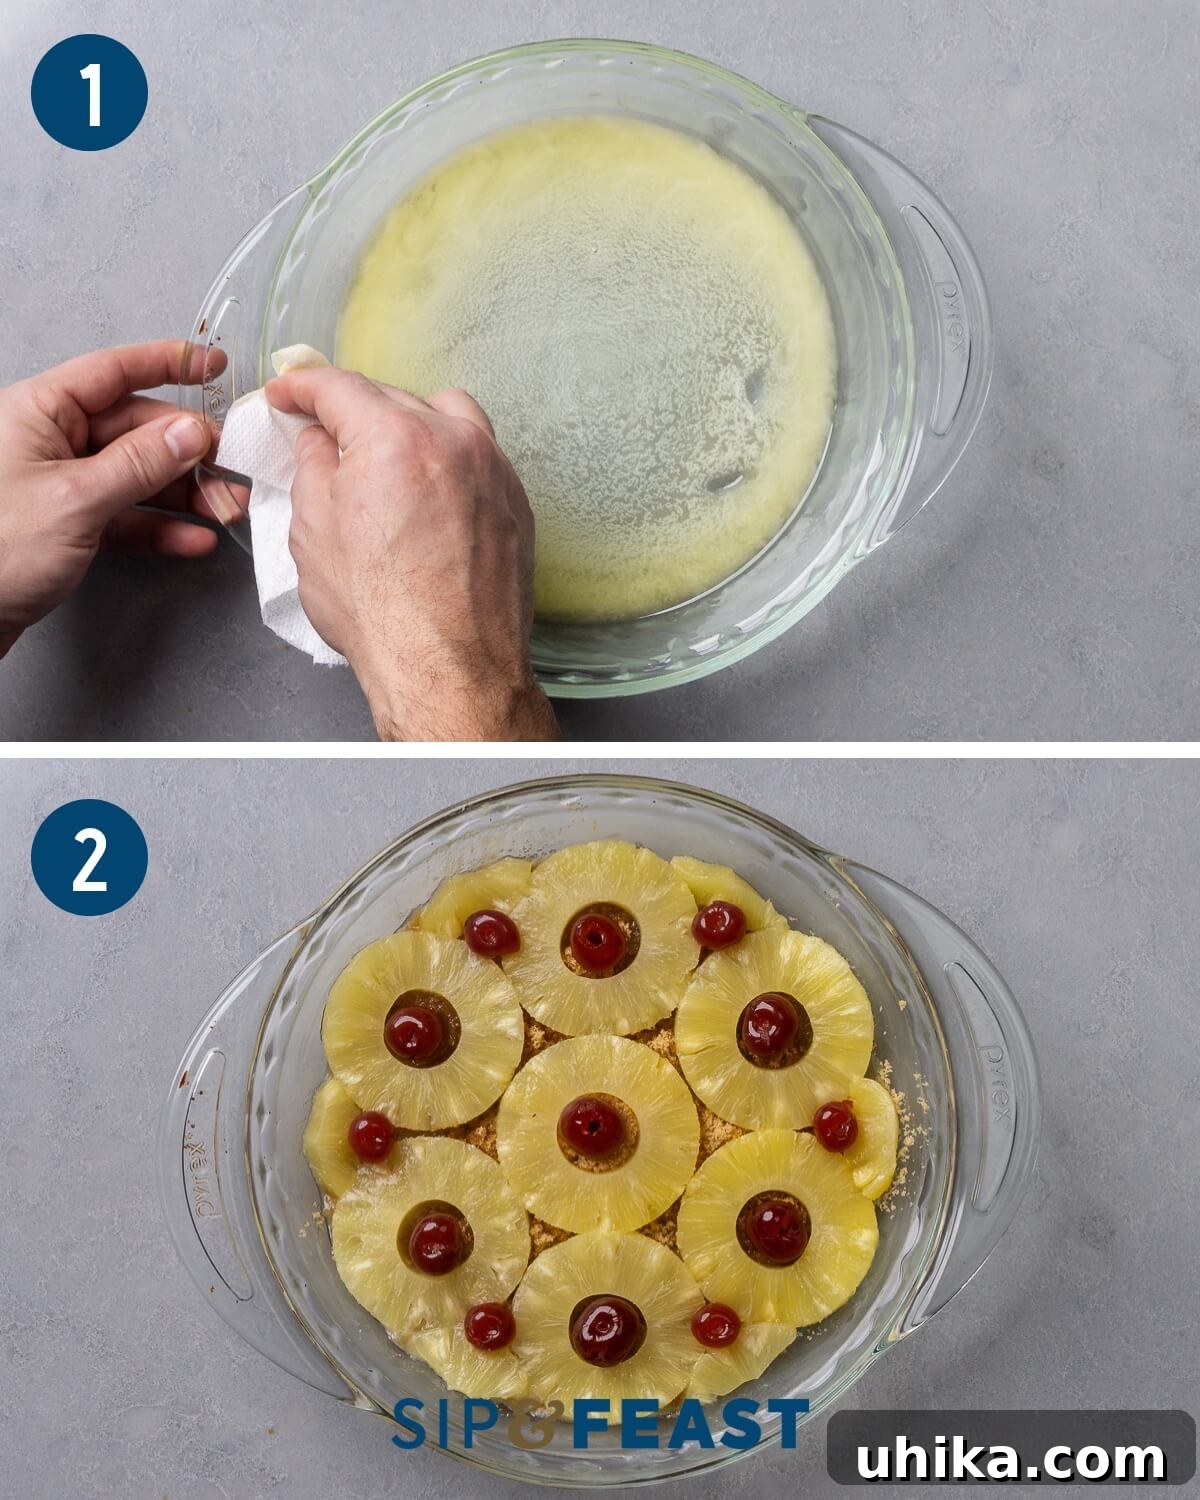
- Once the bottom of the pan is coated with melted butter, evenly sprinkle the 1/2 cup of packed brown sugar over the butter. Next, carefully arrange the pineapple slices into the dish in a neat, uniform pattern, ensuring they do not overlap. You’ll likely use about 7 full rings for the base. Take any remaining pineapple pieces and cut them to neatly fill any empty spots around the edges of the pan, creating a solid layer of fruit. Finally, place one maraschino cherry into the center of each pineapple ring hole, and scatter additional cherries in any half slices or small gaps for an appealing splash of color.
- In a small bowl, combine your dry ingredients: the 1 1/2 cups of cake flour, 1 1/2 teaspoons of baking powder, and 1/2 teaspoon of fine sea salt. Whisk them together until they are well combined and there are no lumps. Set this bowl aside.
- In a separate, large mixing bowl, use a hand mixer or a stand mixer fitted with the paddle attachment to cream the 1/2 cup of room temperature unsalted butter and 3/4 cup of granulated sugar together. Beat on medium speed for about 2-3 minutes, until the mixture is light, fluffy, and pale in color. This process incorporates air, which contributes to the cake’s tender texture.
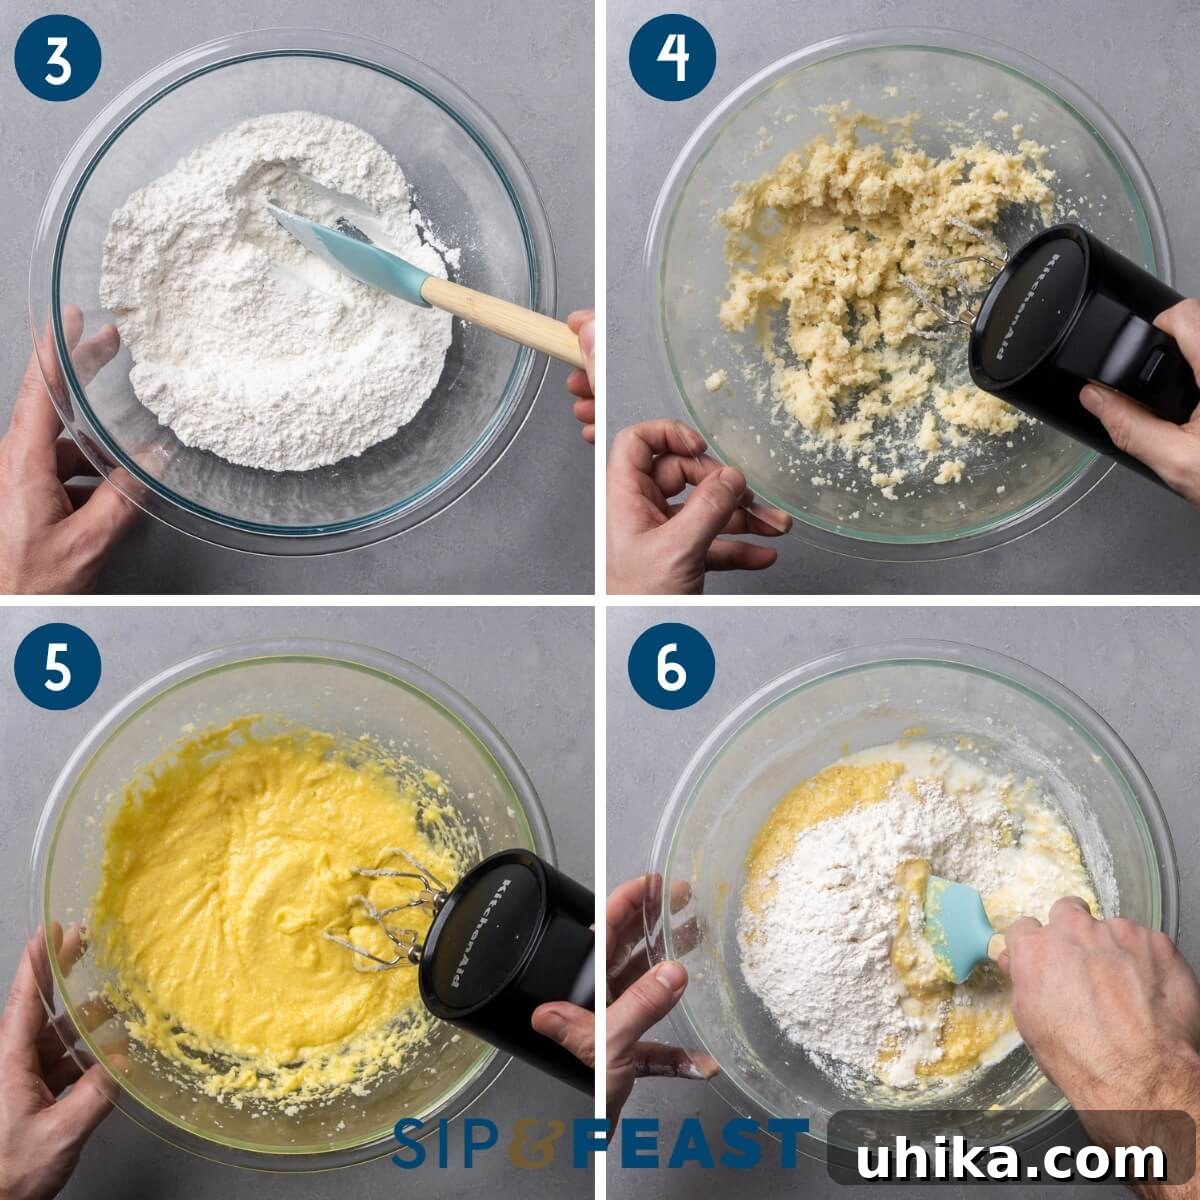
- Next, add the two large room temperature eggs to the creamed butter and sugar mixture, one at a time. Beat well after each addition until fully incorporated, scraping down the sides of the bowl as needed to ensure everything is evenly mixed. Then, mix in the 2 teaspoons of vanilla extract and 1/4 cup of pineapple juice until just combined.
- Now it’s time to incorporate the dry ingredients and milk. Using a spatula, gently fold a portion of your dry ingredients mixture into the wet ingredients, followed by a portion of the 1/4 cup of room temperature milk. Continue alternating between dry and wet ingredients (e.g., 1/3 dry, 1/2 milk, 1/3 dry, remaining milk, 1/3 dry) until all the milk, wet, and dry ingredients are just combined into a smooth batter. It’s crucial not to overmix the batter at this stage, as overmixing can develop the gluten in the flour, leading to a tough and dense cake.
- Carefully pour the cake batter over the arranged pineapple and cherries in your prepared pie dish. Use the back of a spoon or a small offset spatula to gently spread the batter evenly, ensuring it completely covers the fruit layer without disturbing it too much.
- Bake the cake in your preheated 350°F (175°C) oven for 20 minutes. After 20 minutes, loosely cover the top of the cake with aluminum foil to prevent the top from browning too quickly. Continue to bake for an additional 25-30 minutes, or until a wooden toothpick or cake tester inserted into the center of the cake comes out mostly clean (a few moist crumbs are fine, but no wet batter).
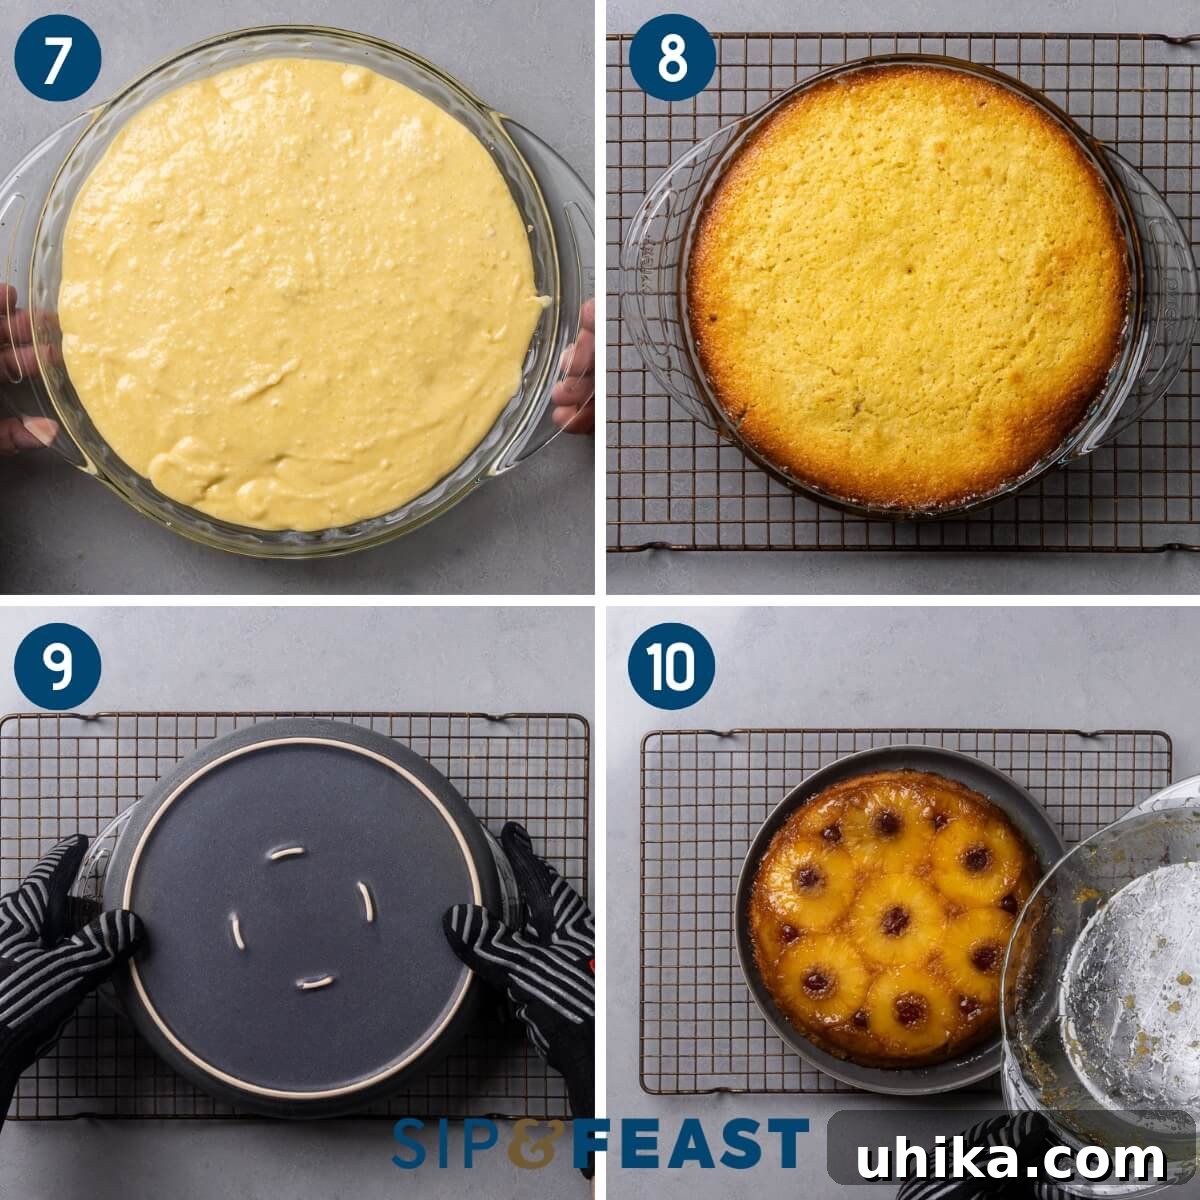
- Once baked, remove the pie dish from the oven and place it on a wire rack to cool for precisely 10 minutes. This cooling period is critical: it allows the caramelized topping to set slightly, making it firm enough to hold its shape but still warm and fluid enough to release easily from the pan.
- After 10 minutes, carefully (and always wearing oven mitts, as the dish will still be quite hot) place a large serving plate or platter upside down directly over the pie dish. In one swift, confident motion, invert the cake onto the plate. Gently lift the pie plate away from the cake, revealing your beautifully caramelized pineapple and cherry topping. Allow the cake to cool a bit more before slicing into generous portions and enjoying this delightful classic!
Expert Tips for the Perfect Pineapple Upside Down Cake
Achieving a picture-perfect and delicious Pineapple Upside Down Cake is easier with these tried-and-true tips:
- Thoroughly Prepare the Baking Dish: Don’t skip or skimp on buttering the sides of your pie dish. This meticulous step is paramount to ensure the caramelized topping releases flawlessly and the cake comes out cleanly when inverted. A well-buttered pan is your best friend for a successful flip.
- Blot the Pineapple Rings: Excess moisture from canned pineapple can make your cake soggy or dilute the rich caramel topping. Take the time to gently pat both sides of the pineapple slices dry with paper towels before arranging them in the pan. This simple step makes a significant difference in the final texture and presentation.
- Use Room Temperature Ingredients: This is a golden rule for many baking recipes, and it’s especially true for this cake. Ensure your eggs, milk, pineapple juice, and especially your butter are at room temperature. Ingredients at a similar temperature emulsify better, creating a smoother, more uniform batter and a finer crumb in the finished cake.
- Avoid Overmixing the Batter: Once you start incorporating the dry ingredients with the wet, mix only until just combined. Overmixing develops the gluten in the flour, which can lead to a tough, chewy cake rather than a tender and moist one. A few small lumps are perfectly acceptable.
- The Critical 10-Minute Cool Down: The instruction to cool the cake for exactly 10 minutes before flipping is not arbitrary. This specific timing allows the hot caramel topping to cool and firm up just enough to cling to the pineapple and the cake, preventing it from running everywhere. It also gives the cake a moment to settle, making it less likely to break when inverted. Always use oven mitts, as the dish will still be very hot.
- Consider Your Pan Choice: While a 9-inch pie dish is traditional, a 9-inch cast iron skillet or a standard 9-inch round cake pan (ensure it’s deep enough) can also work beautifully. Cast iron is particularly good for caramelization due to its even heat distribution.
Serving Suggestions for Your Delicious Cake
This Pineapple Upside Down Cake is truly magnificent on its own, but a few simple additions can elevate the experience even further. Serve it warm, perhaps with a generous scoop of vanilla bean ice cream that melts enticingly into the warm, caramel-y fruit. A dollop of freshly whipped cream provides a lovely contrast in texture and richness, while a sprinkle of toasted coconut flakes can enhance the tropical notes. It’s also wonderful simply dusted with a little powdered sugar for a touch of elegance. Pair it with a cup of coffee or a glass of dessert wine for a truly indulgent treat.
Storage and Make-Ahead Tips
One of the beauties of Pineapple Upside Down Cake is how well it keeps. If you have any glorious leftovers (which is rare!), simply store the cake tightly covered with plastic wrap or in an airtight container in the refrigerator for up to 5 days. For optimal flavor and texture, allow slices to come to room temperature for about 30 minutes before serving, or gently warm them in the microwave for a few seconds. This cake can also be made a day in advance; its flavors often deepen and meld beautifully overnight. Store it covered at room temperature if your kitchen is cool, or in the refrigerator if it’s warm. Freezing is possible for longer storage (up to 2-3 months); wrap individual slices or the whole cake tightly in plastic wrap and then foil. Thaw in the refrigerator overnight.
Creative Variations to Try
While the classic Pineapple Upside Down Cake is perfection, it’s also wonderfully adaptable. Feel free to experiment with these delicious variations:
- Different Fruits: Try sliced peaches, apples, pears, or even thinly sliced oranges for a unique twist. You might need to adjust the sugar in the topping depending on the fruit’s sweetness.
- Spice It Up: Add a pinch of cinnamon, nutmeg, or a dash of ginger to the cake batter for a warm, spiced flavor profile.
- Caramel Enhancements: A splash of rum or bourbon in the melted butter and brown sugar mixture before adding the fruit can add a sophisticated depth of flavor to the caramel.
- Nutty Crunch: Sprinkle a layer of chopped pecans or walnuts over the brown sugar before adding the pineapple for an added layer of crunch and flavor.
- Coconut Infusion: Substitute some of the milk with coconut milk in the cake batter and add a touch of coconut extract for a more tropical cake.
More Beloved Retro Desserts to Explore
If you’re craving more delightful desserts that harken back to a simpler, more charming era, be sure to give these beloved recipes a try. They are sure to bring a smile to your face and transport you back in time:
- Classic Apple Pie: A quintessential American dessert, perfect for any season.
- New York Crumb Cake: Rich, buttery cake with a thick, irresistible streusel topping.
- Easy Old-Fashioned Baked Apples: A comforting and healthy dessert that’s simple to make.
If you’ve enjoyed baking and tasting this wonderful Pineapple Upside Down Cake recipe, we’d be thrilled if you considered giving it a 5-star rating below!
Don’t forget to connect with us! Watch our culinary adventures on YouTube, follow along on our Facebook Page, and for exclusive full-meal videos and behind-the-scenes content, consider becoming a Patreon member. Your support helps us create more delicious recipes!
Easy Pineapple Upside Down Cake
James Delmage
25 mins
45 mins
1 hr 5 mins
8

Caramelized brown sugar, juicy pineapple, and vibrant maraschino cherries crown a moist, tender vanilla cake, creating an irresistible retro classic. This easy pineapple upside down cake is perfect for any gathering or a delightful treat on a quiet evening.
Ingredients
For the topping
- 1/4 cup unsalted butter, melted
- 1/2 packed cup light or dark brown sugar
- 9 slices canned pineapple rings, patted dry to remove excess moisture
- Maraschino cherries
For the cake
- 1 1/2 cups cake flour (can also use all-purpose flour)
- 1 1/2 teaspoons baking powder
- 1/2 teaspoon fine sea salt
- 1/2 cup unsalted butter, room temperature
- 3/4 cup granulated sugar
- 2 large eggs, room temperature
- 2 teaspoons vanilla extract
- 1/4 cup pineapple juice (from can, room temperature)
- 1/4 cup milk, room temperature
Instructions
- Preheat oven to 350°F (175°C).
- Pour the melted butter into a deep 9-inch pie dish. Thoroughly grease the plate sides with the butter as well. Sprinkle the brown sugar all over the butter. Place the pineapple slices into the plate in a uniform pattern without overlapping. Cut the remaining pieces to fill any empty spots around the sides of the pie dish. Place a cherry into each pineapple ring hole, including any half slices.
- In a small bowl, combine the cake flour, baking powder, and salt.
- In a large bowl, with a hand mixer, cream the room temperature butter and granulated sugar. Mix in the eggs, one at a time, until fully incorporated. Mix in the vanilla extract and pineapple juice.
- Using a spatula, gently fold a portion of the dry ingredients and milk into the wet ingredients, alternating, until all of the milk, wet, and dry ingredients are just combined. Make sure to not overmix the batter.
- Pour the cake batter into the pie dish, spreading evenly over the fruit. Bake for 20 minutes, then loosely cover with foil and continue to bake for an additional 25-30 minutes, or until a toothpick inserted in the center comes out mostly clean.
- Place the pie dish on a wire rack to cool for exactly 10 minutes. Then, carefully (the dish will still be hot, so use oven mitts) invert and flip the cake onto a serving plate. Gently remove the pie plate and serve warm. Enjoy!
Notes
- Servings: This recipe makes approximately 8 large or 10-12 smaller slices.
- Pineapple Preparation: You will need about 7 whole rings and pieces from 2 more rings. Make sure to pat all pineapple pieces dry with paper towels to remove excess moisture.
- Flour Choice: Cake flour is recommended for a lighter and fluffier cake, but all-purpose flour will work well too.
- Sticking and Flipping: Generously buttering the pie dish sides and flipping after precisely 10 minutes of cooling will ensure the cake won’t stick and releases beautifully. The pie dish will still be quite hot after 10 minutes, so always use gloves or oven mitts.
- Oven Calibration: This recipe was developed for a conventional oven. If using a convection oven, reduce the temperature by 25°F (about 15°C) and begin checking for doneness at the 75% mark of the total baking time.
- Leftovers: Pineapple upside down cake can be stored, tightly covered, in the refrigerator for up to 5 days. For best taste, bring to room temperature or gently warm before serving.
Nutrition
Carbohydrates: 62g |
Protein: 6.1g |
Fat: 19.9g |
Saturated Fat: 11.8g |
Cholesterol: 139mg |
Sodium: 192mg |
Fiber: 0.8g |
Sugar: 42.3g |
Calcium: 63mg |
Iron: 1mg
Nutrition information is automatically calculated and should be used as an approximation.
Enjoyed this recipe? Leave a comment below!
Check us out on Instagram at @sipandfeast or tag #sipandfeast!