
The Ultimate Guide to New England Steamer Clams: A Sweet, Briny Delight
There’s a quintessential East Coast charm to a bowl of freshly steamed clams, especially the variety affectionately known as “steamers.” Officially recognized as soft-shell Atlantic clams (Mya arenaria), these delectable bivalves are a culinary staple, particularly in the New England region, where they grace tables from casual beach shacks to upscale seafood restaurants. Their delicate flavor, tender texture, and straightforward preparation make them an irresistible appetizer or a delightful main course. If you’ve ever enjoyed a classic New England seafood dinner, chances are you’ve encountered these unique shellfish, often served with nothing more than hot broth and melted butter for dipping.
Easily identified by their distinctive, elongated siphon that protrudes from one side of their shell, steamers have earned the charming nickname “long-necks.” While their appearance might suggest a robust, hard exterior, their shells are notably thinner and more fragile than those of their hard-shelled cousins, such as quahogs, littlenecks, or cherrystones. This delicate shell is part of what makes them so special, allowing for quick cooking and a uniquely tender bite. Join us as we explore everything you need to know about preparing and enjoying these oceanic treasures, ensuring a perfect, grit-free experience every time.
Understanding Steamer Clams: Identification and Flavor Profile
The “Long-Neck” Mystery: Anatomy and Characteristics
Steamer clams are fascinating creatures of the sea. Their defining feature, the long siphon, is essentially a flexible tube that extends into the water, allowing the clam to draw in oxygen and nutrients (incurrent siphon) and expel waste (excurrent siphon) while remaining buried safely beneath the sand or mud. This siphon can be quite long, often extending several inches beyond the shell, which gives them their playful “long-neck” moniker. Unlike hard-shelled clams that can tightly seal their shells, soft-shell clams cannot fully retract their siphon, leaving a small opening that contributes to their reputation for containing sand if not properly purged.
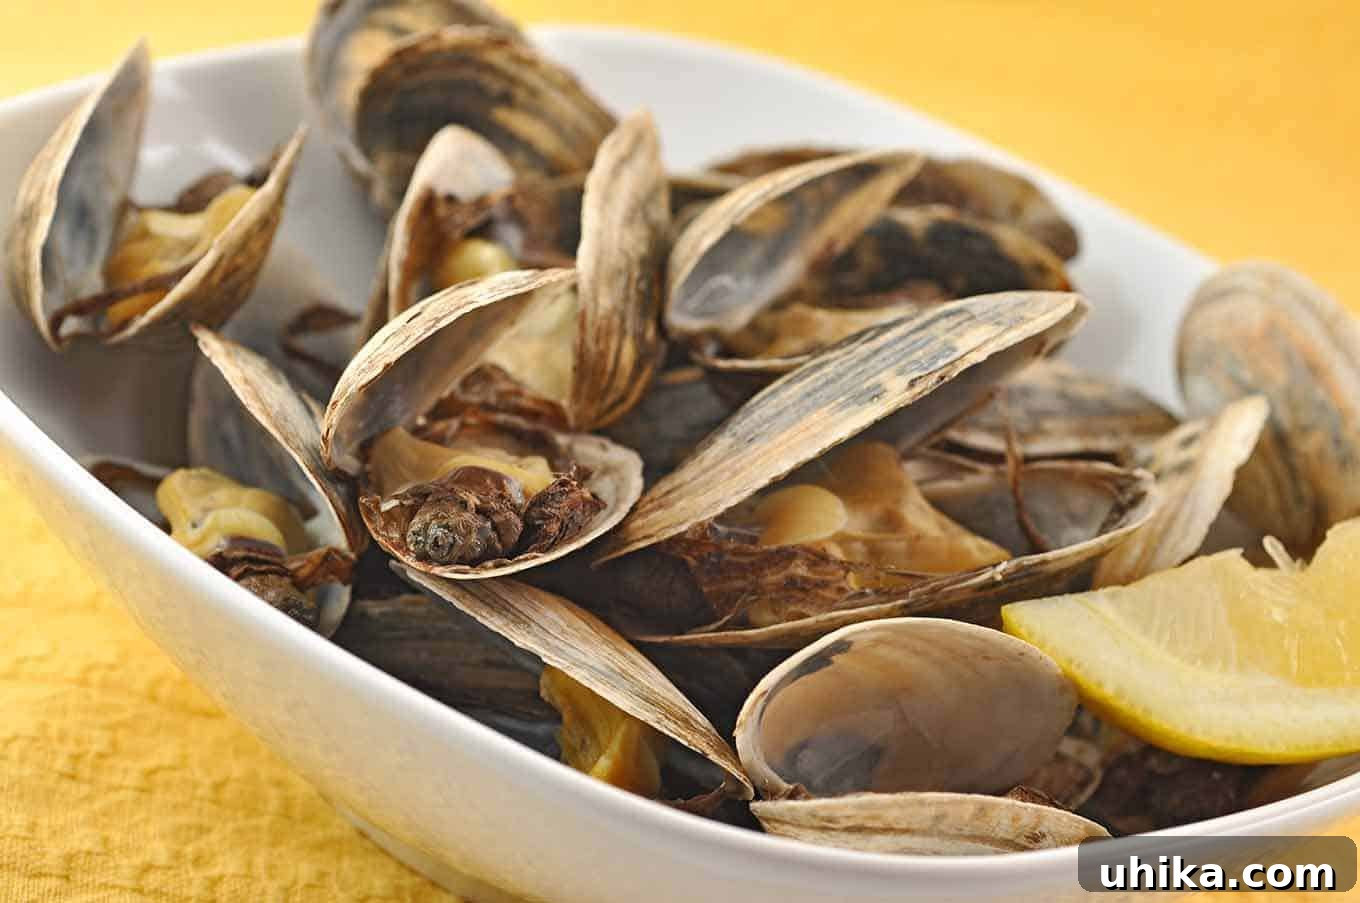
Their shells, while not truly “soft,” are noticeably more brittle and thinner than other clam varieties. They typically have an off-white to grayish color and an oval shape. When cooked, their shells gape open, revealing the plump, succulent meat within. The meat itself is sweet, tender, and possesses a distinct brininess that speaks to its marine origin. The siphon, though often considered the chewier part, is surprisingly flavorful and, after a quick skinning, offers a delightful textural contrast.
A Taste of the Ocean: Flavor and Texture
The flavor of a perfectly cooked steamer clam is a true testament to its natural environment. It’s a delicate balance of sweet and salty, with a clean, ocean-fresh taste that isn’t overwhelmingly fishy. The meat is incredibly tender, almost melting in your mouth, while the siphon provides a slightly firmer, satisfying chew. This unique combination makes them incredibly versatile, though they truly shine when prepared simply, allowing their natural flavors to be the star. The broth produced during steaming also captures these essence, becoming a savory elixir perfect for dipping.
Soft-Shell vs. Hard-Shell: A Comparative Look
It’s important to distinguish steamer clams from their hard-shelled counterparts, which include varieties like littlenecks, cherrystones, and quahogs. Hard-shelled clams have thick, robust shells that can close tightly, making them less prone to retaining sand. They are often eaten raw on the half-shell (littlenecks), grilled, baked, or used in chowders (cherrystones and quahogs). Steamer clams, with their thinner shells and distinctive siphons, are almost exclusively enjoyed cooked, typically steamed, which further tenderizes their delicate flesh.
Sourcing and Selecting the Freshest Steamer Clams
What to Look For
The success of your steamer clam dish begins with selecting the freshest possible shellfish. When purchasing steamer clams, look for ones that appear lively and have slightly open shells with a visible siphon. They should smell fresh, like the ocean, not overly fishy or sulfuric. Avoid any clams with cracked or broken shells, as these may be dead or dying and unsuitable for consumption. It’s also a good practice to gently tap any widely open shells; a live clam will often react by twitching its siphon or attempting to close slightly. If a clam remains wide open and unresponsive, it’s best to discard it.
Storage Tips
Once you bring them home, proper storage is crucial to maintain their freshness. Never store live clams in an airtight container or submerge them in fresh water, as this will suffocate them. Instead, place them in a single layer in a bowl or colander, cover them with a damp cloth or paper towel, and store them in the coldest part of your refrigerator. They can typically be stored this way for 1-2 days. It’s best to prepare them as soon as possible after purchase for optimal flavor and texture.
Essential Preparation: Purging Steamer Clams for a Gritty-Free Experience
One of the most critical steps in preparing steamer clams is purging them. Because soft-shell clams don’t close as tightly as hard-shell varieties and live in sandy or muddy environments, they often contain a small amount of sand within their digestive systems. Skipping this step can lead to an unpleasantly gritty meal, detracting significantly from the otherwise delightful experience. Purging ensures that your clams release any ingested sand, leaving you with perfectly clean, enjoyable shellfish.
Why Purge? The Science Behind It
Clams are filter feeders, constantly drawing water through their siphons to extract plankton and other tiny food particles. In doing so, they inevitably take in sand and sediment from their habitat. To purge them, we create an environment that mimics their natural seawater, encouraging them to continue filtering. However, in our clean saltwater solution, they filter out the sand without taking in new particles. The salt content of the water is key; it needs to be similar to their natural environment to prevent them from clamping shut due to osmotic shock from fresh water.
The Saltwater Soak Method: Step-by-Step
The most effective and widely recommended method for purging steamer clams is a simple saltwater soak. Here’s how to do it:
- Prepare the Clams: Gently rinse your clams under cold running water to remove any loose debris or mud from their shells.
- Mix the Saltwater Solution: In a large, non-reactive bowl or container, prepare a saltwater solution. The ideal ratio is 1 tablespoon of sea salt (or 2-3/4 teaspoons of table salt) per quart of cold water. Ensure the salt is thoroughly dissolved. Using non-iodized salt is often preferred, but regular table salt works too.
- Soak the Clams: Submerge the clams completely in the saltwater solution. Make sure there’s enough room for them to breathe and filter. Avoid overcrowding the bowl.
- Purge Duration: Allow the clams to soak for a minimum of 2-3 hours. For particularly sandy clams, or if you have the time, you can extend the soak up to 4-6 hours, changing the water every hour or two. You might notice small amounts of sand at the bottom of the bowl, indicating the purging process is working.
- Optimal Conditions: Keep the bowl in a cool place, ideally the refrigerator, to maintain the water temperature and keep the clams calm. Some people also suggest placing a dark cloth over the bowl to mimic their buried environment, which can encourage filtering.
Rinsing and Final Checks
After the purging period, carefully remove the clams from the saltwater bath, leaving any settled sand behind. Drain them thoroughly and give them a light final rinse under cold, running water. At this point, your steamer clams are ready for cooking, ensuring a delightfully grit-free experience.
New England Steamer Clams Recipe: Simple, Classic, Delicious
★
★
★
☆
Steamer Clams, New England Style
Rate Recipe
Print Recipe
Ingredients
- 4 lbs steamer clams, purged and cleaned
- 1/4 lb unsalted butter, melted
- 1 lemon, halved, one half juiced, the other cut into wedges
Instructions
-
First, ensure your clams are thoroughly purged and cleaned following the directions listed in the tips section above. This step is crucial for a grit-free dining experience.
-
Add approximately 1 inch of fresh water to the bottom of a large pot equipped with a tight-fitting lid. Bring the water to a gentle simmer over medium-high heat. Once simmering, carefully add the cleaned clams into the pot. Immediately cover the pot with the lid and allow the clams to steam until all the shells have opened wide. This process typically takes about 10 to 12 minutes, depending on the size and quantity of the clams. Discard any clams that do not open.
-
While the clams are steaming, prepare your melted butter. In a small saucepan or microwave-safe dish, melt the unsalted butter until it is completely liquid. Squeeze the juice from half of your lemon directly into the melted butter and stir to combine. Pour this savory lemon-butter mixture into individual small serving dishes, setting them aside for dipping. Cut the remaining half of the lemon into four wedges to be served alongside the clams.
-
Once all the clams have opened fully, indicating they are cooked, carefully use a slotted spoon to scoop the steamed clams into a large serving bowl. Next, gently pour the flavorful clam broth from the bottom of the pot into separate individual serving dishes. This broth is an essential component for dipping, capturing the essence of the clams and sea.
-
Note: If you observe any accumulated sand or sediment at the bottom of the pot after cooking, you may wish to strain the broth through a fine-mesh sieve lined with cheesecloth before serving. This ensures a perfectly clear and clean dipping broth.
-
To enjoy, pick up a clam, remove the tender meat from its shell. Gently strip off the thin, slightly tougher skin from the clam’s neck (siphon). Dip the clam first into the warm, savory broth, then into the rich, melted lemon butter. Savor the delicate flavors and textures that make New England steamer clams a timeless delicacy.
Notes
For the freshest taste, serve these steamer clams immediately after cooking. The delicate flavor and texture are best enjoyed hot off the steamer.
Nutrition
Total Fat: 32g,
Cholesterol: 365mg,
Sodium: 5456mg,
Carbohydrates: 25g,
Fiber: 1g,
Sugar: 1g,
Protein: 116g
Nutrition information is automatically calculated and should only be used as an approximation. Actual values may vary based on ingredients and preparation methods.
Serving Steamer Clams: Beyond Butter and Lemon
The Traditional Dipping Experience
The traditional New England way to enjoy steamer clams is undeniably simple yet incredibly satisfying. The ritual involves plucking a clam from its shell, gently peeling off the skin from its “neck,” and then dipping it first into the warm, flavorful broth from the steaming pot, followed by a dunk in rich, melted butter, often infused with lemon juice. The broth acts as a natural cleanser, washing away any remaining minute grit and enhancing the clam’s inherent briny flavor. The butter provides a luxurious counterpoint, adding richness and a silky mouthfeel that perfectly complements the tender clam meat. This classic approach celebrates the pure taste of the ocean.
Creative Pairings and Side Dishes
While the traditional method is supreme, steamer clams can also be elevated with a few thoughtful additions. For a full New England experience, serve them alongside corn on the cob, boiled new potatoes, and perhaps some steamed lobster or crab for a delightful seafood feast. A crisp, green salad with a light vinaigrette can also provide a refreshing contrast. For dipping, consider adding a dash of hot sauce to your melted butter for a subtle kick, or a pinch of fresh herbs like parsley or dill for an aromatic twist. A crusty baguette is also a welcome companion, perfect for soaking up any leftover broth and butter.
Health Benefits of Clams: A Nutritional Powerhouse
Beyond their exquisite taste, steamer clams offer a impressive array of nutritional benefits, making them a healthy addition to any diet. They are an excellent source of lean protein, essential for muscle repair and growth, without adding excessive fat. Clams are also remarkably rich in vital minerals and vitamins. They are particularly high in iron, which is crucial for blood health and energy production, and zinc, an important mineral for immune function and wound healing. Furthermore, clams are one of the best natural dietary sources of Vitamin B12, which plays a key role in nerve function and the production of red blood cells. They also provide a good amount of omega-3 fatty acids, known for their heart-healthy benefits, and other B vitamins. Enjoying steamer clams means indulging in a delicious meal that also contributes significantly to your overall well-being.
Troubleshooting Common Issues
What if clams don’t open?
During the steaming process, it’s crucial that all clams open wide. A clam that remains tightly closed after the recommended cooking time is likely dead and should be discarded. Never force open a closed clam, as it could be spoiled and pose a health risk. The reason a clam might not open is often due to it being dead before cooking, or perhaps it was not properly purged and is holding onto too much sand, preventing it from relaxing and opening. Ensure you discard these for safety.
Avoiding grit
The primary way to avoid grit is thorough purging, as detailed in our preparation section. However, if you find your cooked clams are still a bit sandy, it usually means the purging process wasn’t quite long enough, or the saltwater solution wasn’t optimal. For future attempts, consider extending the soak time or ensuring the water temperature remains cold. After cooking, carefully remove clams from the pot using a slotted spoon, leaving any residual sand at the bottom of the cooking liquid, especially if you haven’t strained the broth for dipping.
More Delicious Clam Recipes
If you’ve fallen in love with the flavor of clams, there’s a whole world of culinary possibilities to explore. From hearty pasta dishes to crispy baked appetizers, clams can star in a variety of preparations. Here are a couple of other fantastic clam recipes to expand your seafood repertoire:
- Linguine with Red Clam Sauce
- Clams Casino
Conclusion: Your Next Seafood Adventure
Steamer clams are more than just a meal; they are an experience, a taste of New England’s rich culinary heritage. With their sweet, briny flavor and tender texture, they offer a simple yet profound connection to the ocean. From understanding their unique characteristics and meticulously preparing them to the joy of dipping them in savory broth and melted butter, every step of the journey is rewarding. Whether you’re a seasoned seafood lover or new to the world of shellfish, this guide provides all the knowledge you need to confidently select, clean, cook, and savor these incredible “long-necks.” Gather your ingredients, prepare your pot, and embark on a delicious seafood adventure that promises to delight your palate and transport you to the sun-kissed shores of the Atlantic. Enjoy your perfectly steamed, grit-free New England steamer clams!