
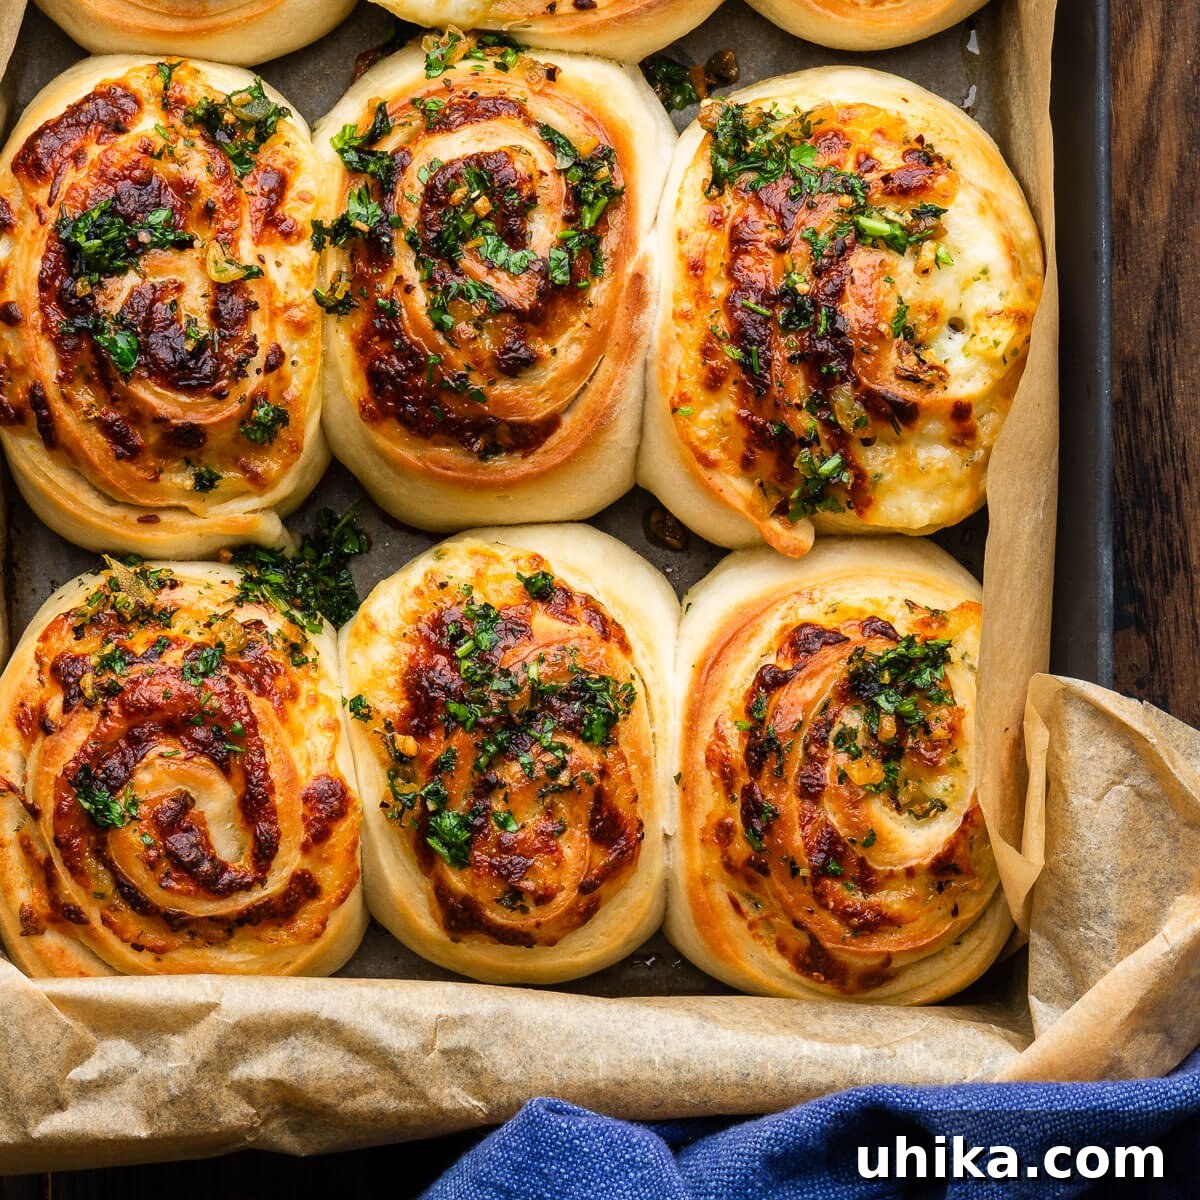
Irresistibly Cheesy Garlic Rolls: Your New Favorite Dinner Companion
Step aside, bland dinner rolls, because these homemade Cheesy Garlic Rolls are here to revolutionize your mealtime! Bursting with savory garlic, two types of melting cheese, and wrapped in a perfectly chewy crust, these rolls are not just delicious – they are an experience. Easier to master than you might imagine, they’re the ultimate comfort food, perfect for soaking up hearty soups, enhancing festive holiday feasts, or simply enjoying as a decadent snack any day of the week.
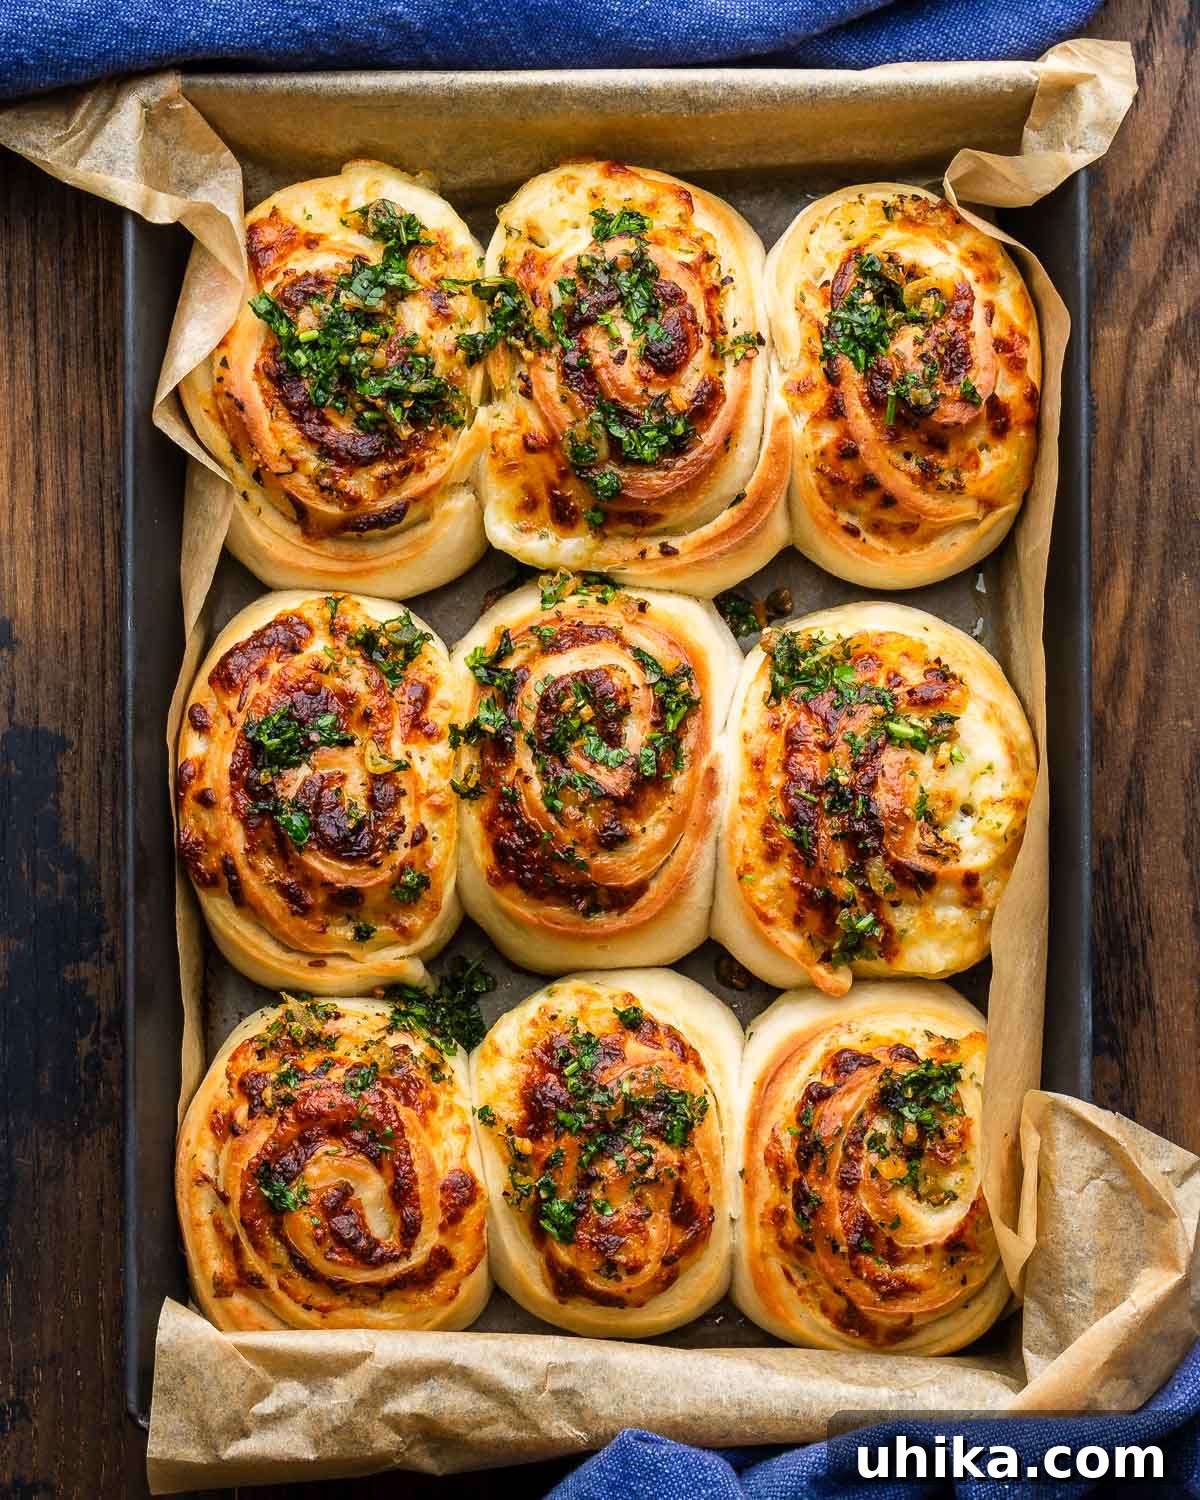

Why You’ll Fall in Love with These Amazing and Easy Rolls
Few things ignite the senses quite like the intoxicating aroma of my cheesy garlic rolls as they emerge, golden and bubbling, from the oven. It’s a scent that promises warmth, comfort, and pure culinary delight. This recipe, developed with a versatile dough base similar to my popular New York-style pizza and classic garlic knots, achieves a remarkable balance of textures and flavors. Each bite offers a wonderfully chewy interior, generously infused with fragrant garlic, the sharp tang of Pecorino Romano, and the irresistible melt of mozzarella cheese.
Beyond their incredible taste, what makes these rolls truly special is their surprising simplicity. They are straightforward to prepare, making them accessible even for novice bakers, and even easier to enjoy! I find myself frequently making these for special occasions and holidays, where they consistently impress guests. Imagine them gracing your Christmas dinner table or adding an extra layer of flavor to your Easter spread. But their appeal isn’t limited to celebrations; they are also a phenomenal accompaniment to everyday meals. There’s nothing quite like dipping one of these warm, cheesy rolls into a comforting bowl of Italian lentil soup or a rich, hearty minestrone. Their versatility and universally loved flavor profile make them a must-try for any home cook looking to elevate their bread game.
Essential Ingredients for Your Cheesy Garlic Rolls
Crafting these delectable rolls begins with understanding the role each ingredient plays. Below, you’ll find a visual overview of everything you’ll need, followed by detailed notes and tips to help you select the best components for your bake.
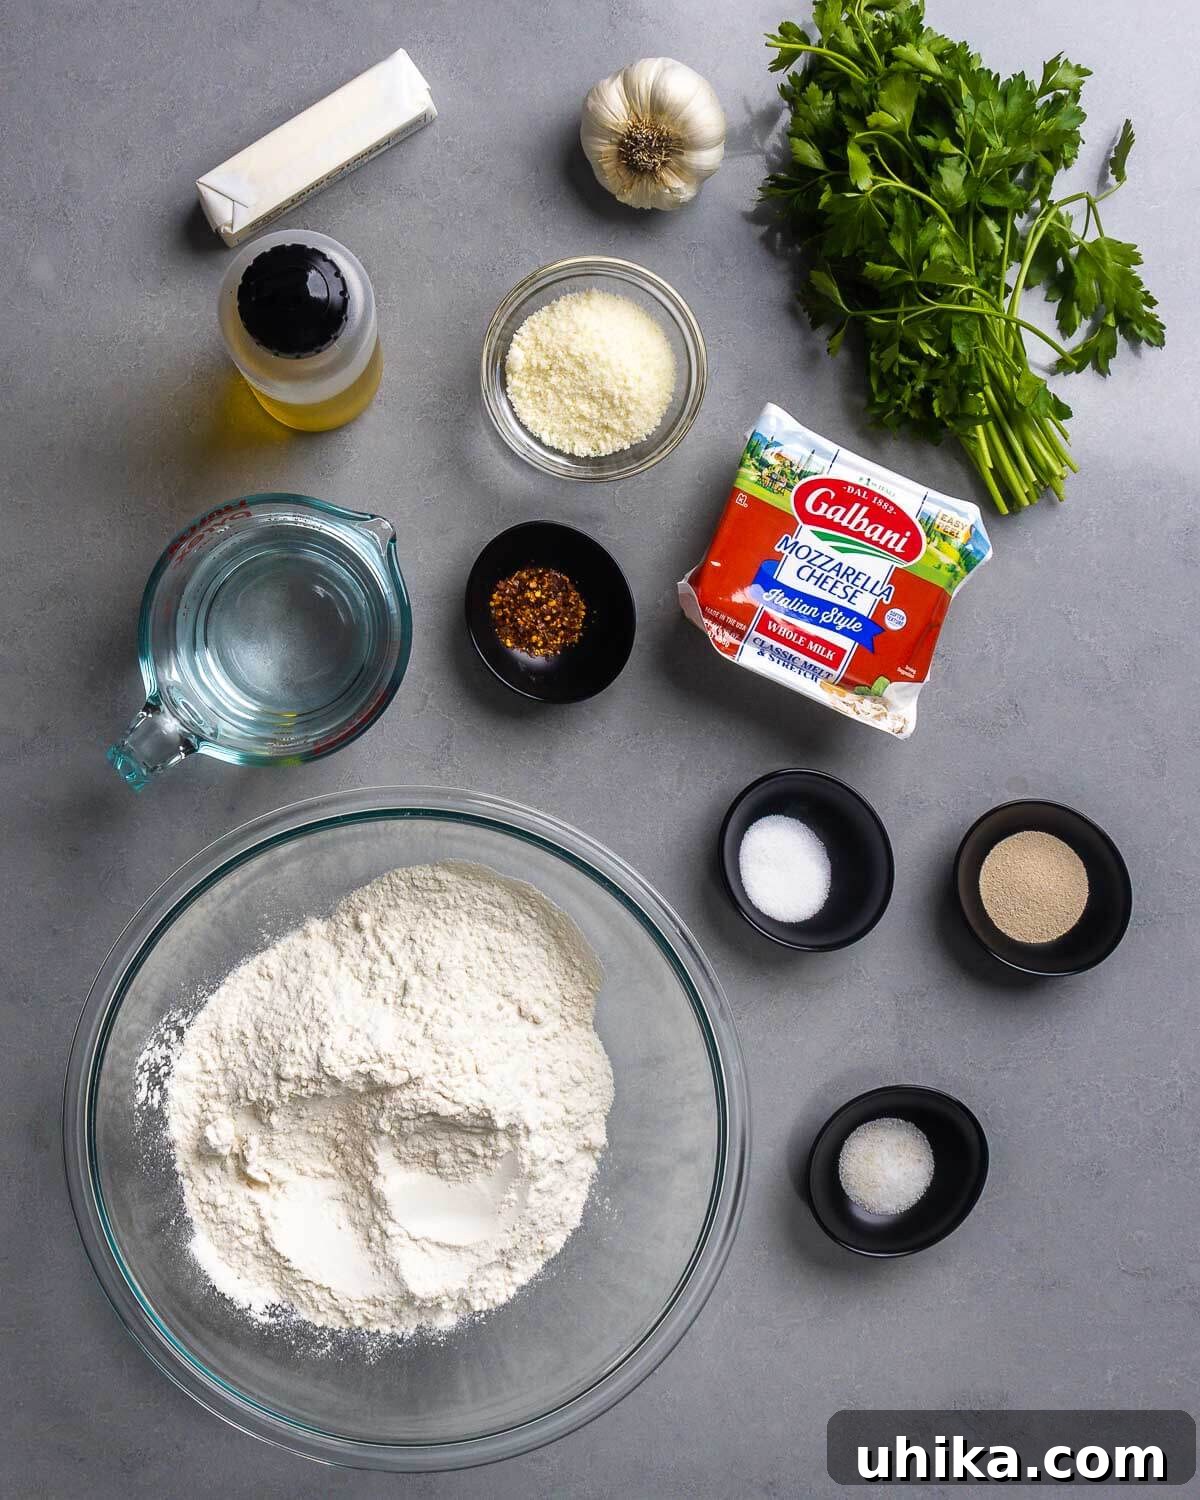
For the Dough
- Flour: For the characteristic chewiness that makes these rolls so satisfying, bread flour is the top recommendation. Its higher protein content facilitates excellent gluten development, resulting in a more elastic and chewy dough. However, if bread flour is not available, all-purpose flour can be used as a convenient substitute, though the final texture may be slightly softer with less chew.
- Yeast: I highly recommend using instant yeast (my go-to is SAF brand) for its incredible ease of use. It can be added directly to your dry ingredients without the need for prior proofing in a warm liquid, saving you a step and ensuring consistent results. If you opt for active dry yeast, it’s crucial to proof it first: sprinkle it over warm water (approximately 105-115°F or 40-46°C) and let it sit for 5-10 minutes until a foamy layer appears. This confirms the yeast is active and ready to work before you combine it with your dry ingredients.
- Sugar: A small measure of granulated sugar serves a dual purpose: it provides a food source for the yeast, helping to kickstart fermentation, and contributes to the beautiful golden-brown crust of your baked rolls.
- Salt: Fine sea salt is used not only to season the dough but also to help control the yeast’s activity, ensuring a steady and well-structured rise.
- Water: The temperature of the water is vital for yeast activation. Aim for warm water around 110°F (43°C). Water that is too hot can kill the yeast, while water that is too cold will inhibit its activation, leading to a sluggish or failed rise.
- Olive Oil: A touch of good quality olive oil enriches the dough, enhancing its flavor, improving its elasticity, and contributing to a wonderfully soft and tender crumb in the final rolls.
For the Garlic Butter
- Olive Oil & Unsalted Butter: The combination of these two fats creates a luxurious, rich, and flavorful base for our aromatic garlic butter. Using unsalted butter allows you to control the overall saltiness of the dish, and having it at room temperature will ensure it melts and blends smoothly.
- Fresh Garlic: This is where the magic truly happens! A generous amount of freshly minced garlic is non-negotiable for achieving that deep, pungent, and utterly irresistible garlic flavor that permeates every layer of these rolls.
- Hot Red Pepper Flakes: A teaspoon of hot red pepper flakes introduces a subtle, welcome warmth and a gentle kick that beautifully complements the savory cheeses and garlic. Feel free to adjust the quantity based on your personal preference for heat.
- Fresh Parsley: Minced flat-leaf Italian parsley adds a burst of freshness and a vibrant, herbaceous note that brightens the overall flavor profile of the garlic butter, along with a lovely visual touch.
For the Filling
- Shredded Mozzarella Cheese: Low-moisture, whole-milk shredded mozzarella is ideal for its superior melt. It provides that classic, gooey, stretchy cheese pull that makes these rolls so appealing. For the best texture and flavor, I always recommend shredding a block of mozzarella yourself rather than buying pre-shredded varieties.
- Grated Pecorino Romano Cheese: This sharp, salty, and intensely flavorful Italian sheep’s milk cheese adds a profound depth of savory character that perfectly balances and enhances the milder mozzarella and robust garlic.
For a detailed breakdown of all ingredients and precise quantities for this recipe, please consult the complete recipe card provided further down.
Step-by-Step Guide to Making Irresistible Cheesy Garlic Rolls
Creating these delicious, homemade cheesy garlic rolls is a rewarding experience. Follow these comprehensive steps to guide you through each stage of the process, from preparing the dough to achieving golden-brown perfection.
- Combine Dry Dough Ingredients: In a large mixing bowl, begin by combining the bread flour, granulated sugar, fine sea salt, and instant yeast. Use a whisk to thoroughly mix these dry ingredients, ensuring they are evenly distributed. This step is crucial for consistent yeast activity and flavor throughout your dough.
- Add Liquids and Form Shaggy Dough: Next, add the warm water (aiming for approximately 110°F or 43°C, which is comfortably warm to the touch but not hot) and the olive oil to the dry mixture. Using a sturdy spatula or a wooden spoon, mix everything together until all the flour is fully hydrated and a rough, shaggy, yet cohesive dough ball starts to form. There’s no need for it to be smooth at this stage; a shaggy texture is perfectly normal.
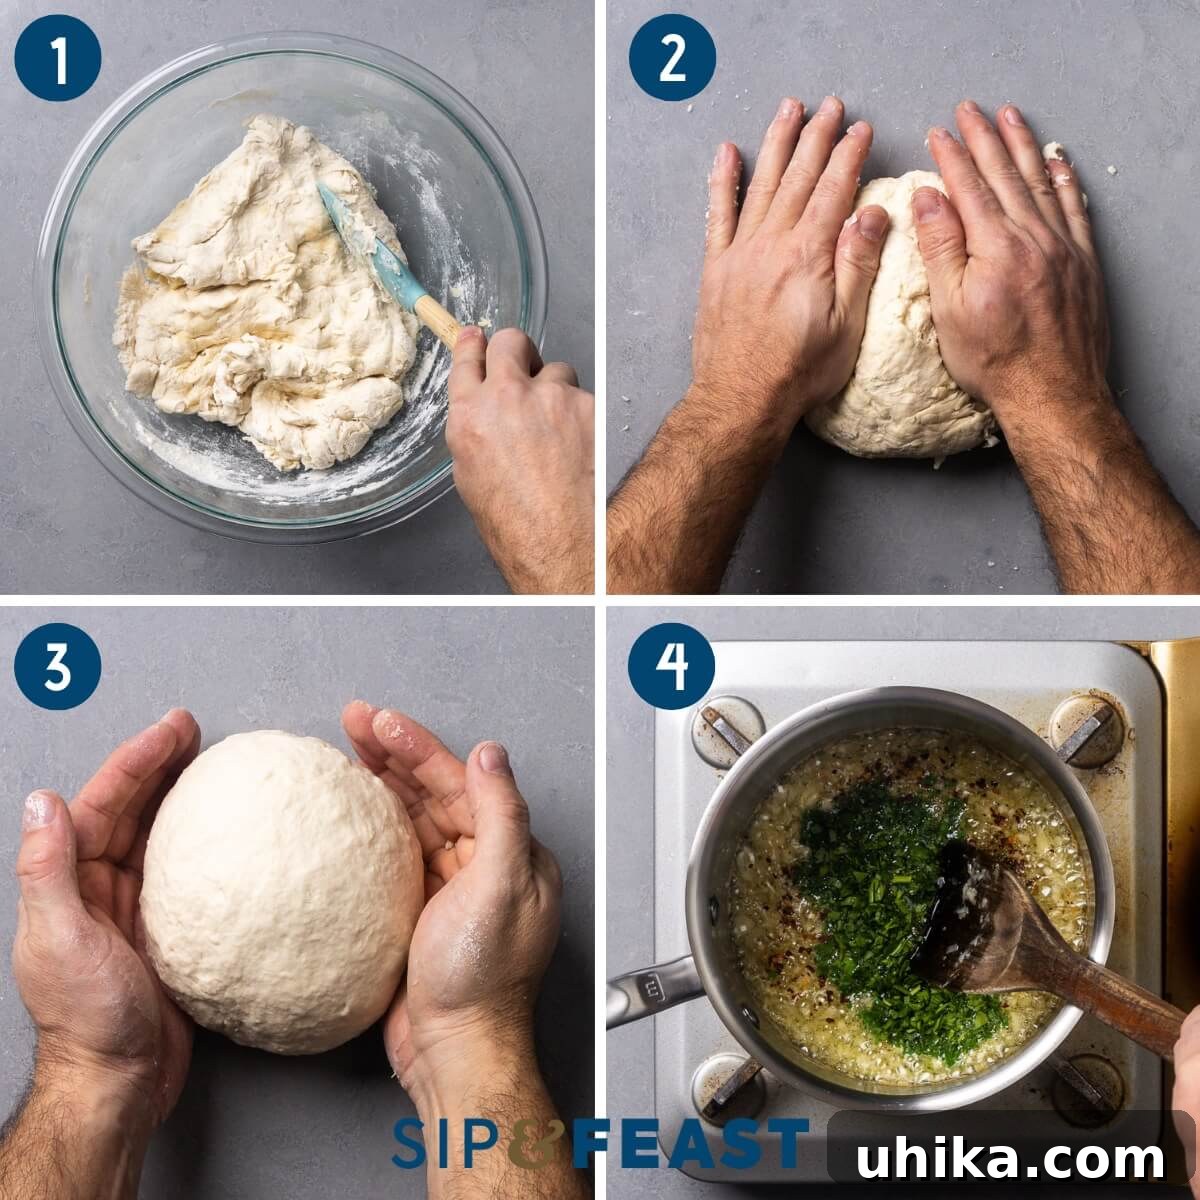
- Knead the Dough to Smoothness: Transfer the shaggy dough from the bowl onto a lightly floured work surface. Begin kneading the dough actively for 5 to 8 minutes. During this process, the dough will transform, developing gluten and becoming smooth, elastic, and less sticky. If you find the dough is still excessively sticky and difficult to work with, gradually add an additional 1/4 cup of flour, a tablespoon at a time, kneading it in until you reach a smooth, pliable consistency.
- First Rise (Bulk Fermentation): Once your dough ball is smooth, lightly oil a clean bowl. Place the kneaded dough into the oiled bowl, turning it once to ensure all sides are lightly coated with oil. This prevents the dough from sticking and drying out. Cover the bowl tightly with plastic wrap and let the dough rise in a warm spot for about 30 minutes, or until it has visibly increased in size and appears slightly puffy.
- Prepare the Aromatic Garlic Butter: While your dough is undergoing its first rise, prepare the star-component: the garlic butter. Heat a small saucepot over medium heat. Add the olive oil and the room-temperature unsalted butter. Once the butter is fully melted and shimmering, add the minced garlic. Cook gently for a few minutes until the garlic becomes fragrant and turns a beautiful golden brown. Be very careful not to burn the garlic, as burnt garlic can taste bitter. Immediately stir in the hot red pepper flakes and the minced fresh parsley. Remove the saucepot from the heat and set the garlic butter aside to cool slightly.
- Roll Out the Dough Rectangle: After the dough has completed its first rise, gently transfer it to a lightly floured work surface. Lightly punch down the dough to release any accumulated air. Using a rolling pin, roll the dough out into a large, even rectangle, aiming for dimensions of approximately 13×17 inches (about 33×43 cm). Strive for a consistent thickness across the entire surface for even baking.
- Spread Garlic Butter and Pecorino: Take about two-thirds of the prepared garlic butter mixture and evenly spread it over the entire surface of the rolled-out dough, leaving a small, half-inch border along the edges. Follow this by generously sprinkling the grated Pecorino Romano cheese over the garlic butter layer. This pungent cheese will add a fantastic depth of flavor.
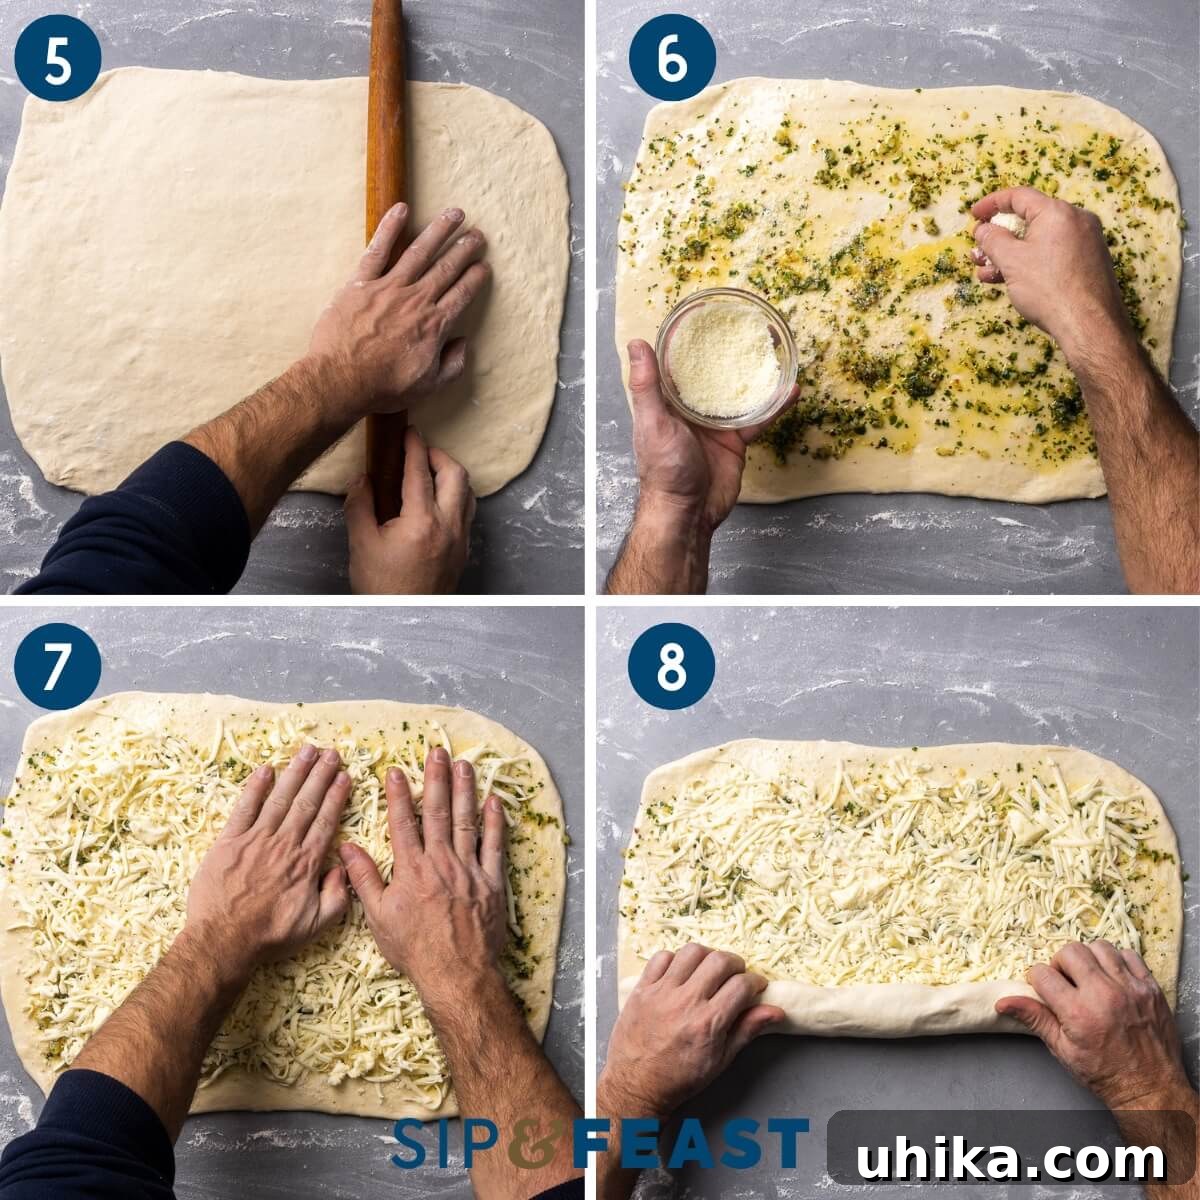
- Add Mozzarella and Press: Now, evenly sprinkle the shredded mozzarella cheese over the Pecorino Romano layer. Using your hands or a gentle spatula, lightly press the cheese into the dough and garlic butter mixture. This small action helps the cheese adhere securely, preventing it from falling out during the rolling and slicing process.
- Tightly Roll the Dough: Starting from one of the longer (17-inch) sides of the rectangle, carefully and tightly roll the dough into a long, uniform cylinder. A tight roll is essential for creating those beautiful swirls of cheese and garlic, and for ensuring the rolls hold their shape during baking.
- Slice the Individual Rolls: With a sharp knife, or for a particularly clean cut, unflavored dental floss, carefully remove about 1/2 inch from each end of the dough cylinder to create neat, even edges. Then, proceed to cut the cylinder into 9 or 12 equal-sized pieces. For larger, more substantial rolls, aim for 9 pieces; for slightly smaller, more delicate rolls, 12 pieces work perfectly.
- Arrange for Second Rise: Lightly grease a 9×13-inch baking dish, or line it with parchment paper for easy removal. Carefully arrange the sliced rolls in the prepared dish, ensuring there’s a small amount of space between each roll to allow for expansion during their final rise and baking. If you’ve opted for 12 rolls, you might find that a second, smaller baking dish (such as an 8×8-inch pan) is needed to accommodate them comfortably.
- Second Rise (Final Proofing): Once arranged, cover the baking dish(es) loosely with plastic wrap. Place them in a warm area and allow the rolls to undergo their second rise for 90 to 120 minutes, or until they have visibly doubled in size and appear wonderfully puffy and light.
Make-Ahead Tip: For ultimate convenience, especially when preparing for holidays, you can place the covered baking dish directly into the refrigerator immediately after arranging the rolls. They will undergo a slow, cold fermentation and rise gradually overnight, developing deeper, more complex flavors, and will be perfectly ready to bake the following morning.
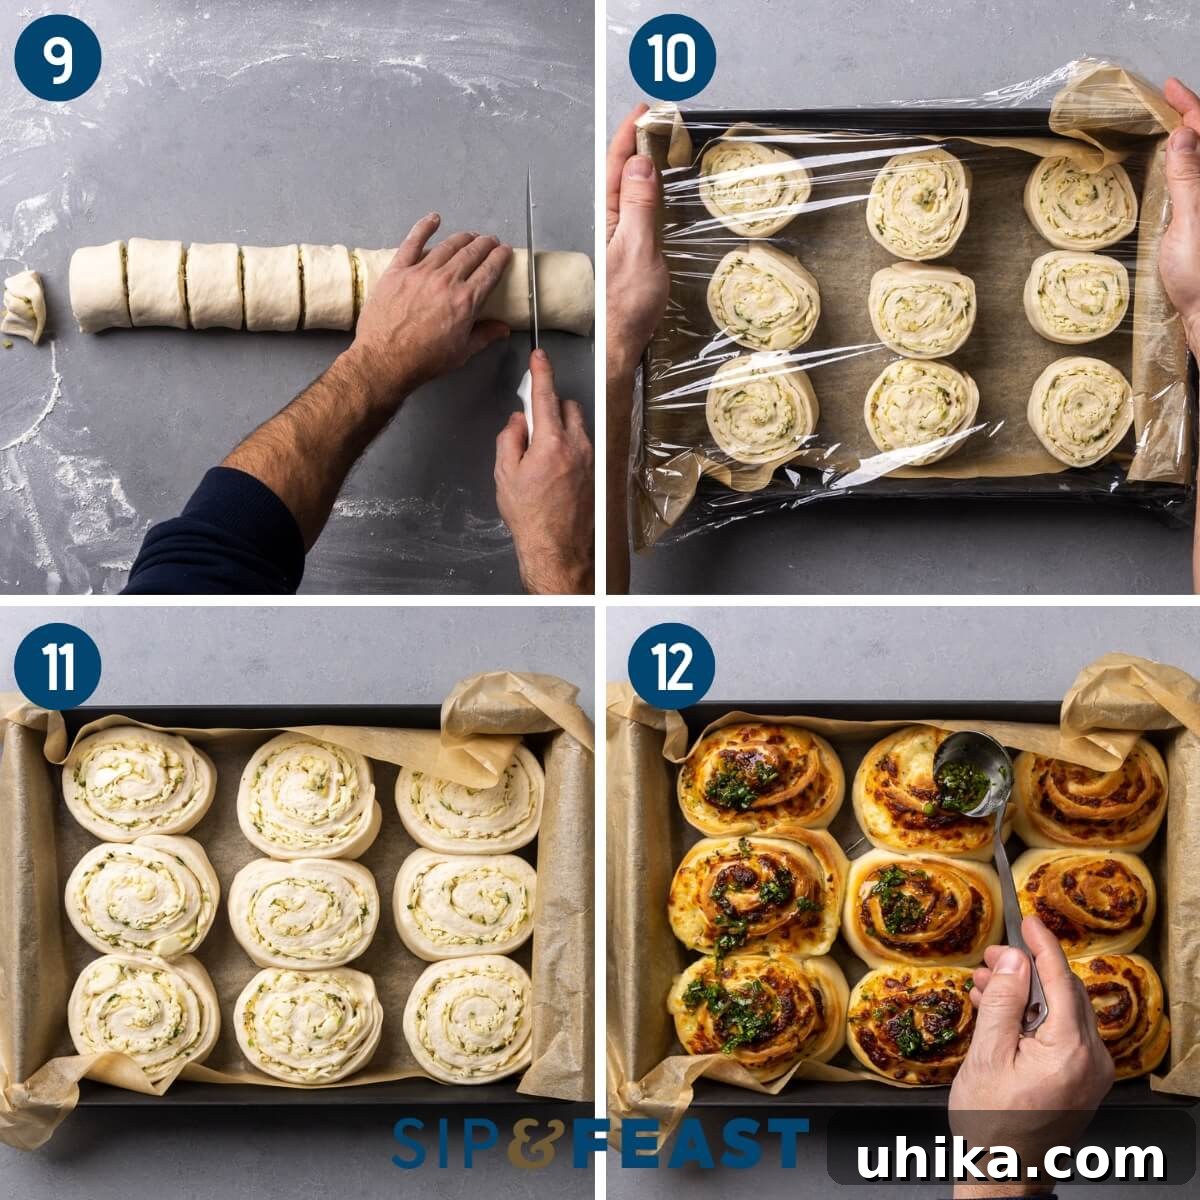
- Preheat Oven and Bake to Perfection: Preheat your oven to 425°F (220°C). Position an oven rack to the middle level, ensuring optimal heat circulation. Once your rolls have doubled in size during their final proofing, gently uncover them and place the baking dish(es) into the preheated oven. Bake for 18 to 23 minutes, or until the rolls achieve a beautiful golden-brown color on top and an instant-read thermometer inserted into the center of a roll registers an internal temperature of 195°F (90°C). If you notice the tops of the rolls browning too quickly before they are fully cooked, loosely tent them with aluminum foil for the remainder of the baking time.
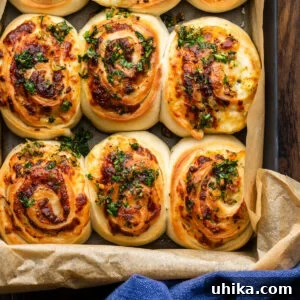
- Finish with Garlic Butter and Serve: As soon as the cheesy garlic rolls emerge from the oven, immediately warm up any remaining garlic butter mixture in your saucepot. Generously pour or brush this warm, incredibly aromatic butter over the tops of the hot rolls. The warm butter will soak into the crust, adding an extra layer of flavor and moisture. Serve these magnificent rolls right away, allowing everyone to savor every incredible, cheesy, garlicky bite!
Expert Tips for Flawless Cheesy Garlic Rolls
- Consider a Stand Mixer: While I often enjoy the tactile satisfaction of hand-kneading dough for smaller recipes like this, a stand mixer fitted with a dough hook can make the process significantly easier and less labor-intensive. If you choose this method, knead the dough on medium speed for approximately 5 minutes until it transforms into a smooth, elastic ball.
- Mastering Dough Proofing: Achieving the perfect rise is fundamental to creating light, airy, and fluffy rolls. During warmer seasons, a sunny spot in your kitchen often provides enough warmth. However, in colder winter months, finding an ideal warm environment can be a challenge. My personal favorite tool is a baking heat pad, precisely set to a consistent 78-80°F (25-27°C). Alternatively, you can create a warm, humid environment in your microwave: simply boil a cup of water, then turn off the microwave and leave the cup inside. Immediately place your covered baking dish with the rolls into the microwave and close the door. Regardless of your chosen method, always monitor your rolls carefully, ensuring they double in size for optimal results.
- Make Ahead for Convenience: These cheesy garlic rolls are an absolute dream for make-ahead meal planning, particularly during busy holidays or special events. To prepare them in advance, simply form the rolls and arrange them in your baking dish as directed. Then, cover them tightly with plastic wrap and place them in the refrigerator. They will undergo a slow, cold fermentation overnight (or even up to two days), which not only allows them to slowly rise but also significantly enhances their flavor profile. When you’re ready to bake, remove them from the fridge, preheat your oven, and proceed with baking as outlined in the recipe.
- Cutting Made Easy and Clean: For perfectly uniform and beautifully shaped rolls, using a very sharp, thin knife is key. For an even more surprisingly clean cut that minimizes squishing the dough, try using unflavored dental floss! Simply slide the floss under the log of dough, cross the ends over the top, and pull firmly to slice through.
- Achieving the Right Dough Consistency: When kneading, aim for a dough that is slightly tacky to the touch but not so sticky that it aggressively clings to your hands. If your dough feels too wet, add flour sparingly, a tablespoon at a time, until the desired consistency is reached. Conversely, if it feels too dry and stiff, a tiny bit of olive oil can help improve its pliability.
- Don’t Skimp on the Garlic: The recipe calls for a generous 10 cloves of garlic, and for good reason! This quantity ensures that a robust, fragrant, and truly unforgettable garlic flavor permeates every single layer of these rolls. Resist the urge to reduce the garlic; it’s what makes these rolls shine!
Delicious Pairings and More Dough Recipes You’ll Love
These cheesy garlic rolls are incredibly versatile and can elevate almost any meal. Beyond being the perfect sidekick for your favorite soups and stews, they pair wonderfully with hearty pasta dishes, grilled meats, roast chicken, or even a simple, crisp fresh salad. Their rich, savory profile and satisfying texture make them a comforting and highly complementary addition to a wide array of culinary creations.
If you’ve thoroughly enjoyed the process of making homemade dough and bread, and are looking to expand your baking repertoire, I wholeheartedly encourage you to explore these other fantastic recipes from our collection:
- Hearty Sausage Bread: A flavorful, savory bread loaf packed with delicious Italian sausage and cheese, perfect for a casual meal or appetizer.
- Classic Stromboli: Dive into this delightful Italian-American turnover, generously filled with a medley of meats and cheeses, all baked within a crispy, golden crust.
- Easy Pepperoni Pinwheels: These fun, cheesy, and easy-to-make appetizers are an absolute hit for parties, game nights, or quick snacks, bursting with classic pepperoni flavor.
If you’ve enjoyed preparing and tasting this Cheesy Garlic Rolls recipe, we would be incredibly grateful if you could share your feedback and consider giving it a 5-star rating! Your reviews help us reach more home cooks like you.
Stay connected with us for a continuous stream of culinary inspiration, delicious recipes, and cooking tips! You can watch our latest cooking demonstrations and tutorials on YouTube, follow along with our daily updates and behind-the-scenes glimpses on our Facebook Page, and become a Patreon member to gain exclusive access to full-meal videos, special content, and support our work.
Cheesy Garlic Rolls Recipe
This recipe for irresistible cheesy garlic rolls combines an easy-to-manage dough with a luscious, aromatic garlic and two-cheese filling. Baked until golden and bubbly, these rolls are the perfect companion for soups, salads, or any special holiday dinner, promising a burst of flavor in every bite.
Author: James Delmage
Prep time: 1 hour
Cook time: 25 minutes
Proofing time: 2 hours
Total time: 3 hours 25 minutes
Yields: 9 to 12 rolls
Ingredients
For the Dough
- 4 cups bread flour (plus more as needed for kneading)
- 2 1/4 teaspoons instant yeast (or 1 standard packet of instant yeast)
- 1 teaspoon granulated sugar
- 1 1/2 teaspoons fine sea salt
- 1 1/2 cups water (approximately 110°F / 43°C)
- 1 1/2 tablespoons olive oil
For the Garlic Butter
- 1/4 cup olive oil
- 1 stick (8 tablespoons) unsalted butter, at room temperature
- 10 cloves garlic, finely minced
- 1 teaspoon hot red pepper flakes (optional, adjust to taste)
- 3 tablespoons minced fresh flat-leaf Italian parsley
For the Filling
- 1 pound shredded low-moisture mozzarella cheese
- 1/3 cup grated Pecorino Romano cheese
Note: All measurements are in US Customary units. For accurate conversions to metric, a reliable kitchen scale is recommended for dry ingredients.
Instructions
- Prepare Garlic Butter: In a small saucepot over medium heat, combine 1/4 cup olive oil and 1 stick unsalted butter. Once the butter is melted and shimmering, add the 10 cloves of minced garlic and cook gently until the garlic is golden and fragrant, taking care not to burn it. Stir in 1 teaspoon hot red pepper flakes (if using) and 3 tablespoons minced fresh parsley. Remove from heat and set aside to cool slightly.
- Combine Dry Dough Ingredients: In a large mixing bowl, combine 4 cups bread flour, 1 teaspoon granulated sugar, 1 1/2 teaspoons fine sea salt, and 2 1/4 teaspoons instant yeast. Whisk these dry ingredients together thoroughly to ensure they are well combined.
- Add Liquids to Dough: Warm 1 1/2 cups water to approximately 110°F (43°C). Pour the warm water and 1 1/2 tablespoons olive oil into the bowl with the dry ingredients. Mix with a sturdy spatula or wooden spoon until all the flour is fully hydrated and a shaggy, cohesive dough forms.
- Knead the Dough: Transfer the shaggy dough to a lightly floured work surface. Knead the dough for 5 to 8 minutes, or until it becomes smooth, elastic, and forms a non-sticky ball. If the dough remains too sticky, add an additional 1/4 cup of flour gradually, kneading it in until the desired smooth consistency is achieved.
- First Dough Rise: Lightly oil a clean bowl. Place the kneaded dough ball inside, turning it once to coat all sides with oil. Cover the bowl tightly with plastic wrap and let the dough rise in a warm spot for 30 minutes, or until it has visibly increased in size.
- Roll Out Dough: Transfer the risen dough to a lightly floured surface and gently punch it down to release the trapped air. Using a rolling pin, roll the dough out into a large rectangle, approximately 13×17 inches (33×43 cm) in size, aiming for an even thickness.
- Fill the Dough: Spread about two-thirds of the prepared garlic butter mixture evenly over the rolled-out dough, leaving a small, half-inch border around the edges. Generously sprinkle 1/3 cup grated Pecorino Romano cheese over the garlic butter, followed by 1 pound shredded mozzarella cheese. Gently press the cheese into the dough with your hands to help it adhere securely.
- Roll and Slice: Starting from one of the longer (17-inch) sides, tightly roll the dough into a 17-inch long cylinder. Using a sharp knife or unflavored dental floss, carefully trim off about 1/2 inch from each end of the cylinder to create neat, clean edges. Then, cut the cylinder into 9 or 12 equal-sized pieces (9 pieces for larger rolls, 12 pieces for smaller ones).
- Second Dough Rise: Lightly grease a 9×13-inch baking dish or line it with parchment paper. Arrange the sliced rolls in the dish, leaving a small amount of space between each roll for expansion. If you are making 12 rolls, you may need an additional small baking dish to comfortably accommodate them. Cover the dish(es) loosely with plastic wrap and place in a warm area to rise for 90 to 120 minutes, or until the rolls have visibly doubled in size and appear puffy.
Make-Ahead Note: If you wish to bake the rolls the next day, place the covered baking dish directly into the refrigerator immediately after arranging the rolls. They will undergo a slow fermentation and rise overnight, ready to bake in the morning. - Bake the Rolls: Preheat your oven to 425°F (220°C) with an oven rack positioned in the middle level. Once the rolls have doubled in size, uncover them and place the baking dish(es) in the preheated oven. Bake for 18-23 minutes, or until the rolls are golden brown on top and an instant-read thermometer inserted into the center of a roll registers an internal temperature of 195°F (90°C). If the rolls start to brown too quickly, lightly tent them with aluminum foil for the remaining baking time.
- Finish and Serve: Immediately after taking the cheesy garlic rolls out of the oven, quickly warm up any remaining garlic butter mixture. Generously pour or brush this warm, aromatic butter over the tops of the hot rolls. Serve the rolls warm and savor every incredible, cheesy, garlicky bite!
Recipe Notes & Expert Tips
- Flour Substitution: While bread flour is recommended for the best chewy texture, all-purpose flour can be used as a convenient alternative if needed.
- Yeast Type & Proofing: Instant yeast (such as SAF brand) is preferred because it can be mixed directly with dry ingredients without proofing. If using active dry yeast, proof it in warm water (105-115°F / 40-46°C) for 5-10 minutes until foamy before adding it to your other ingredients.
- Stand Mixer Option: For an easier kneading process, a stand mixer fitted with a dough hook can be used. Knead the dough on medium speed for approximately 5 minutes until it becomes smooth and elastic.
- Cold Kitchen Proofing Solutions: In colder environments, a baking heat pad set to 78-80°F (25-27°C) is excellent. Alternatively, boil a cup of water in the microwave, then turn it off, leave the cup inside, and immediately place your covered baking dish with rolls into the microwave to create a warm, humid environment for rising. Always check that the rolls have doubled in size.
- Clean Cutting Technique: For perfectly shaped and cleanly sliced rolls, use a very sharp, thin knife or, surprisingly, unflavored dental floss.
- Adjusting Roll Size: For larger, more substantial rolls, cut the dough cylinder into 9 equal pieces. For slightly smaller, more delicate rolls, cut into 12 equal pieces.
- Overnight Preparation for Enhanced Flavor: If preparing a day ahead, simply form the rolls, place them in the baking dish, cover, and refrigerate overnight (up to 2 days). This cold fermentation process not only allows for a slow rise but also develops a richer, more complex flavor in the dough. Bake directly from the fridge the next day.
- Storing and Reheating Leftovers: Store any leftover cheesy garlic rolls in an airtight container in the refrigerator for up to 5 days. To reheat, place them in an oven preheated to 350°F (175°C) for 7-8 minutes until warmed through and slightly crispy.
Nutrition Information (Approximate)
Per serving (1 roll, based on 12 servings):
Calories: 436 kcal | Carbohydrates: 43.8g | Protein: 14.1g | Fat: 22.9g | Saturated Fat: 11.1g | Cholesterol: 52mg | Sodium: 584mg | Fiber: 1.3g | Sugar: 8.9g | Calcium: 223mg | Iron: 2mg
Please note: Nutrition information is automatically calculated and should be used as an approximation. Actual values may vary depending on specific ingredients, brands, and preparation methods.
Enjoyed this recipe? Share your thoughts below!
Find us on Instagram at @sipandfeast or tag your creations with #sipandfeast!