
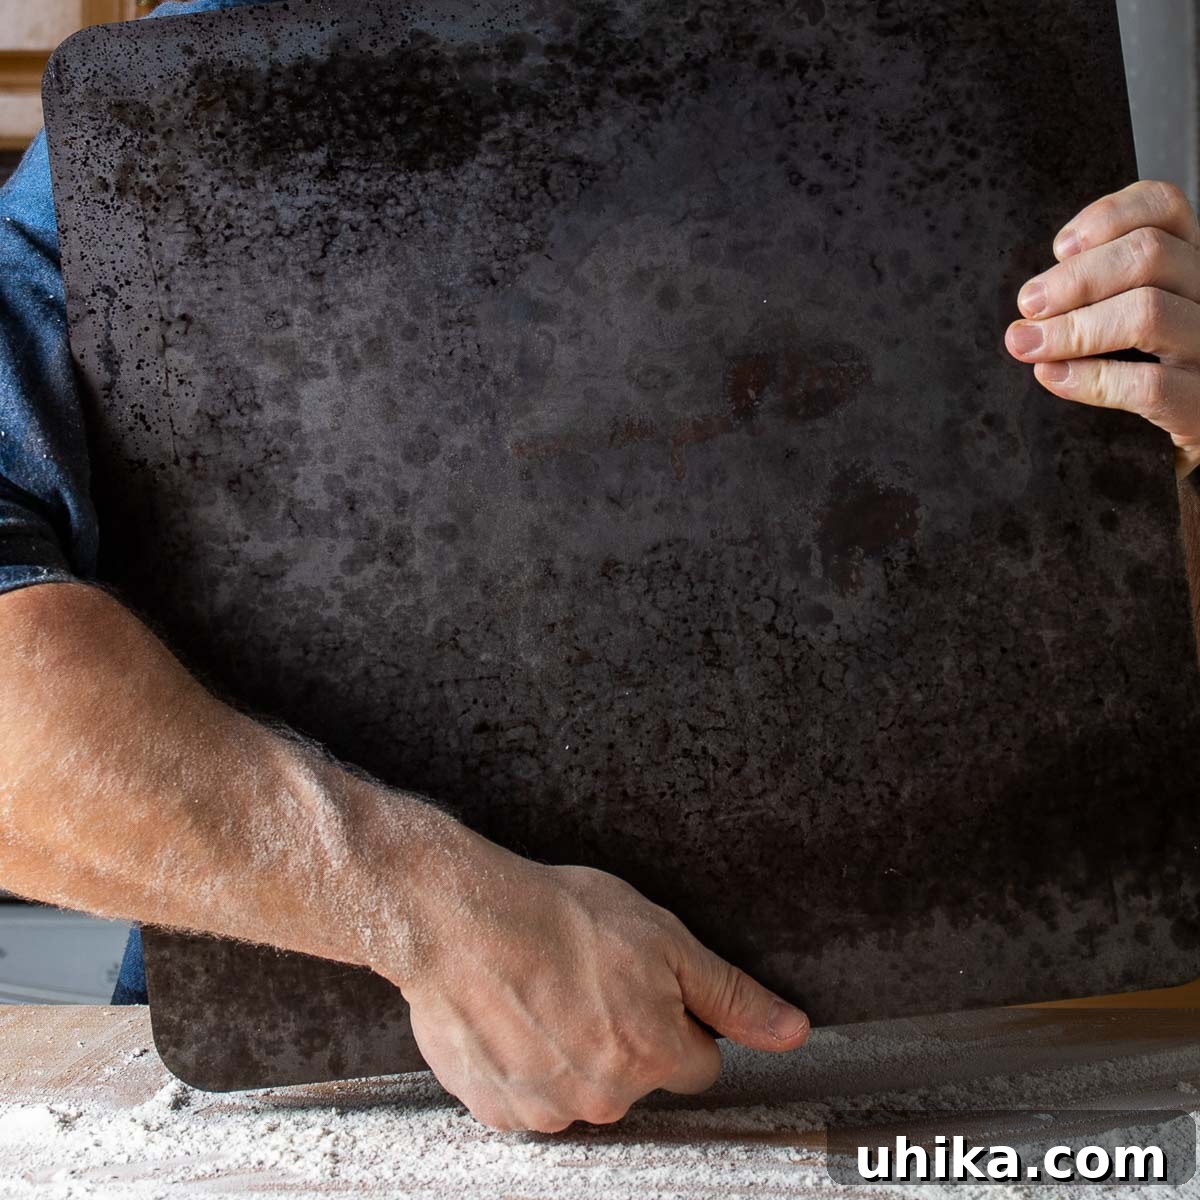
Mastering Homemade Pizza: Your Guide to a DIY Pizza Steel
For too long, the dream of crafting artisanal, pizzeria-quality pizza right in your own kitchen felt out of reach. Professional deck ovens with their intense, consistent heat were thought to be the secret weapon. However, the advent of the pizza steel has revolutionized home pizza making, bringing that perfect charred crust and melty top within everyone’s grasp. While pre-seasoned, ready-to-use pizza steels can retail for upwards of $150-$200, making them a significant investment, this guide empowers the savvy home cook to create their own DIY pizza steel at a fraction of the cost. Not only will you save money, but the satisfaction of producing incredible pizza on a tool you built yourself is truly unmatched.

The single most impactful upgrade for achieving superior pizza in a standard home oven is the pizza steel. It consistently outperforms other home methods, delivering results that are truly game-changing for any pizza enthusiast. For clarity, “baking steel” and “pizza steel” refer to the same essential kitchen tool.
What is a Pizza Steel and Why is it Essential?
A pizza steel is essentially a thick plate of steel, typically ranging from 3/16-inch to 1/2-inch in thickness. While some ambitious bakers might use a 3/4-inch plate, its sheer weight can make it impractical for a home oven. The reason a pizza steel yields such extraordinary results lies in its exceptional thermal properties: steel is an ultra-efficient conductor and retainer of heat.
Unlike traditional ceramic pizza stones, which are prone to cracking and have lower thermal conductivity, steel rapidly absorbs and stores a massive amount of heat from your oven. When a pizza is launched onto the preheated steel, this intense, direct heat is immediately transferred to the dough. This rapid heat transfer is crucial for achieving that coveted, crispy, charred bottom crust that is the hallmark of authentic New York-style pizza and pizzas baked in high-temperature professional ovens. The result is a crust that cooks quickly, preventing sogginess and promoting a beautiful rise and an open, airy crumb, mimicking the effect of a professional deck oven.
Getting Started: Materials You’ll Need for Your DIY Pizza Steel
Embarking on your DIY pizza steel project is straightforward, requiring a few essential items. Sourcing these materials yourself dramatically reduces the cost compared to purchasing a pre-made steel. Here’s what you’ll need:
- One ¼” x 16” x 16” A36 steel plate: A36 is a common structural steel, readily available and suitable for this purpose. The 1/4-inch thickness provides excellent heat retention without being excessively heavy. Remember to keep its cardboard packaging!
- Flax oil: Such as Barlean’s 100% organic flax oil. This specific oil is excellent for seasoning due to its high smoke point and polymerization properties, creating a durable, non-stick surface.
- 150 grit sandpaper: Used for smoothing any rough edges on the steel plate.
- 1 small block of wood: To wrap the sandpaper around for better grip and control.
- 1 gallon of white vinegar: A natural and effective descaling agent.
- 1 gallon of water: To dilute the vinegar for the descaling bath.
- Spacers or pencils: These will elevate the steel plate in the soaking container, allowing for even mill scale removal.
- 1 wheelbarrow, bathtub, or any large container: Must be big enough to fully submerge the steel plate horizontally without draining.
- 1 sponge with an abrasive edge: Like a Scotch-Brite pad, useful for stubborn mill scale.
- Disposable blue shop towels or lint-free paper towels: Ideal for wiping off oil during seasoning, leaving no fibers behind.
- Infrared thermometer: An indispensable tool for checking your steel’s temperature before baking, ensuring optimal pizza results.
DIY Pizza Steel Instructions: A Step-by-Step Guide
Creating your own pizza steel is a rewarding process. Follow these detailed steps carefully to ensure a perfectly prepared and seasoned steel ready for countless delicious pizzas.
- **Unpack and Prepare the Steel:** Carefully remove the A36 steel plate from its packaging, but remember to save the cardboard – it will come in handy later. Take a sheet of 150-grit sandpaper and wrap it around a small block of wood. Gently sand all four edges of the steel plate. This step is crucial for removing any burrs or sharp points that might have resulted from the cutting process, making your steel safe to handle. A few light swipes should be sufficient.
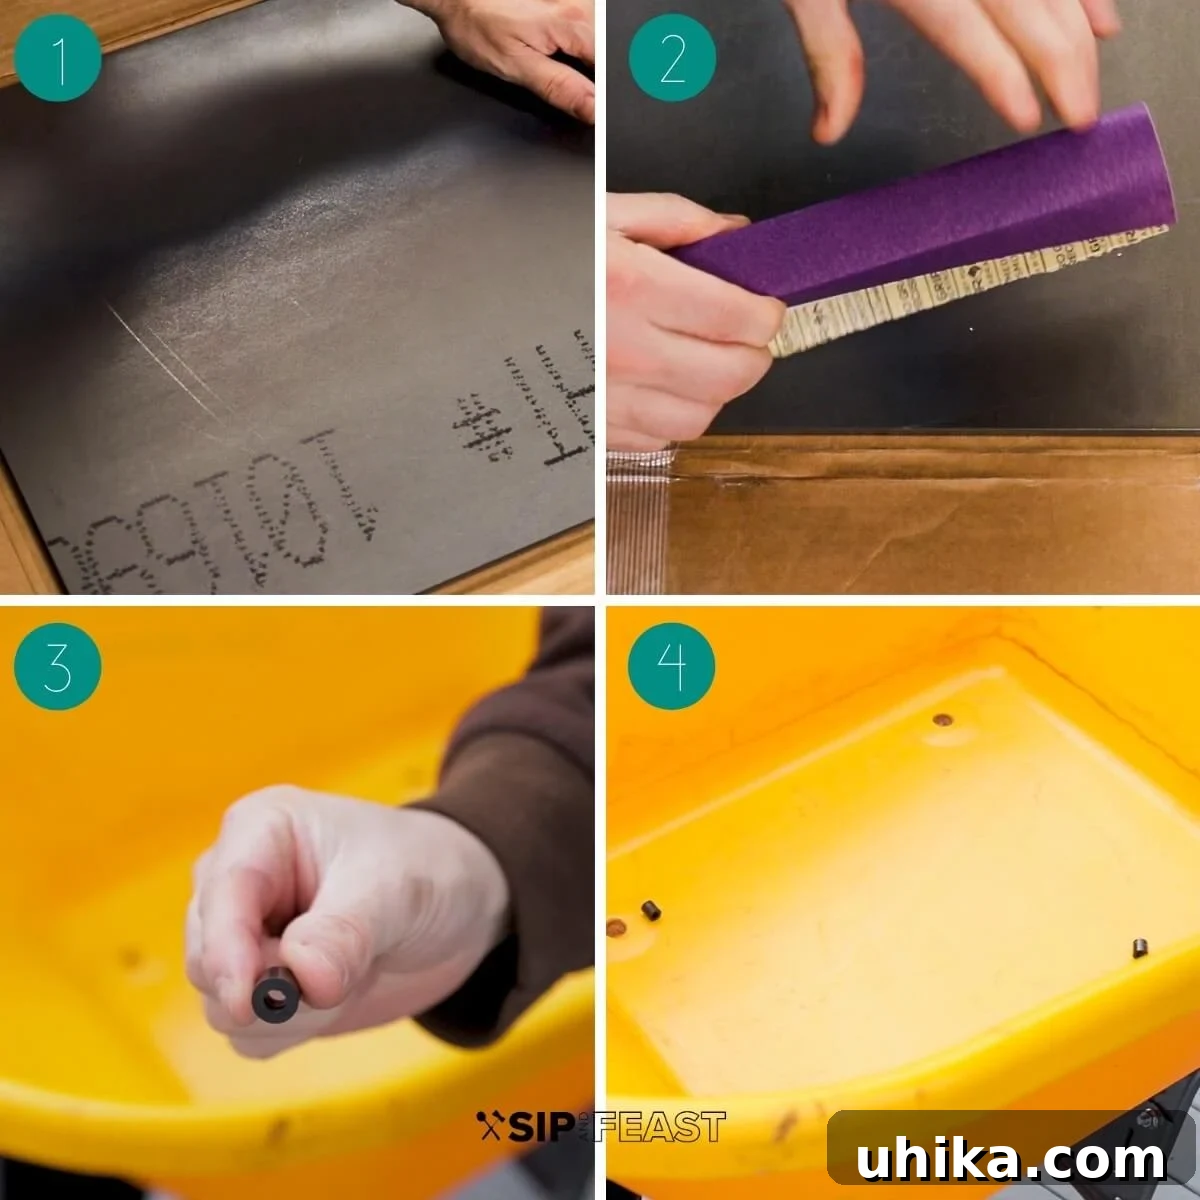
- **Set Up the Descaling Bath:** Find a large container that can comfortably hold the steel plate flat and submerged. A wheelbarrow, a large plastic tub, or even a bathtub can work. If using a wheelbarrow, prop up the front wheel slightly to level the container section. Place four spacers (such as plastic TV mounting spacers, or simply four pencils) into the corners of the container. These spacers will elevate the steel, allowing the descaling solution to circulate completely around it.
- **Submerge the Steel:** Carefully place the steel plate onto the spacers in the container. Pour one gallon of white vinegar and one gallon of water into the container, creating a 50/50 ratio. Ensure the steel is completely submerged. If your container or steel size requires more liquid, maintain the 50/50 vinegar-to-water ratio until the steel is fully covered.
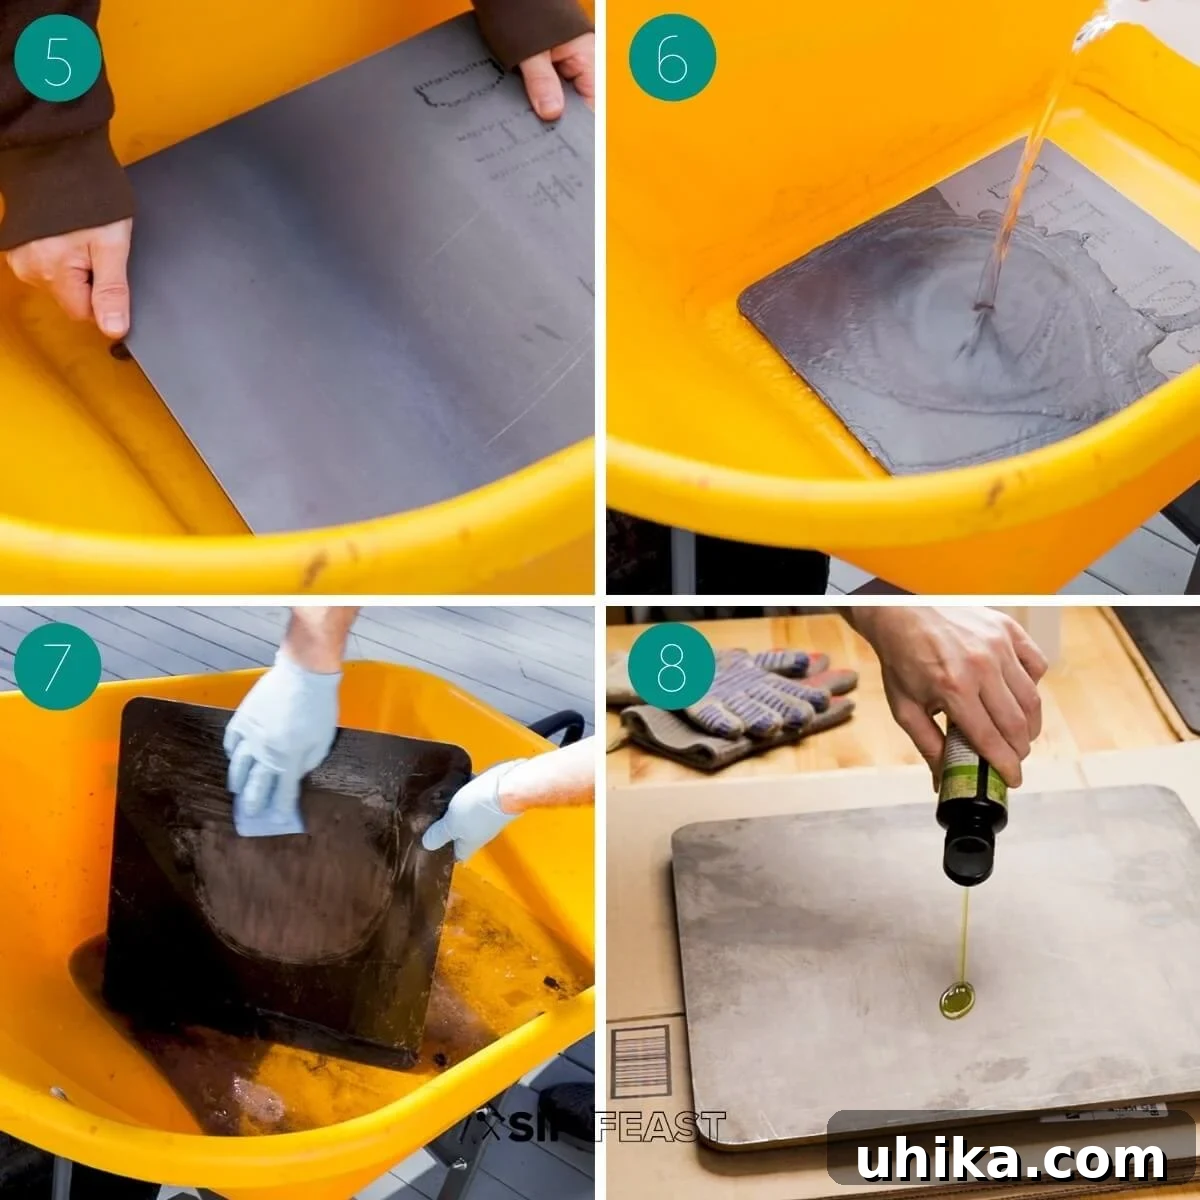
- **Descaling and Initial Drying:** Allow the steel to soak in the vinegar solution for a full 48 hours. After this time, the mill scale (a dark, flaky layer of iron oxide) will have loosened considerably. Wear gloves and use paper towels to wipe off the mill scale. For any stubborn spots, use an abrasive sponge (like a Scotch-Brite pad) to scrub them clean. Once the mill scale is removed, hose off the steel thoroughly with water and dry it as quickly as possible with clean towels to prevent flash rust. Immediately transfer the steel to an oven preheated to 170°F (77°C) for about 20 minutes to completely evaporate any residual moisture.
- **First Coat of Seasoning Oil:** After 20 minutes, carefully remove the hot steel from the oven (using heat-resistant gloves). Place it on a clean, heat-safe work surface – this is where the saved cardboard can be useful as a protective layer. Increase your oven temperature to 450°F (232°C). Squeeze a very small amount of flax oil onto the steel – less than a tablespoon is usually sufficient. Using blue shop towels or lint-free paper towels, rub the oil vigorously over the entire surface of one side.
- **Complete Oiling and Initial Bake:** Repeat the oiling process for the other side of the steel, and don’t forget the four narrow side edges. All six surfaces must be coated. Once coated, use fresh paper towels to rub off as much of the flax oil as you possibly can. The goal is to leave an extremely thin, almost imperceptible film of oil on the steel, rather than a thick layer. Excess oil can lead to a sticky, uneven seasoning. Place the steel onto the middle rack of your 450°F (232°C) preheated oven and let it bake for 1 hour. After 1 hour, turn the oven off, but keep the oven door closed. Allow the steel to cool inside the oven for at least two additional hours before removing it. This slow cooling helps the seasoning layer polymerize effectively.
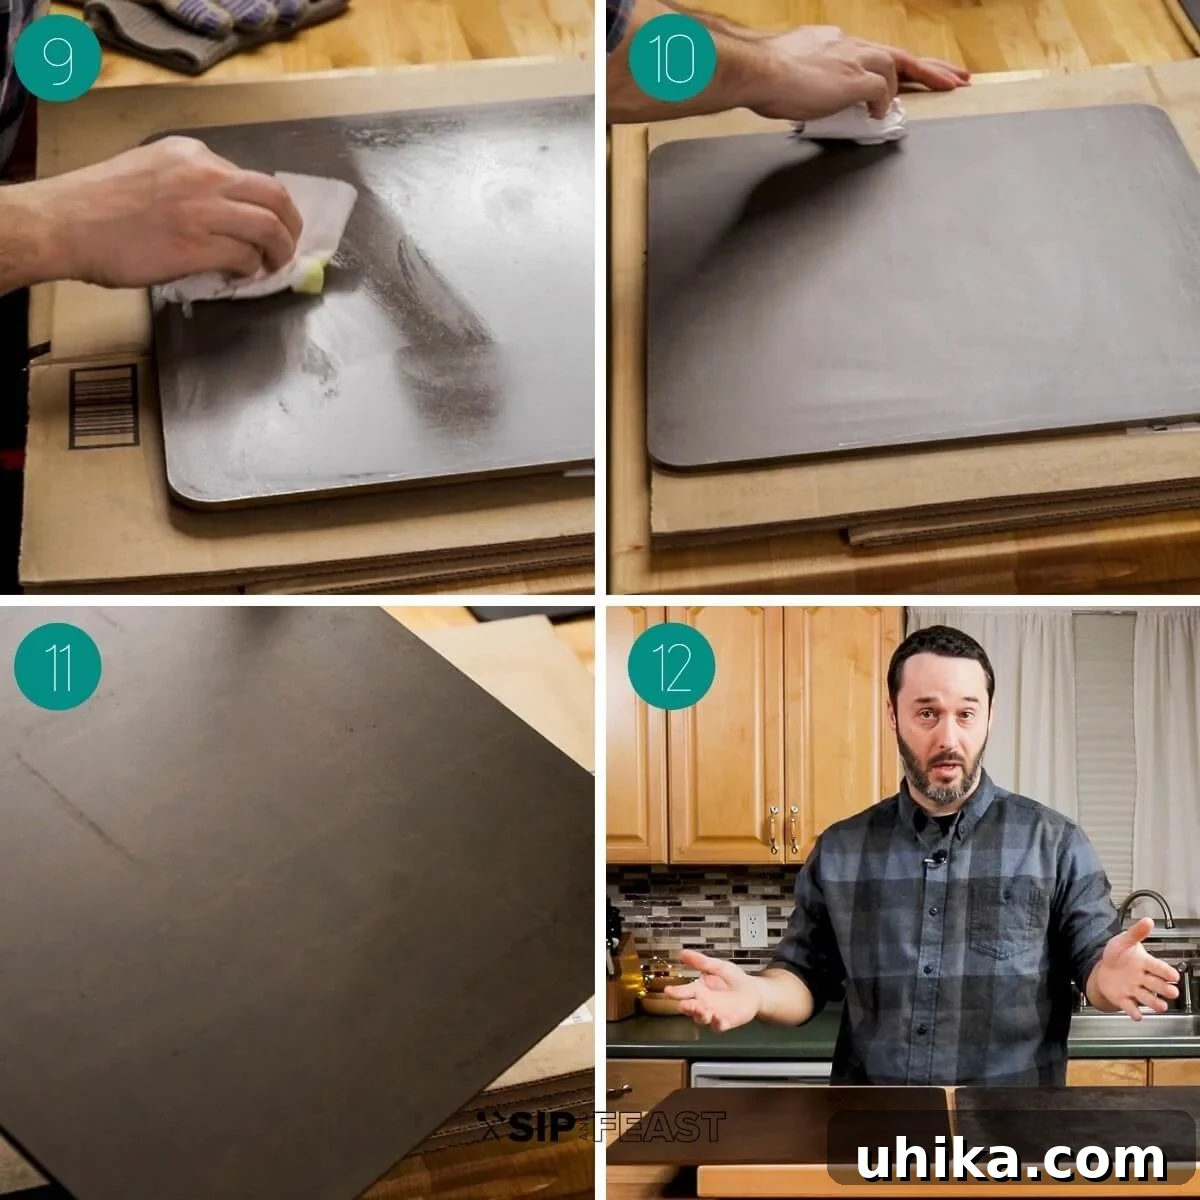
- **Building Multiple Coats:** After the first coat, your steel will have taken on a slightly maroon or brownish tint. Each subsequent coat will deepen this color. For optimal performance and durability, aim for at least three coats of flax oil. To apply additional coats, simply repeat steps 5 and 6. Ensure the steel is completely cool before applying the next layer of oil. Starting the seasoning process early in the day is recommended to allow ample time for multiple coats and cooling periods.
- **Comparing Results and Readiness:** On the right in the image below, you’ll see a newly seasoned pizza steel after three coats of flax oil. Next to it is a well-loved steel that has likely baked over a hundred pizzas, demonstrating the beautiful, deep patina that develops with consistent use.
- **First Use Preparation:** Before baking your first pizza, you’ll want to preheat your oven with the steel inside for at least 45 minutes to an hour, or even longer, at its highest temperature (typically 500-550°F or 260-290°C). Use your infrared thermometer to check the surface temperature of the steel. A temperature of around 600°F (315°C) is ideal for making a truly great pizza with a perfectly crispy crust!
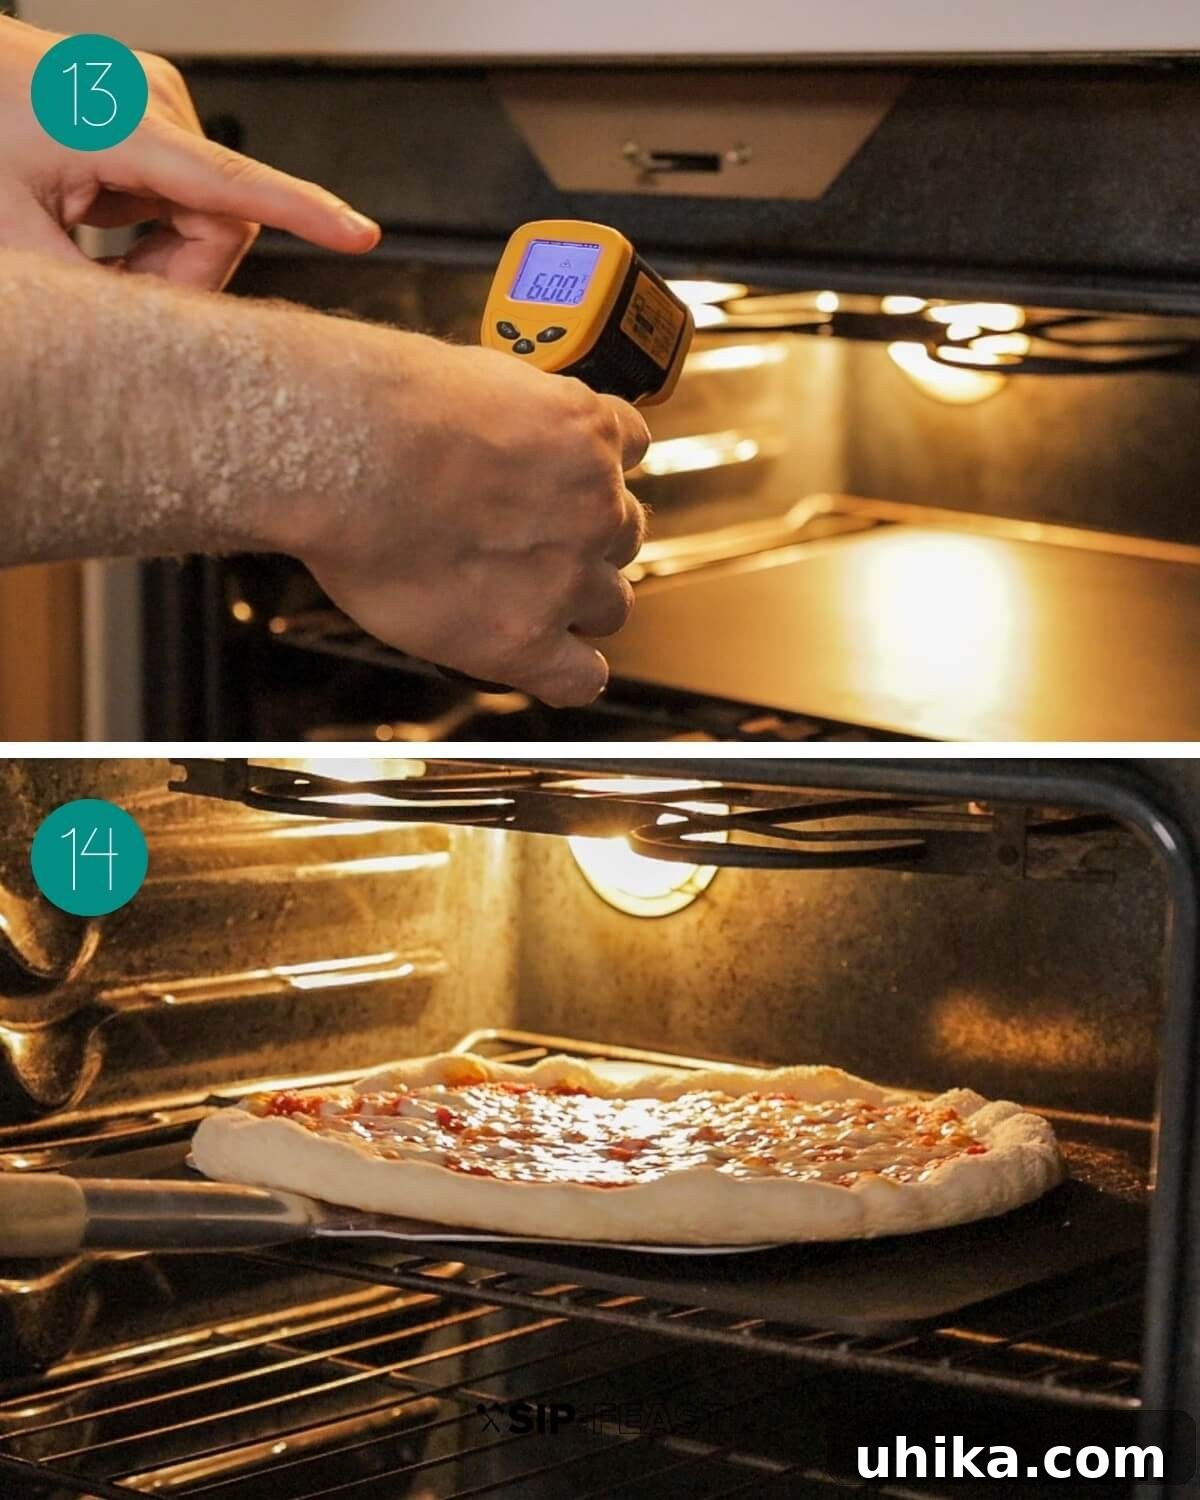
- **Pizza Launch and Retrieval:** Once the steel is at temperature, it acts as your oven’s “floor.” Simply slide your pizza onto the steel using a metal or wooden pizza peel. The incredibly hot surface will immediately begin to cook the bottom of your crust. After baking, use your peel to easily retrieve your perfectly cooked pizza. Easy peasy!
Why Season Your Pizza Steel?
Seasoning your pizza steel with multiple thin coats of flax oil is a critical step, much like seasoning a cast-iron pan. This process creates a polymerized layer – essentially, baked-on oil that forms a hard, naturally releasing, and protective surface. This patina is essential for several reasons:
- **Non-Stick Surface:** The polymerized oil creates a naturally non-stick coating, allowing pizzas, calzones, or any other baked goods to slide off effortlessly, preventing sticking and making retrieval a breeze.
- **Rust Prevention:** Raw steel is highly susceptible to rust, especially in humid environments. The seasoning layer forms a protective barrier, preventing oxidation and preserving your steel for years of use.
- **Easy Clean-up:** The non-stick, seasoned surface makes cleanup significantly easier. Inevitable cheese spills, sauce drips, or flour residue will carbonize and turn to ash at high temperatures, which can then be easily scraped off.
Should your steel ever need a refresh or if you notice its non-stick properties diminishing, simply apply one more thin coat of flax oil and bake it in the oven as described in the seasoning steps. Ensure the plate is clean and free of any debris before re-seasoning. There’s no need to repeat the descaling process unless rust has formed due to neglect.
The Crucial Role of Vinegar: Descaling Your Steel
The white vinegar plays an indispensable role in preparing your raw steel for seasoning. Its natural acidity acts as a safe and effective remover of “mill scale.”
- **What is Mill Scale?** Mill scale is a dark, flaky iron oxide layer that forms on steel during the hot rolling manufacturing process. It’s a byproduct of the steel cooling in air after being shaped.
- **Why Must it Be Removed?** Mill scale is non-porous and will prevent the seasoning oil from properly bonding with the steel surface. If left on, your seasoning will be weak, flaky, and ineffective, leading to poor non-stick properties and potential rust.
- **Vinegar’s Advantage:** Using a dilute white vinegar bath is a non-toxic and relatively hands-off method for descaling. The acetic acid in the vinegar slowly dissolves the mill scale, making it easy to wipe away after soaking. While mechanical means (like aggressive sanding or grinding) or stronger acids (like muriatic acid) can also remove mill scale, vinegar is a safer and simpler option for the home DIYer. If you consider using stronger acids, extreme caution and proper safety equipment are absolutely essential.

Pizza Steel vs. Pizza Stone: The Ultimate Showdown
While pizza stones have been a staple in home pizza making for years, the pizza steel offers significant advantages that make it the superior choice for achieving truly outstanding results:
- **Speed and Efficiency:** A pizza steel dramatically reduces baking time. You can expect a pizza to cook in as little as 6 to 6 1/2 minutes on a steel, compared to 9-11 minutes or longer on a pizza stone. This efficiency is due to steel’s higher thermal conductivity and capacity.
- **Superior Crust Development:** The rapid, intense heat transfer from a preheated steel creates an unparalleled bottom crust. You’ll achieve that desirable charred, crispy exterior while maintaining a soft, airy interior – a combination that ceramic stones struggle to deliver consistently.
- **Unmatched Durability:** Pizza stones, particularly less expensive ones, are notoriously prone to cracking due to thermal shock (rapid temperature changes). Steel, on the other hand, is virtually indestructible under normal baking conditions. You’ll never have to worry about your pizza steel cracking, making it a much more durable long-term investment.
- **Heat Recovery:** Steel recovers its heat much faster than ceramic. This is crucial if you’re baking multiple pizzas in a single session.
Considerations and Potential Downsides
While a pizza steel offers numerous benefits, there are a few practical considerations to keep in mind:
- **Weight:** Steel is dense. A 1/4-inch by 16-inch by 16-inch plate is substantial and can be difficult to move around. Many users, including myself, prefer to leave their pizza steel in the oven permanently, treating it as a dedicated baking surface. This minimizes handling.
- **Oven Racks:** For a 1/4-inch steel plate, the risk of bending standard oven racks is relatively low. However, it’s always wise to periodically inspect your racks to ensure they are holding up well under the weight. For thicker steels, reinforcing the racks might be necessary.
- **Safety:** Due to its weight and extreme temperature, exercise caution when transporting the steel during the DIY process and especially when removing it from a hot oven. Always use heat-resistant gloves and handle it with the same care you would any heavy, hot object.
Understanding Baking Steel Thickness
The thickness of your baking steel impacts its thermal mass and heat retention capabilities:
- **1/4-inch plate:** This is an excellent all-around choice for the home cook. It’s heavy enough to provide exceptional heat but manageable enough to move if needed. It won’t typically bend oven grates. Its primary characteristic is delivering fantastic results for single pizzas or two pizzas baked with a short recovery time in between.
- **Thicker plates (e.g., 3/8-inch or 1/2-inch):** These plates possess even greater thermal mass, meaning they absorb and store more heat. This is particularly beneficial if you plan on making multiple pizzas in a row frequently, as a thicker plate will maintain its heat longer and recover more quickly between bakes. For a 1/4-inch plate, I typically recommend waiting 7-10 minutes between pizzas to allow the steel to fully regain its optimal temperature. This waiting period is often just enough time to slice and enjoy the first pie!
Pro Tip for Rapid Heat Recovery: After a pizza is finished baking, you can significantly speed up the steel’s heat recovery. Turn your oven’s broiler on high for approximately 5 minutes. This direct top-down heat will quickly replenish the steel’s temperature. Then, turn the oven back to its highest bake setting. Use your infrared thermometer to confirm the steel has reached 600°F (315°C) before launching your next pizza!

Recipes to Master with Your New Pizza Steel
With your newly forged pizza steel, a world of culinary possibilities opens up! Here are some fantastic recipes to get you started on your journey to homemade pizza perfection:
- New York Pizza: Dive deep into the art of classic New York-style pizza, complete with instructions for making the perfect homemade dough.
- New York White Pizza: Experience the delightful combination of mozzarella, ricotta, roasted garlic, and a hint of Pecorino Romano for a rich, flavorful white pizza.
- Garlic Knots: Utilize your pizza dough skills to create these iconic New York-style garlic knots, bathed in a savory garlic butter, olive oil, Pecorino Romano, and fresh parsley mixture.
If you’re a visual learner, a comprehensive video guide demonstrating the entire steel seasoning process is available below. You can also find many of our recipes and instructional videos on YouTube and our Facebook Page.
Pizza Steel – DIY Baking Steel
Author: James Delmage
Prep Time: 1 hr | Cook Time: 9 hrs | Soaking time: 2 days | Total Time: 2 days 10 hrs
Servings: 1 pizza steel
Print Recipe
Ingredients
Materials
- 1 piece 1/4 x 16 x 16″ steel plate (see notes below)
- 3 ounces organic 100% pure flax oil
- 1 gallon distilled vinegar
- 1 gallon water
Tools
- 4 pencils (to act as spacers)
- 1 roll paper towels (lint-free paper towels or blue shop towels recommended)
- 1 sheet 150 grit sandpaper
- 1 small block of wood (to wrap sandpaper)
- 1 large tub, wheelbarrow, etc. (see notes below)
- 1 abrasive sponge (Scotch-Brite or similar)
Instructions
Descaling the steel
- Wrap the sandpaper around the block of wood and lightly sand all edges of the steel plate, checking for any sharp burrs. You only need to take a few swipes with the sandpaper to knock down any sharp edges.
- In a container large enough to hold the steel plate, lay the 4 pencils or any small object to act as a spacer and prevent the steel from touching the bottom of the container. Place the steel onto the spacers.
- Pour 1 gallon of vinegar and 1 gallon of water into the container, making sure the steel plate is completely submerged. If the steel is not submerged, add more vinegar and water in a 50/50 ratio to completely cover the steel.
- After 48 hours, wipe off all the mill scale with paper towels and if needed, use the scoring action of an abrasive sponge to remove any tough bits. When finished wiping the scale off, rinse with water then dry off immediately to prevent any surface rust from forming.
- Quickly place the dried-off steel in a 170°F (77°C) oven to remove any remaining moisture.
Seasoning the steel
- After 20 minutes, remove the dry steel (use heat resistant gloves to handle) from the oven and place it on a clean working surface. Preheat oven to 450°F (232°C). Squirt a tablespoon or less of flax oil (you don’t need a lot) onto the steel and wipe it all over. Flip the steel and repeat, then wipe the oil on all 4 small side edges. Basically, wipe the oil on all 6 sides of the steel.
- With lint-free paper towels, rub off every bit of the oil that you can. A small film will be left on the steel. Place the steel in a 450°F (232°C) oven for 1 hour. After 1 hour, turn the oven off. Leave the oven door closed and wait at least two hours to remove the steel.
- Continue the process until 3 coats of flax oil have been applied. After the third coat, your pizza steel is ready to be used. Enjoy!
Notes
- The tub or wheelbarrow must be large enough to hold the steel lying flat so that the water/vinegar can completely submerge the steel.
- I have made 3 pizza steels. One each with 5 coats, 3 coats, and 2 coats of flax oil. They all have held up to dozens of pizzas. For extra insurance, 3 coats is my recommendation, but feel free to do as many as you want.
- Use this ¼” x 16” x 16” steel plate. You can use a 1/2″ plate but you will most likely need to reinforce the oven grates.
- Any 100% flax oil will work.
- Cheese, semolina for launching, and a host of other food will wind up on your steel. The high temps will burn off the food and turn it into ashes. You can scrape off the remaining residue with a nylon brush.
- I prefer to leave the steel in the oven at all times and rarely move it.
Did you make this recipe? Mention @sipandfeast or tag #sipandfeast