

Authentic Homemade Cannoli Recipe: A Sicilian Delight for Your Kitchen
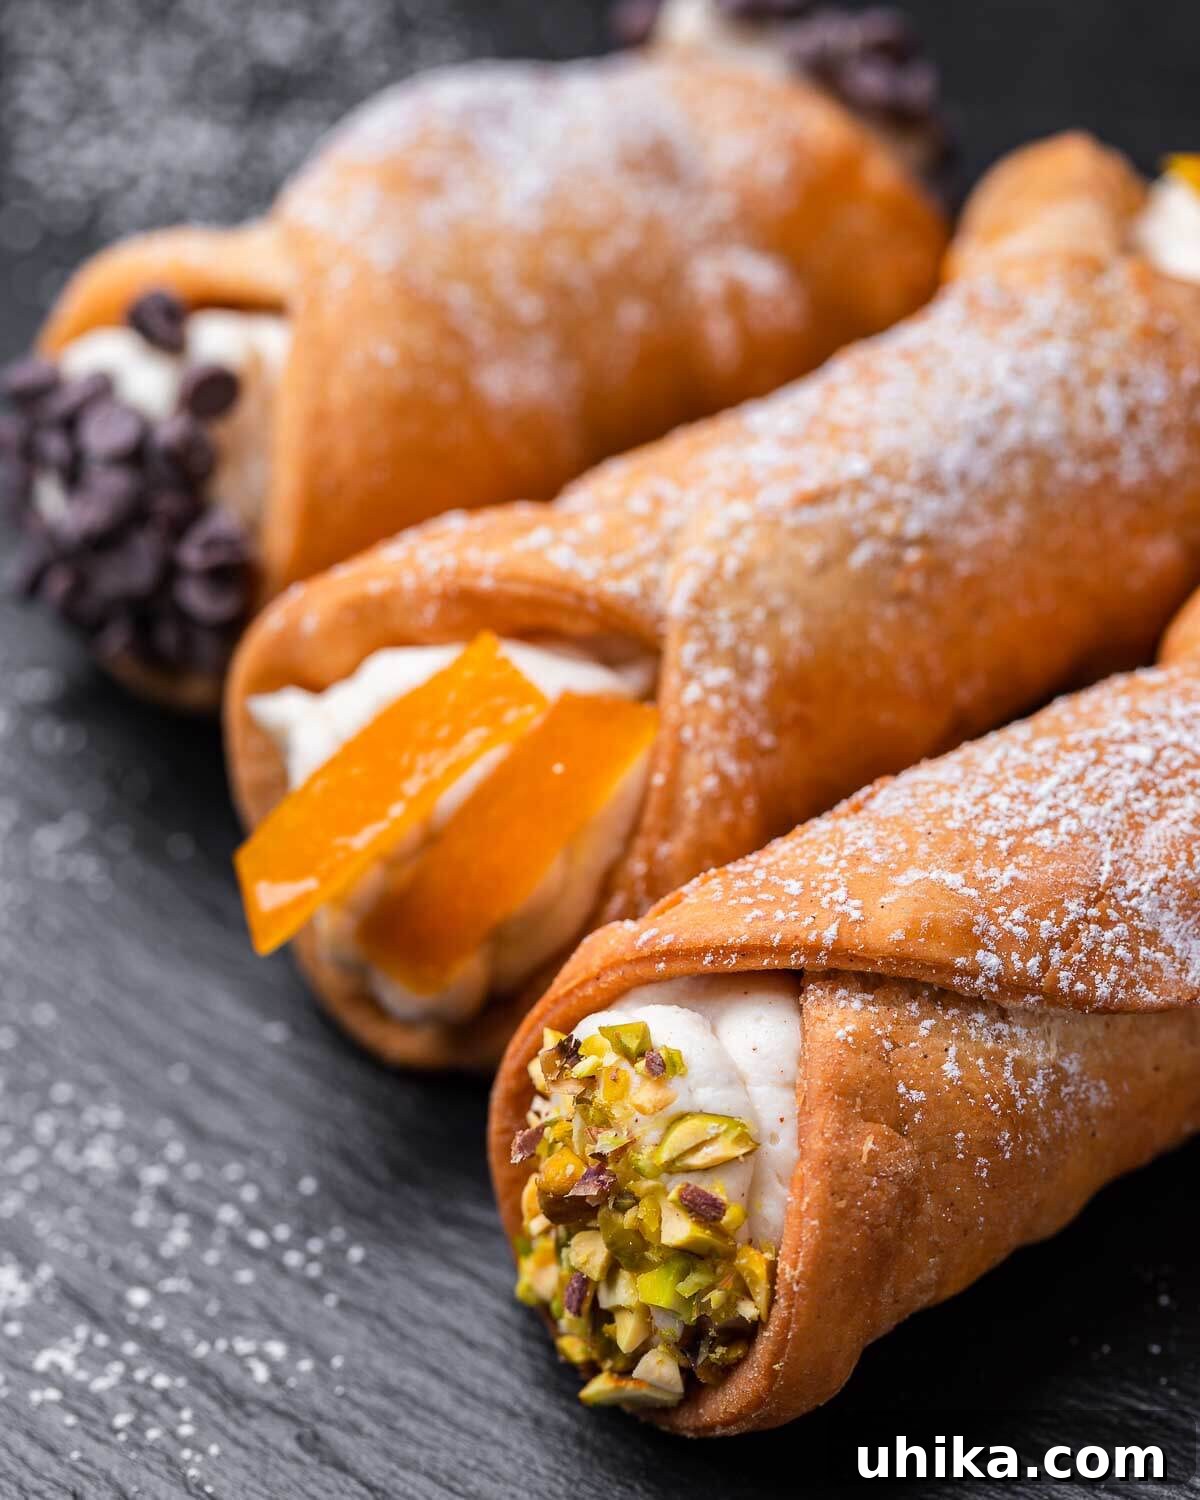
Experience the timeless allure of Cannoli, the iconic Italian pastry that captures the heart of Sicilian culinary tradition. These delectable treats feature crisp, blistered pastry shells, expertly fried to a golden perfection, and generously filled with a velvety, sweetened ricotta-cinnamon cream. While often adorned with classic toppings like rich chocolate chips, vibrant chopped pistachios, or tangy candied orange peel, the beauty of homemade cannoli lies in the freedom to personalize them with any delightful embellishment you desire. From the bustling streets of New York to the sun-drenched landscapes of Southern Italy, cannoli stand as a testament to simple ingredients transformed into an extraordinary dessert.
The Irresistible Charm of Cannoli: A Culinary Journey
Cannoli are more than just a dessert; they are a celebration, a staple at every Italian-American holiday, and a beloved symbol of family gatherings. For many, especially those in areas with a rich Italian heritage like the New York metropolitan area, the sight and smell of cannoli evoke cherished childhood memories. Growing up, these crispy, cream-filled marvels were a constant companion to other festive Italian sweets such as rainbow cookies, reginelle, and pignoli cookies. What started for many with simple green sprinkles as a topping has evolved over the years, with chocolate chips becoming a popular choice, and even shells dipped entirely in chocolate for an extra layer of indulgence.
While modern variations abound, the essence of cannoli remains rooted in its Sicilian origins. Traditional Sicilian cannoli often incorporate ingredients like bright citron, aromatic orange peel, sweet candied pumpkin, ruby-red cherries, or earthy pistachios, each adding a unique dimension to the flavor profile. Regardless of your chosen toppings, the result is always an incredibly delicious and satisfying pastry that delights the senses.
The thought of making homemade cannoli might seem daunting at first, with tales of tricky dough and hot oil. However, this comprehensive guide is designed to demystify the process, walking you through each step with clear, concise instructions. You’ll discover that crafting these authentic Italian delicacies in your own kitchen is not only achievable but also incredibly rewarding. Prepare to impress your family and friends with cannoli that rival those from the finest Italian bakeries, infused with the incomparable taste of homemade goodness.
Essential Equipment for Perfect Cannoli Making
While some baking projects require minimal tools, making authentic cannoli benefits greatly from a few specific pieces of equipment. These items will not only make the process smoother but also help you achieve those signature crisp shells and perfectly piped fillings.
- Cannoli Forms: These indispensable metal tubes are specifically designed for shaping and frying cannoli shells. Owning a good set is crucial for uniform and professional-looking pastries.
- Candy or Oil Thermometer: Achieving the correct oil temperature is paramount for perfectly blistered, non-greasy shells. An oil thermometer ensures your frying oil is consistently within the optimal range, preventing soggy or burnt results.
- Rolling Pin, Pasta Maker, or Stand Mixer with Pasta Attachment: While a sturdy rolling pin and some elbow grease can certainly get the job done, a pasta maker or a KitchenAid stand mixer with a pasta attachment will significantly ease the task of rolling the dough to the necessary thinness and consistency. These tools ensure even sheets of dough, which are key to uniform shells.
- Kitchen Tweezers or Needle-Nose Pliers: After frying, the cannoli forms become extremely hot. These tools are invaluable for safely and efficiently removing the crisp shells from the forms, protecting your hands from the heat.
- Pastry Bag with Piping Tip: For beautifully filled cannoli, a reusable pastry bag with a coupler and a large round piping tip is ideal. If you don’t have one, a gallon-sized Ziploc bag with a corner snipped off can serve as a makeshift alternative, though a proper pastry bag offers more control.
- Round Cookie Cutters: Essential for cutting the cannoli dough into consistent shapes. 4 to 5-inch cutters are generally recommended, but you can adjust the size to your preference, creating cannoli of various dimensions. Alternatively, a knife can be used to cut the dough into squares.
Crafting Authentic Cannoli: A Detailed Step-by-Step Guide
Making homemade cannoli is a labor of love that rewards patience with unparalleled flavor and texture. Follow these detailed steps to create crispy shells and a luscious ricotta filling that will transport you straight to Sicily.
1. Preparing the Perfect Cannoli Dough
- In a large mixing bowl, or the bowl of a stand mixer equipped with a dough hook, combine 2 cups (240g) of all-purpose flour, 1 tablespoon of sugar, 1/4 teaspoon of cocoa powder, 1/2 teaspoon of ground cinnamon, and a pinch of salt. Mix these dry ingredients together gently, just until they are fully combined, typically taking less than 15 seconds.
- Add 3 tablespoons (39g) of vegetable shortening to the dry mixture. Use your fingertips (if mixing by hand) or the stand mixer on low speed to work the shortening into the flour until the mixture achieves a fine, grainy texture. This step is crucial for developing the characteristic crispness of the shells.
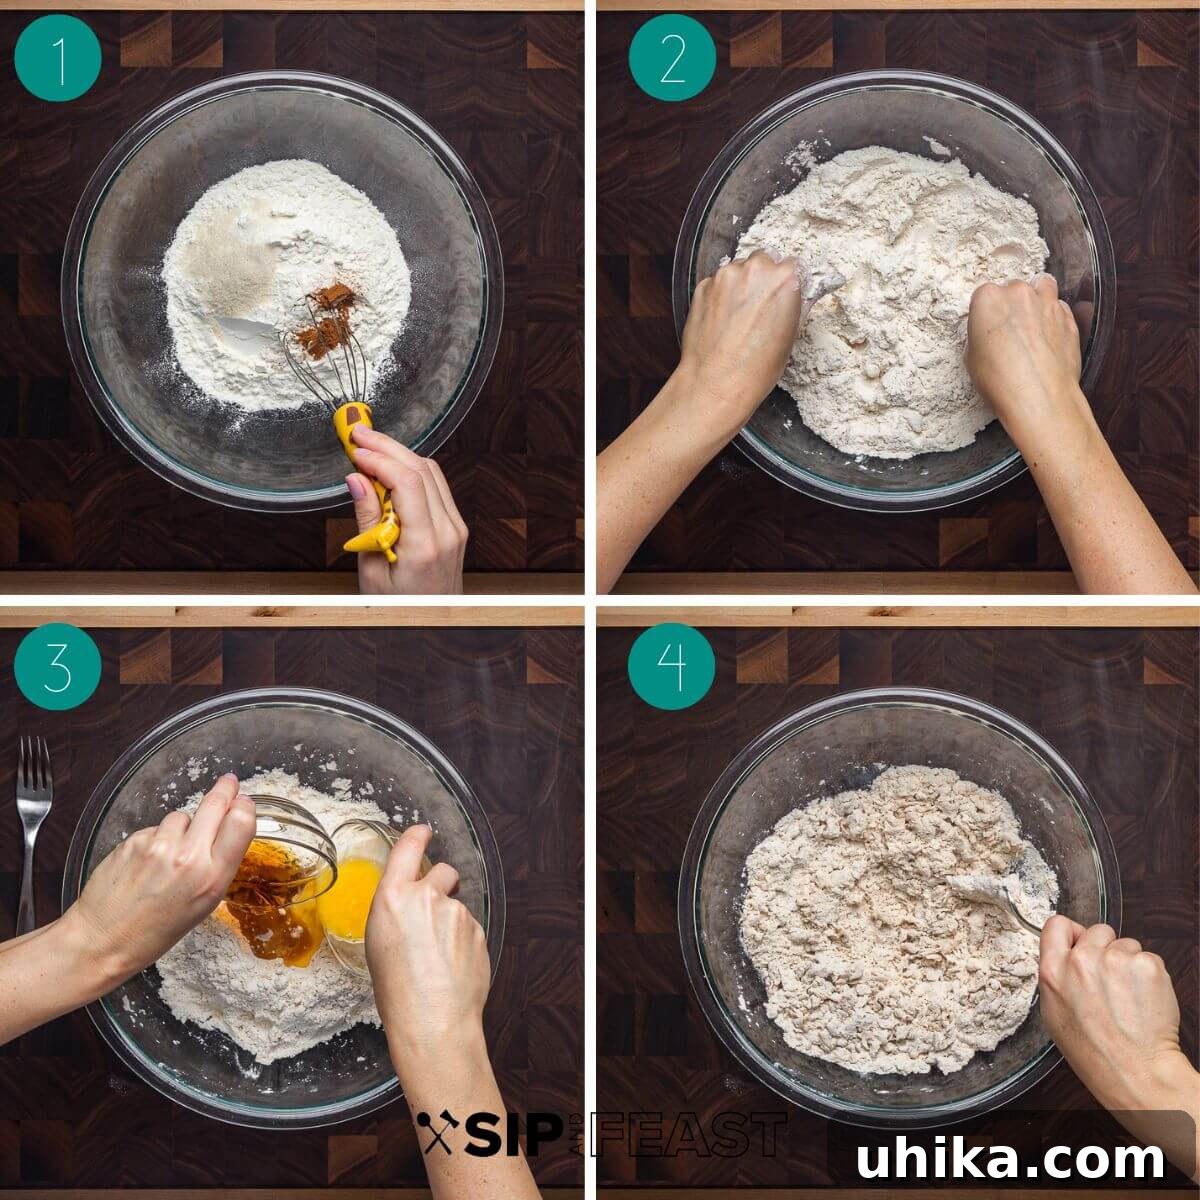
- If you are preparing the dough by hand, create a well in the center of the flour and shortening mixture. Pour in 1/4 cup (56g) of Marsala wine and one large beaten egg. Marsala wine adds a traditional depth of flavor to the shells.
- Begin to mix the ingredients with a fork, gradually incorporating the flour from the sides into the liquid, until a cohesive dough starts to form. If you’re using a stand mixer, continue mixing on low speed with the dough hook until the dough comes together. Note: If using a stand mixer, the kneading step that follows can be done directly in the mixer on speed level 3 for 3-4 minutes, which is usually sufficient. This recipe demonstrates both hand and mixer methods for flexibility.
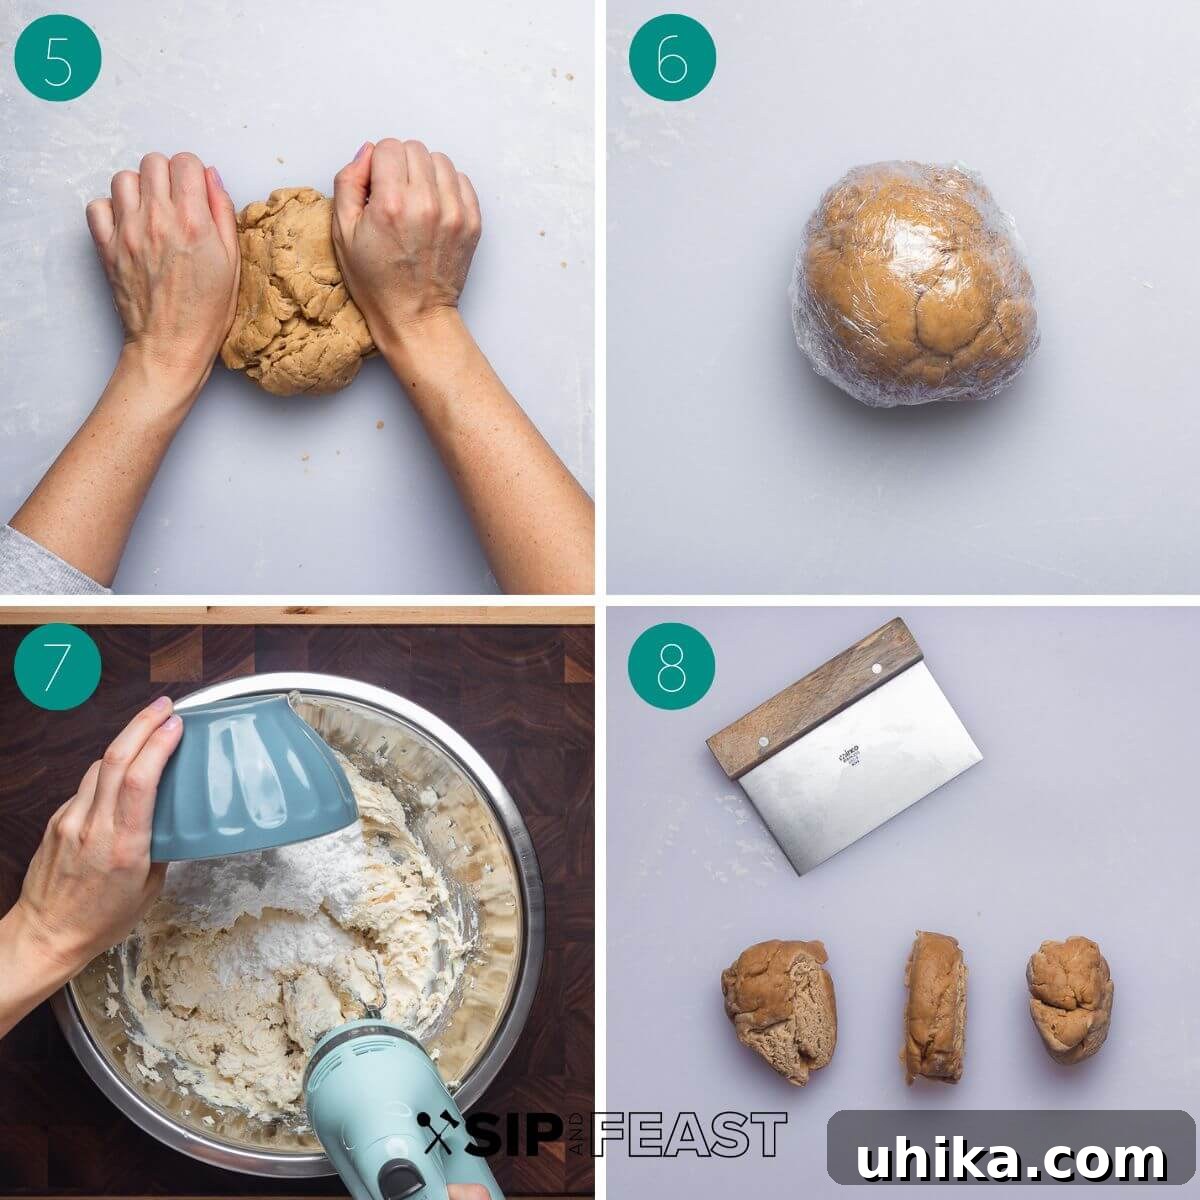
- Transfer the dough to a clean, lightly floured work surface. Knead the dough vigorously for approximately 8-10 minutes. Initially, the dough will be quite firm and resistant, but as you continue to knead, it will become progressively more pliable and smooth. This extensive kneading develops the gluten, which is essential for the dough’s elasticity and ability to form thin shells.
- Once kneaded, wrap the dough tightly in plastic wrap to prevent it from drying out. Place it in the refrigerator to rest for at least 30 minutes. For optimal results and easier handling, allowing the dough to rest for 60 minutes or longer is highly recommended. This resting period allows the gluten to relax, making the dough easier to roll.
2. Crafting the Velvety Ricotta Cream Filling
- While your dough is chilling in the refrigerator, prepare the luscious cannoli cream. In a separate bowl, combine 32 ounces (907g) of impastata (or well-drained ricotta), 1 cup (113g) of confectioner’s sugar, 1/2 teaspoon of ground cinnamon, and 1/2 teaspoon of vanilla extract. Mix these ingredients thoroughly until the cream is smooth and uniformly blended. Once combined, cover the mixture and set it aside in the refrigerator until you are ready to fill the fried cannoli shells. This allows the flavors to meld beautifully.
3. Shaping and Frying the Cannoli Shells
- Remove the rested dough from the refrigerator and allow it to come to room temperature for at least 20 minutes; this makes it easier to work with. Divide the dough into three equal-sized pieces.
- On a lightly floured surface, take one piece of dough and begin to roll it out with a rolling pin until it is thin enough to pass through a pasta machine. While a rolling pin is feasible, a pasta machine (either hand-cranked or a stand mixer attachment) is highly recommended for achieving consistent, evenly thin sheets of dough, which are crucial for crispy shells.
- Pass the strip of dough through the pasta machine, starting with the thickest setting. Once a sheet has formed, fold the dough into thirds (like laminating it) and pass it through the machine again. Repeat this folding and passing until the width of your dough sheet equals the width of your pasta machine. This process helps to further develop the dough’s texture and achieve a smoother finish.
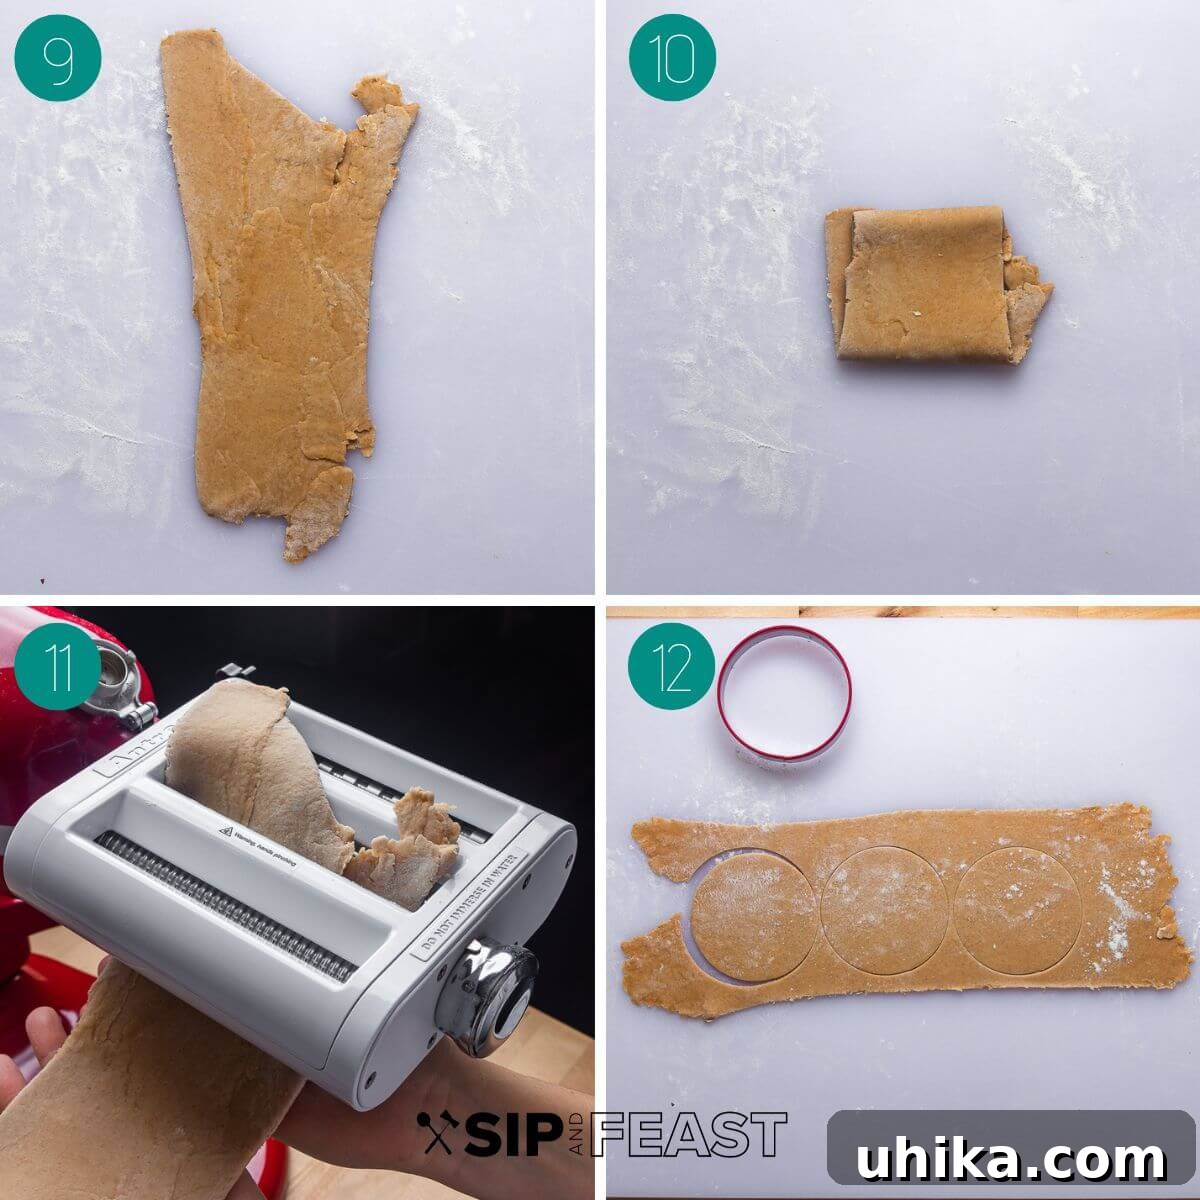
- Continue passing the dough through the pasta machine, progressively adjusting the thickness settings down, until you reach a final thickness of approximately 1/16 of an inch. If you are rolling by hand, continue rolling until you achieve a similar thinness. Don’t stress too much about perfection; unlike pasta making, a slightly uneven sheet won’t significantly impact the final cannoli texture, as long as it’s sufficiently thin.
- Using a 3 1/2-inch round cookie cutter, begin cutting circles from your thin dough sheet. If a cookie cutter isn’t available, you can use the rim of a glass or simply cut the dough into 3 to 4-inch squares with a knife.
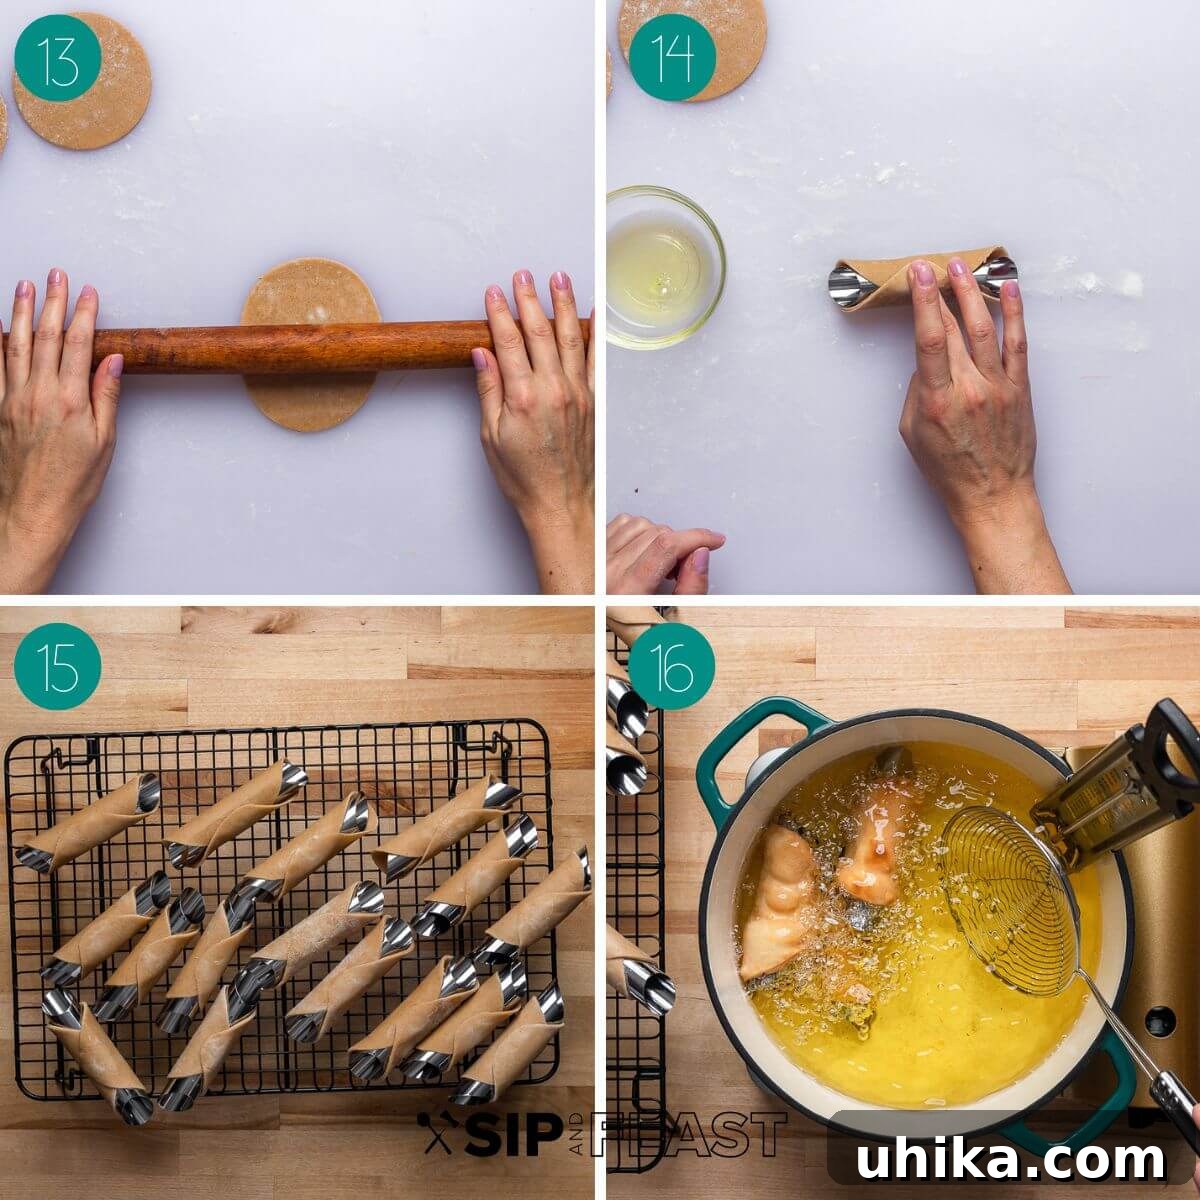
- If you cut circles, use a rolling pin to gently shape each circle into a slight oval. This subtle adjustment will make wrapping the dough around the cannoli forms much easier and ensure a good seal.
- Begin wrapping the oval (or square) dough pieces around your cannoli forms. Dip your finger into the reserved egg white and dab it onto the overlapping pieces of dough to create a secure, envelope-type seal. It’s vital to take special care not to get any egg white onto the metal cannoli form itself, as this can cause the fried shell to stick, making it difficult to remove later.
4. Frying to Golden Perfection
- Fill a large, heavy-bottomed pot with about 2 inches of vegetable oil. Using an oil thermometer, heat the oil to a precise temperature of 365-375°F (185-190°C). While the oil is heating, line a baking sheet with several layers of paper towels; this will be used for draining the fried shells. Continue wrapping dough around your cannoli forms until all available forms are ready to go into the oil.
- Once the oil reaches the correct temperature, gently lower the cannoli-wrapped forms into the hot oil. Fry them until they are beautifully blistered and achieve a rich golden-brown color, which typically takes about 2 minutes. Avoid overcrowding the pan; frying in small batches (3 cannoli at a time is usually a good starting point, depending on your pot size) ensures the oil temperature remains stable and the shells fry evenly. Use a pasta spider or a slotted spoon to carefully remove the finished shells from the oil.
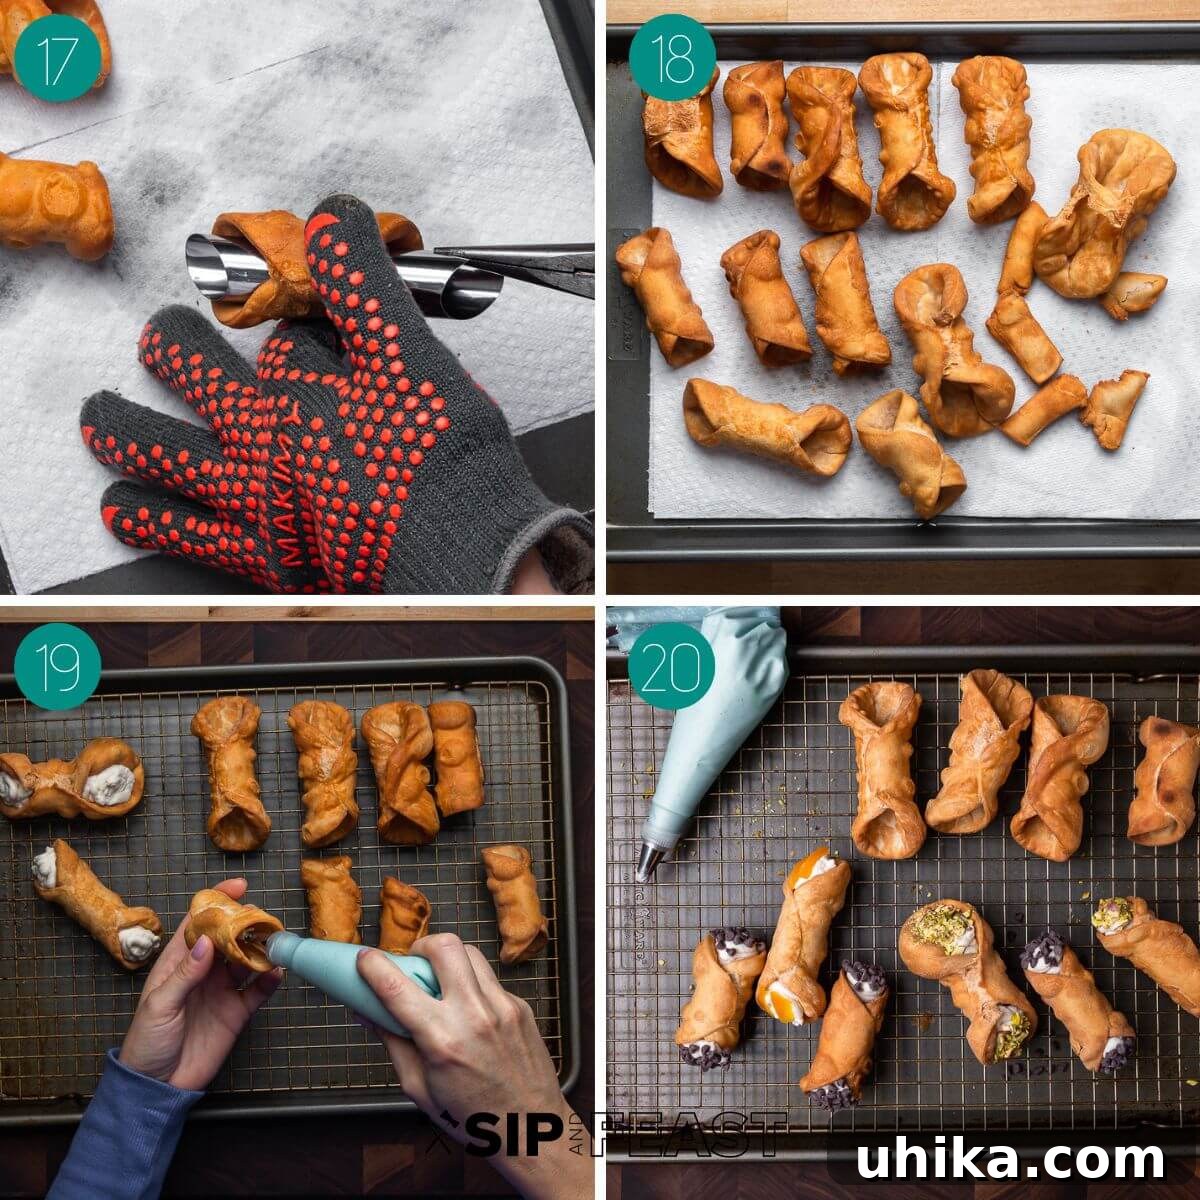
- Immediately after removing the shells from the hot oil, use kitchen tweezers or needle-nose pliers to hold the fried shell and carefully slide the cannoli form out. Exercise extreme caution, as the metal forms will be incredibly hot.
- Allow the newly freed shells to drain and cool completely on the paper towel-lined baking sheet. Don’t be discouraged if some shells open during frying; these “scraps” are perfect for making delicious cannoli chips, which can be enjoyed with any leftover cream.
5. Assembling and Serving Your Cannoli
- Once the shells have cooled completely and you are ready to serve (this is key!), retrieve your prepared cannoli cream from the refrigerator. Fill a pastry bag fitted with a piping tip with the cream. Begin piping the cream into one end of a cannoli shell, filling it about halfway. Then, flip the shell and pipe cream into the other side, ensuring a full, even filling. Note: For the crispiest shells, it is crucial to fill cannoli immediately before serving, or no more than an hour beforehand. Filling them too early can lead to soggy shells, compromising the delightful contrast between the creamy filling and the crisp pastry.
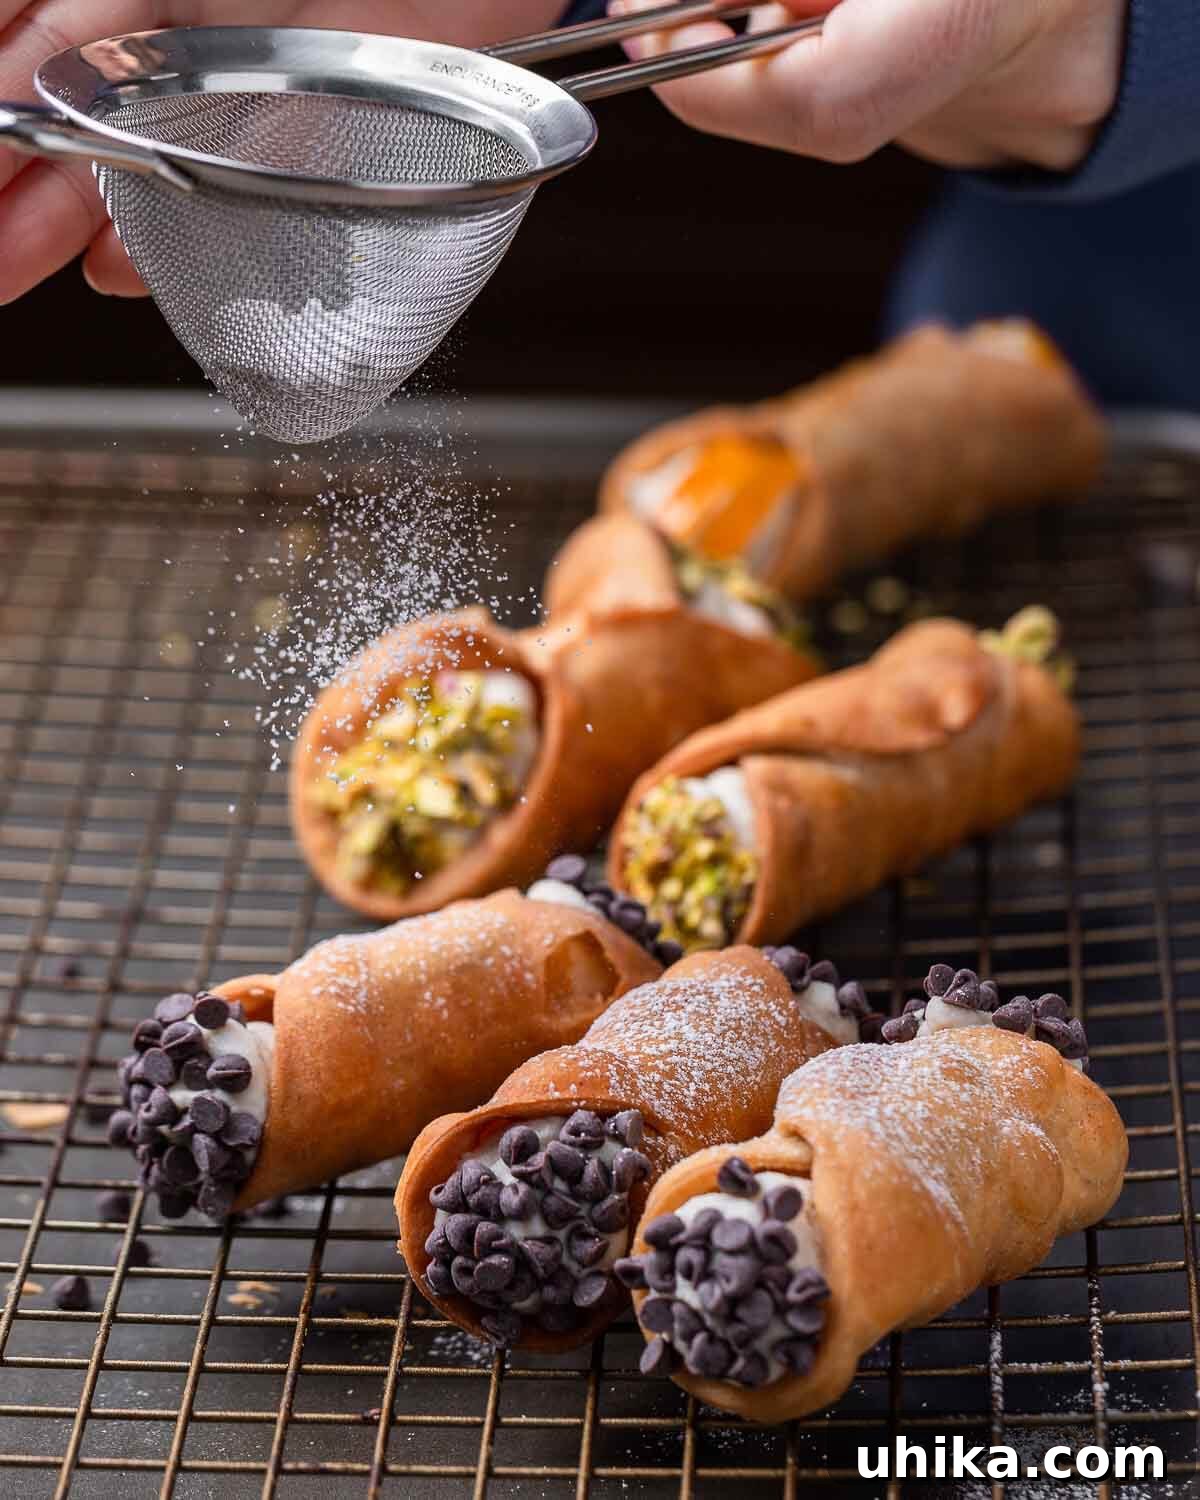
- After filling, gently dip the cream-filled ends of each cannoli into your desired toppings. We love mini chocolate chips, finely chopped pistachio nuts, and delicate candied orange peel, but feel free to get creative! Other fantastic options include green sprinkles (or jimmies), maraschino cherries, citron, or toasted chopped hazelnuts. Finally, dust your freshly filled cannoli with a generous sprinkle of confectioner’s sugar and serve them immediately to enjoy their exquisite freshness. Enjoy your culinary masterpiece!
Expert Tips for Achieving Cannoli Perfection
Making cannoli from scratch is a rewarding experience, but a few key insights can elevate your results from good to truly exceptional. Keep these expert tips in mind for consistently perfect cannoli.
- Embrace Patience: Like many artisanal Italian desserts, cannoli are not a hurried affair. They require time for dough preparation, chilling, and careful assembly. Don’t rush the process; each step contributes to the final perfection. Your first attempt might be a learning curve, but with each subsequent batch, your technique will improve, and the results will speak for themselves. The effort is undoubtedly worth it for the incomparable taste of homemade cannoli, reminiscent of enjoying one in Sicily with a strong espresso.
- The Secret to Creamy Filling: Impastata or Drained Ricotta: For the most authentic and non-runny cannoli cream, we highly recommend using impastata. This extremely dry, almost spackle-like ricotta is a staple in professional Italian bakeries, especially in the New York metro area, precisely because of its low moisture content. If impastata is unavailable, opt for a drier brand of ricotta, such as Galbani. Crucially, drain the ricotta overnight (or even longer) through a cheesecloth or a fine-mesh sieve set over a bowl in the refrigerator. The drier your ricotta, the firmer and more stable your cannoli cream will be, preventing a soggy shell.
- Dough Consistency is Key: Cannoli dough shares similarities with pasta dough in its firm texture and the amount of work required. For this reason, we strongly advocate using a pasta machine – whether a hand-cranked model or an electric stand mixer attachment. These tools make rolling the dough to the necessary uniform thinness significantly easier and more consistent than rolling by hand, ensuring evenly cooked and crisp shells.
- Handle Cannoli Forms with Care: Be extremely cautious when working with the metal cannoli forms, especially after they’ve been immersed in hot oil. They retain heat for a considerable time and can cause severe burns. Always use heat-resistant gloves in conjunction with needle-nose pliers or kitchen tweezers to remove the fried shells from the forms. This should be done within minutes of taking them out of the oil. If you have a limited number of forms, allow them to cool completely before reusing them for any remaining dough to ensure safety and prevent sticking.
- Mastering the Fry: Proper oil temperature is non-negotiable for crispy, blistered cannoli shells that aren’t greasy. Heat your vegetable oil over medium heat, aiming for a temperature between 365-375°F (185-190°C). A candy or oil thermometer is an essential tool here to continuously monitor and maintain the correct temperature range throughout the frying process.
- Fill Just Before Serving: To preserve the signature crispness of the shells, it is imperative to fill cannoli only when you are ready to eat them, or at most, within an hour of serving. Filling them too far in advance will cause the shells to absorb moisture from the ricotta cream, leading to an undesirable soggy texture. The magical contrast between the crunchy shell and the creamy filling is what makes cannoli so special! Additionally, any leftover cannoli cream can be used to make delightful pizzelle sandwiches.
- Creative Topping Ideas: While our recipe suggests classic mini chocolate chips, chopped pistachios, and candied orange peel, the choice of toppings is entirely yours! Explore other delicious options such as traditional green sprinkles or jimmies, vibrant maraschino cherries, tangy citron, or crunchy chopped hazelnuts to customize your cannoli and make them truly your own.

More Italian Desserts to Savor
If your love for Italian desserts extends beyond cannoli, we invite you to explore these other beloved favorites from our collection. Each recipe offers a unique taste of Italy’s rich culinary heritage.
- NY-Style Zeppole: Fluffy, fried dough fritters often dusted with powdered sugar.
- Pastiera Napoletana: A classic Neapolitan grain pie, traditionally enjoyed at Easter.
- Tiramisu: The world-famous coffee-flavored Italian dessert, layered with mascarpone and ladyfingers.
- Almond Biscotti: Crunchy Italian almond biscuits, perfect for dipping in coffee or wine.
- St. Joseph’s Pastries: Sweet, cream-filled pastries traditionally made for St. Joseph’s Day.
We hope you thoroughly enjoy this homemade cannoli recipe! If you’ve tried this or any other recipe on our site, please consider leaving a 5-star rating and sharing your experience in the comments below. Your feedback helps us grow and improve!
For those who prefer visual learning, many of our recipes are also available on our YouTube channel and Facebook Page.
Cannoli
James Delmage
1 hr
30 mins
1 hr
2 hrs 30 mins
16 cannoli

Pin
Cannoli are an Italian pastry made with crispy fried dough that’s filled with a creamy blend of ricotta and cinnamon, and topped with chocolate chips, chopped pistachio, or candied orange peel.
Ingredients
For the cannoli shells
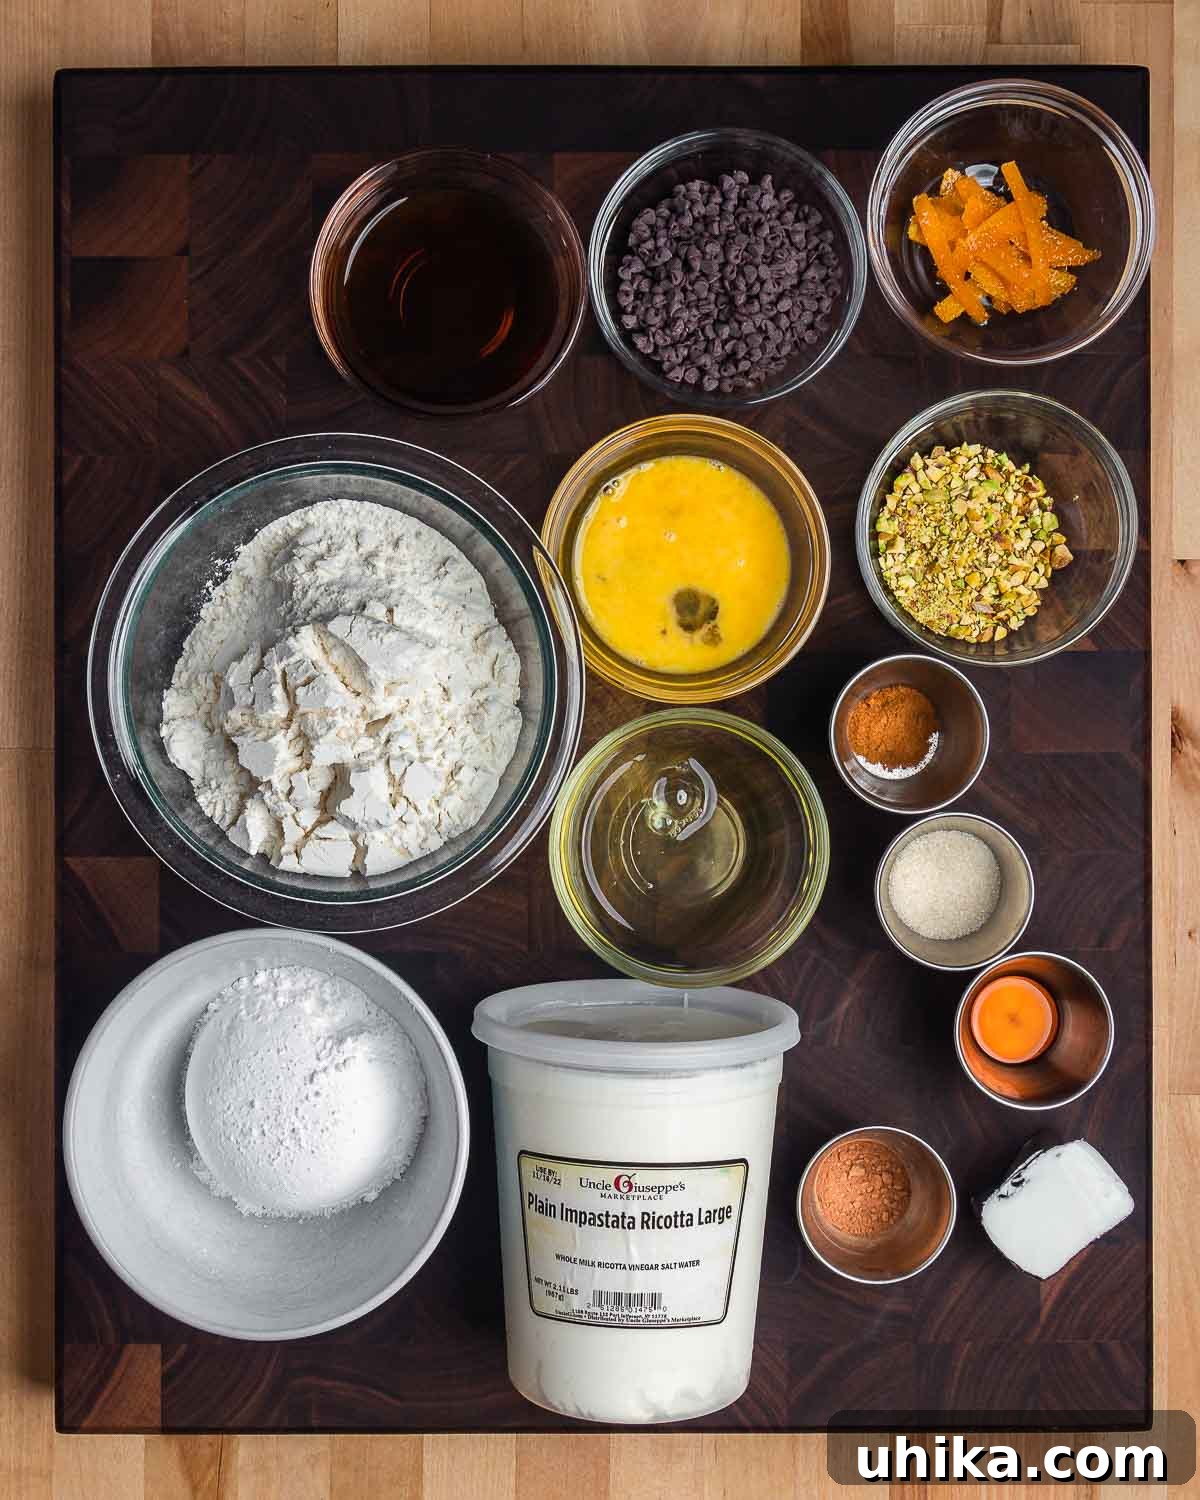
- 2 cups (240g) all purpose flour
- 1 tablespoon sugar
- 1/4 teaspoon cocoa powder
- 1/2 teaspoon ground cinnamon
- 1 pinch salt
- 3 tablespoons (39g) vegetable shortening
- 1/4 cup (56g) Marsala wine
- 1 large egg beaten
- 1 large egg white for sealing the edges
- vegetable oil for frying
For the cannoli filling
- 32 ounces (907g) impastata or dry ricotta that’s drained overnight
- 1 cup (113g) confectioner’s sugar plus more for dusting
- 1/2 teaspoon ground cinnamon or 1 -2 drops cinnamon oil
- 1/2 teaspoon vanilla extract
- 1/4 cup (45g) mini chocolate chips optional
- 1/4 cup (30g) chopped pistachios roughly chopped, optional
- candied orange peel optional
Instructions
For the cannoli shells
-
In a large bowl, or in the bowl of a stand mixer fitted with a dough hook, combine the flour, sugar, salt, cinnamon, and cocoa powder and mix together until combined.
-
Add the shortening and work into the flour until grainy.
-
Make a well in the middle of the flour mixture and add the egg and Marsala wine, mixing with a fork until a dough is formed. If using a stand mixer, continue to mix on low speed with the dough hook.
-
Move the dough to a clean, flat surface that’s dusted with flour and knead for approximately 8-10 minutes, or continue to mix on low speed if using the stand mixer. Then, wrap the dough in plastic and allow it to rest in the refrigerator for 60 minutes or longer.
-
Remove the dough from the fridge and let it come up to room temperature or at least 20 minutes. Cut into 3 equal pieces.
-
On a lightly floured surface roll out the dough until it’s thin enough to begin to pass through a pasta machine. Pass the dough through the machine, adjusting down the thickness settings until you reach a thickness of approximately 1/16″.
-
Once the dough is thin enough, use a 3 1/2″ circular cookie cutter to cut the dough into circles. Then, using a rolling pin, roll into an oval shape as this will allow the dough to easily wrap around the cannoli form. If you don’t have a cookie cutter, you can cut the dough into 3 1/2″ by 3 1/2″ squares.
-
Fill a large heavy pot with 2 inches of vegetable oil and heat to 365-375°F. Line a baking sheet with parchment paper and place a wire cooling rack on top.
-
Place the cannoli forms directly onto the ovals or squares and wrap the dough around the form, pressing the overlapping edge to hold them together and use a drop of egg white on your finger to seal. Take care to not get the egg white on the cannoli form as it will stick to the cannoli dough.
-
Fry the cannoli in the oil until golden and puffed up, about 1 minute. Remove from the oil as soon as they are crisp and blistered. Remove the cannoli from the form immediately using kitchen tweezers or needlenose pliers. Use caution when removing from the cannoli form as they will be quite hot, then allow to drain and cool on a paper towel-lined baking sheet or rack.
-
Allow the forms to cool completely, then repeat the process.
For the cannoli filling
-
In a large bowl, combine the impastata, sugar, cinnamon, and vanilla extract and whisk until combined.
For the assembly
-
Fill a pastry bag with the mixture and pipe it into the cannoli shells one side at a time.
-
Garnish with crushed pistachios, chocolate chips, or candied orange peel.
Notes
- Wrap the dough around as many cannoli forms as you have so they’re all ready to go when you begin to fry. Don’t overcrowd the pot; 3 is usually a good amount to start with.
- Don’t fill the cannoli shells until just before you’re ready to eat. This will ensure the shells stay crisp.
- If you can find impastata, we recommend using that. Otherwise, it’s best to use a drier ricotta, like Galbani, and drain it overnight or longer through a cheesecloth or fine mesh sieve.
Nutrition
Calories: 236 kcal |
Carbohydrates: 23.9 g |
Protein: 8.8 g |
Fat: 11.5 g |
Saturated Fat: 6.4 g |
Cholesterol: 43 mg |
Sodium: 60 mg |
Potassium: 106 mg |
Fiber: 0.7 g |
Sugar: 9.7 g |
Calcium: 129 mg |
Iron: 1 mg
Nutrition information is automatically calculated, so should only be used as an approximation.
Check us out on Instagram at @sipandfeast or tag #sipandfeast!