
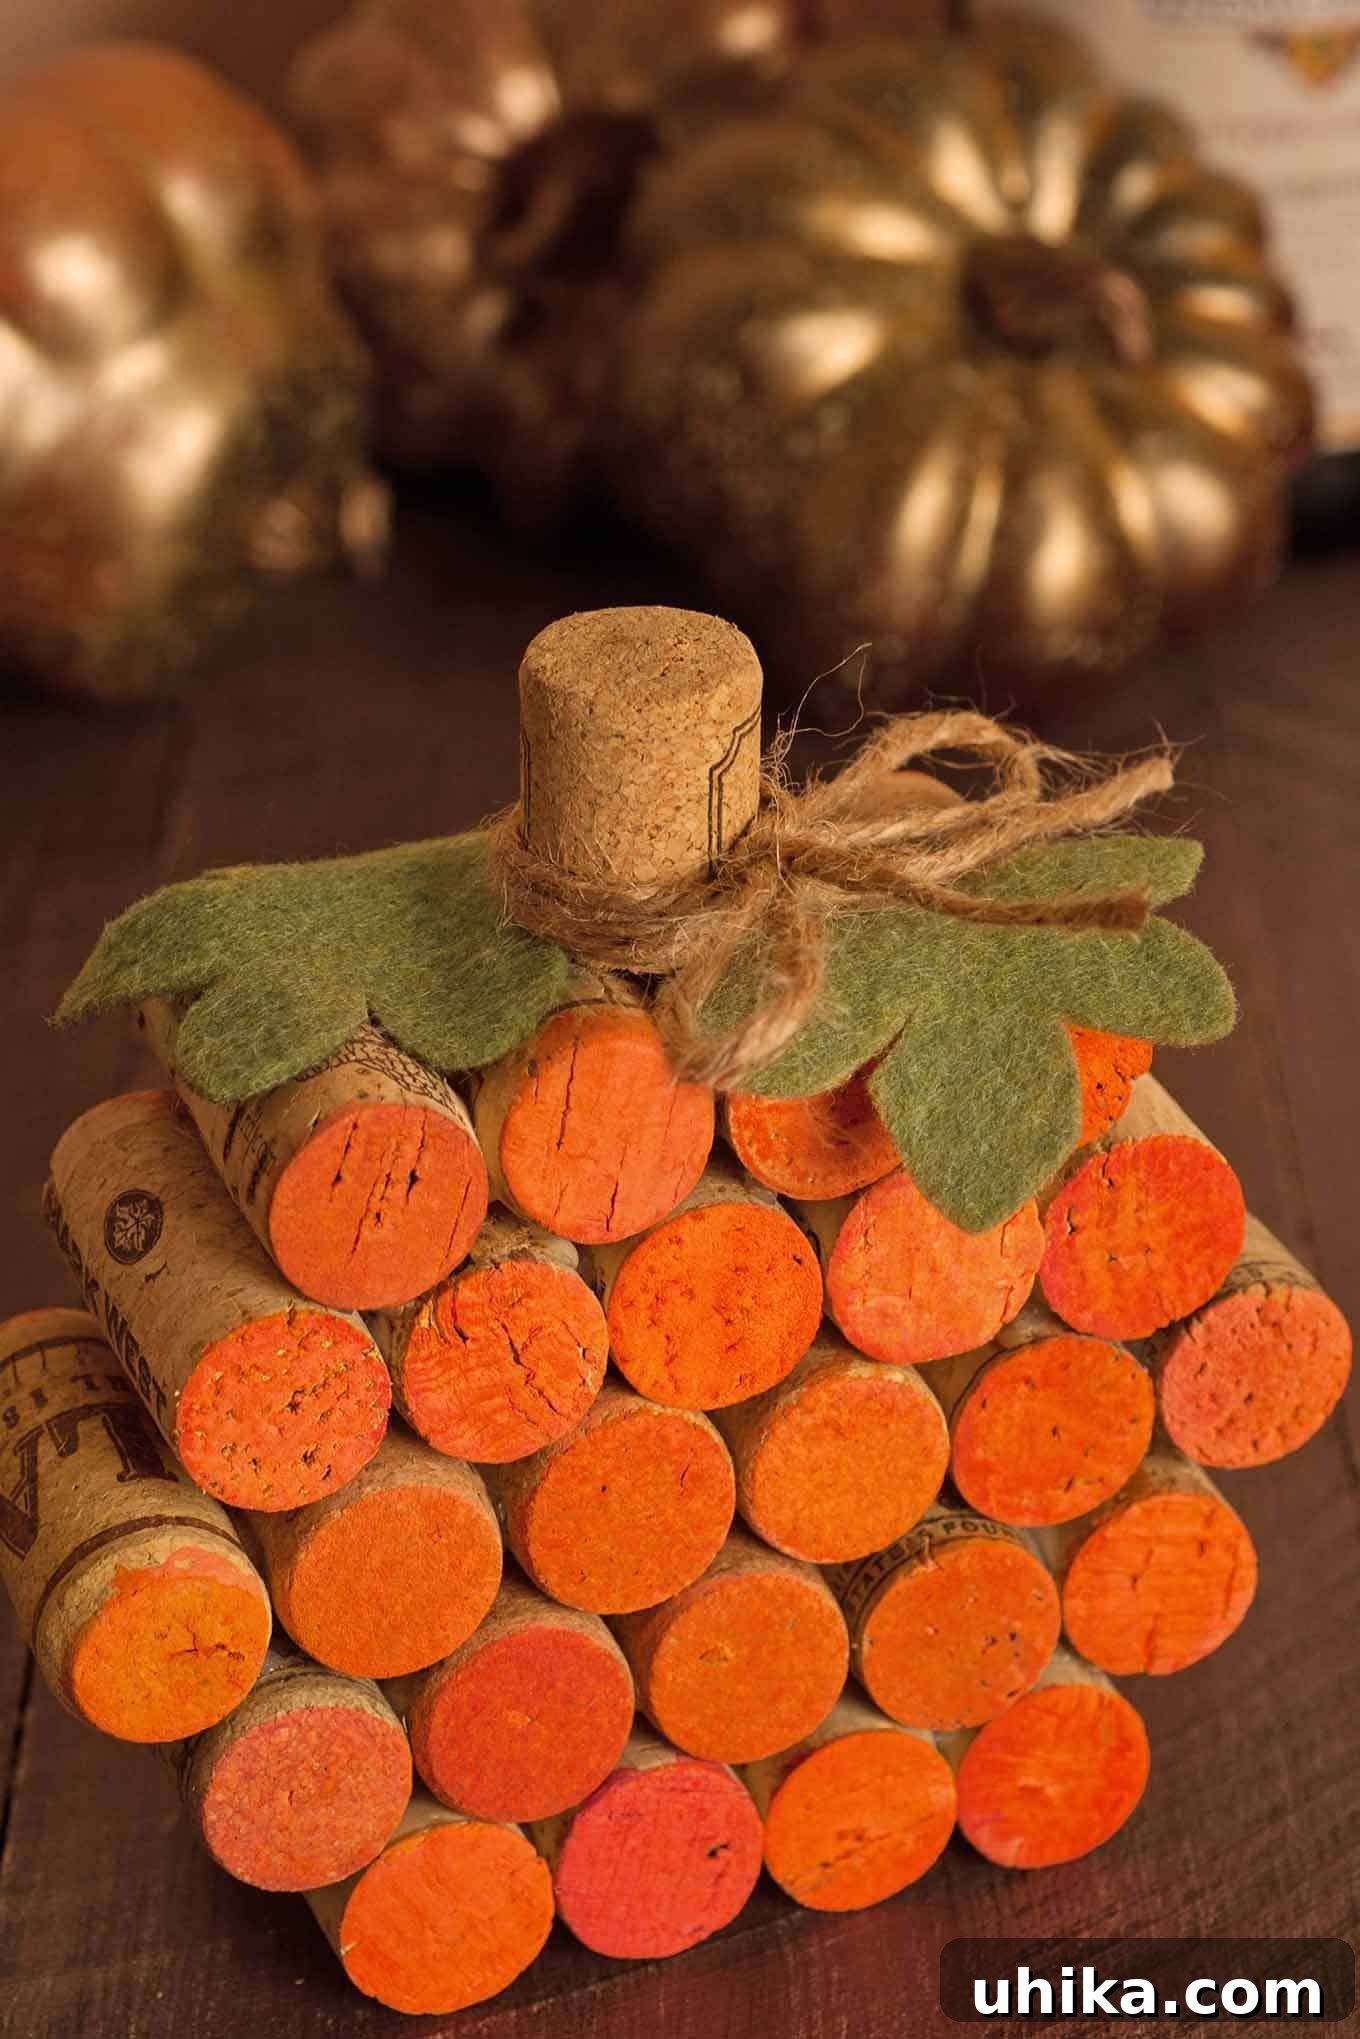
As autumn leaves begin to fall and a crispness fills the air, our homes naturally turn towards warm, inviting decor that celebrates the harvest season. If you’re looking for a unique, eco-friendly, and utterly charming way to infuse your space with fall spirit, look no further than the humble wine cork. We’ve all accumulated them over time, perhaps in a jar or a decorative bowl, wondering what delightful purpose they might eventually serve. Well, wonder no more! We’re about to transform those forgotten corks into a beautiful, lasting symbol of autumn: an adorable DIY wine cork pumpkin.
This engaging craft project isn’t just about making a decoration; it’s about sustainable living, creative expression, and adding a personal touch to your seasonal displays. Far from being a fleeting decoration, a wine cork pumpkin is sturdy, reusable, and brings a rustic charm that store-bought items often lack. Imagine the conversations it will spark on your dining table or nestled on your mantelpiece, a testament to your creativity and commitment to upcycling. Dive into this guide, and you’ll discover just how simple and rewarding it is to craft your very own fall masterpiece.
Crafting Your Own Eco-Friendly Wine Cork Pumpkin: A Step-by-Step Guide
Embrace the spirit of autumn and sustainable crafting by transforming everyday wine corks into an eye-catching pumpkin decoration. This engaging DIY project requires minimal supplies, about 30 minutes of your time, and a dash of creativity, resulting in a charming accent piece that you can proudly display year after year. Forget about flimsy, single-use decor; your handmade wine cork pumpkin offers a unique texture and rustic elegance that beautifully captures the essence of the fall season. It’s perfect for adding a touch of warmth to your Thanksgiving table, a cozy corner, or a festive mantelpiece. Let’s gather our materials and begin creating a lasting piece of seasonal joy.
Essential Tools for Your Wine Cork Pumpkin Project
Having the right tools makes any craft project smoother and more enjoyable. For your wine cork pumpkin, you’ll need a few basic items that are likely already in your craft drawer or easily found at any craft store. Safety first, especially when working with cutting tools and hot glue!
- Paintbrush: A medium-sized, soft-bristle paintbrush is ideal for applying an even coat of paint to your corks. Look for one that’s comfortable to hold and easy to clean. You might also want a smaller detail brush for touch-ups or if you decide to add intricate designs.
- Hot Glue Gun: An indispensable tool for quick and strong adhesion in many DIY projects. A low-temperature glue gun is often safer for beginners, but a standard one works well too. Ensure you have plenty of glue sticks on hand, and always use caution to avoid burns.
- Craft Knife: A sharp craft knife (like an X-Acto knife) will be useful for precisely cutting felt shapes. Always use a cutting mat underneath to protect your work surface and exercise extreme care when handling sharp blades. If you’re uncomfortable with a craft knife, sharp scissors can also work for felt.
- Scissors: A good pair of sharp scissors is essential for cutting felt leaves and jute twine. Crafting scissors work best as they provide clean, crisp cuts, especially important for the intricate leaf shapes.
Materials to Bring Your Cork Pumpkin to Life
The beauty of this project lies in its simplicity and the use of readily available materials, many of which are recycled or natural. You might already have most of these items lying around, waiting for a creative purpose!
- 25 Recycled Wine Corks: The star of our show! Collect natural corks if possible, as they absorb paint better and offer a more authentic, rustic texture. Synthetic corks can also be used, but might require more coats of paint. Make sure your corks are clean and dry before starting.
- Orange Acrylic Paint: Opt for a vibrant orange acrylic paint, which provides good coverage and dries quickly. Acrylic paint is water-soluble when wet, making cleanup easy. You can choose different shades of orange – from a bright pumpkin orange to a deeper, burnt orange – to match your desired aesthetic.
- Green Felt: A small sheet of green felt will be used to create the pumpkin’s leaves. Choose a shade of green that complements your chosen orange paint, perhaps a forest green or a more muted olive tone. Felt is easy to cut and has a lovely soft texture that mimics natural leaves.
- Jute Twine: A short length of jute twine adds a rustic, natural touch to your pumpkin, mimicking a curling vine. Its earthy texture and color perfectly complement the cork and felt. If you don’t have jute twine, a thin piece of brown or green yarn or raffia would also work.
Detailed Steps for Assembling Your Wine Cork Pumpkin
Now that you have all your tools and materials ready, let’s embark on the fun part: bringing your wine cork pumpkin to life! Follow these steps carefully to ensure a sturdy and beautiful finished product.
- Prepare and Paint Your Corks: Begin by selecting 24 of your wine corks. Keep one cork aside – this will be your pumpkin’s stem, and it won’t be painted. For the remaining 24 corks, prepare your orange acrylic paint. To achieve a slightly translucent or aged effect, or to make the paint spread more easily, you can dilute it with a tiny bit of water. Mix thoroughly. Using your paintbrush, carefully paint both ends of each of the 24 corks. You want a good, even coating. Painting just the ends creates a layered effect when assembled, allowing some of the natural cork texture to show through, adding to its rustic charm. Set the painted corks aside on a non-stick surface or wax paper to dry completely. Depending on the paint and humidity, this could take anywhere from 15 minutes to an hour.
- Construct the Pumpkin Body: This step involves carefully arranging and gluing your painted corks to form the classic pumpkin shape. The structure will be built in rows, forming a gentle curve:
- Bottom Row (4 corks): Lay four painted corks side by side, ensuring the painted ends are facing outwards. Apply a small bead of hot glue along the side of one cork and press it firmly against the adjacent cork. Continue until all four corks are securely glued together in a straight line. Hold each bond for a few seconds to ensure it sets.
- Second Row (5 corks): Carefully center five painted corks on top of the first row. The corks in this row should be slightly offset, resting in the valleys between the corks of the row below. Apply hot glue to the top of the corks in the first row where the second row will sit, and also apply glue to the sides of the corks in the second row where they touch each other. Press firmly to create a stable layer.
- Third Row (6 corks – The Widest Point): This will be the widest part of your pumpkin. Center six painted corks on top of the second row, again ensuring they sit snugly in the gaps. Apply hot glue generously but carefully, connecting this row to the one below and to its neighboring corks. This row forms the “equator” of your pumpkin.
- Fourth Row (5 corks): Mirroring the second row, place five painted corks on top of the third row, centering them. Glue them in place as before, ensuring a strong bond.
- Top Row (4 corks): Finally, complete the pumpkin body with four painted corks, centered on the fourth row. This creates the gently tapering top of the pumpkin. Take your time with each layer, ensuring stability before moving to the next. The goal is a compact, cohesive pumpkin form.
- Attach the Stem: Take the one unpainted cork you set aside earlier. This will serve as your pumpkin’s natural stem, providing a lovely contrast to the orange body. Position it vertically at the very center of the top row (the four corks). Apply a generous amount of hot glue to the bottom of the stem cork and press it firmly onto the junction of the four top-row corks. Hold it in place for a few moments until the glue cools and sets, ensuring a secure attachment.
- Craft and Attach the Leaves: Take your green felt and your craft knife or scissors. Freehand or use a simple template to cut out several leaf shapes. Pumpkin leaves are typically broad and somewhat jagged, so don’t aim for perfect symmetry; a bit of irregularity adds to the natural look. Cut two or three leaves of varying sizes for a more organic appearance. Once cut, arrange the felt leaves around the base of the cork stem on top of your pumpkin. When you are happy with their placement, apply a small dot of hot glue to the underside of each leaf and gently press it onto the pumpkin, ensuring it adheres well without glue seeping out.
- Add the Twine Vine: For that final rustic detail, take a short length of jute twine – about 6 to 8 inches should suffice. Gently wrap one end around the base of the cork stem, just above where the leaves are attached, and tie a small, secure knot. You can let the loose ends dangle naturally, or for a more whimsical touch, gently curl the twine around a pencil or your finger to create a spiral “vine.” A tiny dot of hot glue can help secure the knot if needed. This touch adds dimension and a lifelike quality to your handmade pumpkin.
Tips for a Perfect Wine Cork Pumpkin
To ensure your wine cork pumpkin project is a resounding success and yields a beautiful, long-lasting decoration, consider these helpful tips:
- Cork Consistency: Try to use corks of similar length and diameter for a more uniform and stable pumpkin. If some corks are significantly shorter or longer, you might need to adjust the structure or select them strategically for less visible areas.
- Paint Dilution: Experiment with how much water you add to your paint. Less water will give you opaque, vibrant coverage, while more water creates a translucent, wash-like effect, allowing the cork texture to show through more distinctly.
- Hot Glue Control: Use small amounts of hot glue. Too much can squeeze out and look messy. Work quickly as hot glue sets fast. If you do get excess glue, it can often be peeled off once completely dry.
- Drying Time: Allow ample drying time for the paint before assembling. Handling wet corks can smudge the paint and require touch-ups.
- Stem Alternatives: While a natural cork makes an excellent stem, consider other options like a small, clean twig from your garden, a cinnamon stick for added aroma, or even a tightly rolled piece of brown felt for a different look.
- Stability Check: As you build each layer, gently press down and check for stability. If a bond feels weak, add a tiny bit more glue and hold it firmly until set.
Customizing Your Wine Cork Pumpkin: Beyond the Basics
The beauty of DIY lies in customization! While the classic orange pumpkin with green leaves is charming, don’t hesitate to personalize your creation to match your unique style and existing fall decor:
- Color Palette: Why stick to orange? Paint your corks white or cream for a sophisticated “ghost pumpkin” look, or go with metallic gold or silver for a glamorous touch. Muted blues and greens can also create a chic, non-traditional fall pumpkin.
- Embellishments: Add small rhinestones, glitter, or tiny beads to your pumpkin for extra sparkle. You could also hot glue miniature artificial berries or tiny pinecones around the stem for a woodland theme.
- Leaf Variations: Instead of plain green felt, try patterned felt, craft foam, or even fabric leaves. Cut different leaf shapes (maple, oak) or use varying shades of green, yellow, and brown felt for a more autumnal foliage display.
- Distressing and Aging: After painting, lightly sand the edges of some corks or dab them with a darker brown paint to create an aged, weathered look. This adds depth and character.
- Multiple Sizes: Collect more corks and create a family of pumpkins in different sizes by varying the number of corks in each row. A small cluster makes a lovely centerpiece.
Display Ideas and Care for Your Upcycled Decor
Once your wine cork pumpkin is complete, it’s time to showcase your craftsmanship! This versatile decoration can enhance various areas of your home:
- Table Centerpiece: Group several cork pumpkins of different sizes in the center of your dining table, perhaps surrounded by faux autumn leaves, small gourds, or candles.
- Mantelpiece Accent: Place your pumpkin amongst other fall-themed items on your fireplace mantel, creating a warm and inviting focal point.
- Entryway Welcome: A cork pumpkin on an entryway table or console immediately signals a festive welcome to guests.
- Shelf Decor: Integrate it into a bookshelf display alongside your favorite autumn reads or other decorative items.
- Window Sill Charm: Brighten up a window sill, especially if it catches the autumn sunlight.
Caring for your cork pumpkin is straightforward. To clean, simply dust it gently with a soft brush or a dry cloth. Avoid using water or harsh chemicals, as these could damage the paint or the corks. When the fall season concludes, store your pumpkin in a dry, safe place, perhaps in a box with some tissue paper, and it will be ready to bring joy again next year.
The Enduring Appeal of Upcycling: Why Craft with Wine Corks?
Beyond the immediate joy of creating a beautiful decoration, crafting with wine corks offers a deeper satisfaction rooted in sustainability and resourcefulness. Every cork you repurpose is one less item in a landfill, contributing to a greener planet. Wine corks, particularly natural ones, have a unique texture and warmth that cannot be replicated by synthetic materials. They tell a story of past gatherings and celebrations, adding character and history to your craft. Furthermore, cork is a durable, natural material, ensuring your handmade pumpkin will last for many autumns to come. This project is not just about making a pumpkin; it’s about embracing creativity, reducing waste, and adding a heartfelt, personal touch to your home decor. It’s a small step towards a more sustainable lifestyle, proving that beauty and utility can emerge from everyday discarded items.